
| JEEP Willys MB 1/35th Scale by Terry Ashley 
|
|
 |
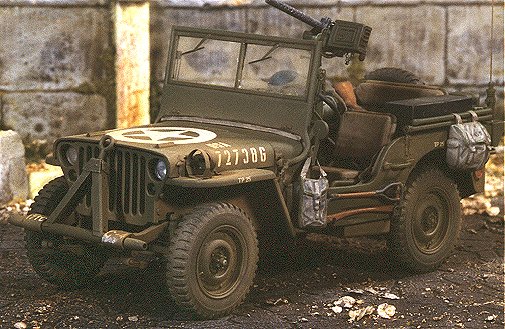
Detailing Tamiya's Jeep (Kit No. 35219)
using the new EDUARD etched metal update set. (#35176)
| JEEP Willys MB 1/35th Scale by Terry Ashley
|
|
|
The
Tamiya Jeep: Kit No. 35219
The kit comprises 94 parts in olive drab plastic and 4 clear
parts (windshields and headlights). The decal sheet has markings for 5 vehicles
all from the ETO. The driver figure included has a nice relaxed pose, certainly
an improvement on the static figures of the past. Detail on the kit is excellent
including an engine, it is the basic engine block and larger accessories and
has room for additional detailing. Included are optional parts for the front
bumper with the "A" frame tow bar or the standard bumper and a nice .30cal M/G
with mount for the rear compartment. Two notable omissions are the brake and
clutch pedals and the "T" securing handles for the bonnet and windscreen. Without
doubt it is the best Jeep kit available in 1/35th today.
The
Eduard Update Set: No. 35176
This new set has approx. 205 etched pieces and a small clear
film for the instrument panel dials. The quality of the etching is first class,
with three levels of relief on some parts. The latest sets from Eduard are
a
step up from earlier sets in terms of quality. They also now have a coating
of nickel alloy (or similar) as an anti-corrosive measure, which give them
a
steel appearance as opposed to the older brass colour.
Most parts have engraved bend lines for precise bending, while some of the parts
are extremely small and need care when removing from the frame and during handling.
The instruction sheet is well laid out and easy to follow, making assembling
the parts a breeze. See notes below on working with etched metal.
Also provided
by Eduard are two nice non-skid foot plates for the cab floor. The side
safety belts are also provided and these were bent slightly to represent natural
sag and attached to the side panels just behind the seats. The small fire extinguisher
has an etched cradle, which was fitted to the extinguisher after it was painted.
The seats in Steps 5 and 6 were assembled as per the kit instructions,
but left separate until after final painting. Eduard gives you a complete
instrument panel to replace the kit part with the usual printed film for the
instrument faces. I didn't use this as I had stated assembling the kit before
the Eduard set was released. The kit panel was detailed by adding the
two attachment eyes for the safety straps from thin wire and the hand brake
lever from the Eduard set. The instrument panel was attached to part
35, this then glued to the bottom body shell. No filler was required as it fitted
perfectly. The chassis was securely glued to the body shell in Step 7
and the wheels assembled in Step 8. These two steps are straight forward.
I did add tire valves to the rims with thin wire inserted into pre-drilled holes.
I didn't attach the wheels as called for in Step 9, but left these separate
until all painting was completed, including the spare.
In Step 10, the body hand holds and towing pintle were added as per instructions.
The supports for the canvas top were carefully removed from the frame using
an X-Acto #11 blade. These were replaced with the Eduard parts. Take
care when bending the main side supports, it's important to get the angles right
as the thin metal doesn't give you many chances to re-bend without breaking
apart. The rear kit jerry can and holder were discarded and replaced with the
etched metal holder and a Jerry can from the new Tamiya Allied Vehicles Accessory
Set (#35229), the strap was also from the Eduard set. It is easiest to
bend the can holder using a spare jerry can as a former. Finally the etched
aerial mount bracket was added to the rear corner of the body, with the aerial
base being a Verlinden resin item.
The windscreen
assembly in Step 11 has a number of improvements. Firstly I carefully
cut away the moulded on wipers and replaced these with the Eduard parts.
The screen opening guides (parts B44 & 45) are also replaced with the etched
parts as were the mounting brackets for the M1 Garand holder on the windscreen
frame. I cut away the moulded on holder from the kit M1 and replaced this using
the etched metal piece provided, again carefully bent to shape. The kit M1
had
a sling added from thin paper strip and then placed in the new etched holder.
The small Eduard wing nuts were added to the windscreen pivot points
in pre-drilled holes. Care should be taken here, as these parts are rather small.
Finally the kit supplied clear windscreen (parts C2) were replaced with thinner
clear sheet, these being left off until after the painting was completed. The
whole windscreen assembly was also painted separately from the Jeep body. There
is a small sealing strip between the windscreen panel and the body, this was
added to the bottom of the screen from a strip of thin paper.
In Step 12, I first replaced the kit headlight guard with the etched
Eduard part and added the wiring from thin wire, again into pre-drilled
holes. The hood and windscreen "T" attachments were added from the Eduard
set. To give a better three dimensional appearance I ran a bead of white
glue along the parts, when dry, it gives a raised profile. The moulded on bracket
on the shovel was cut off and also replaced with the etched part. The shovel
handle and axe tie downs were added from thin wire, the securing straps are
provided as etched parts. The tools and hood were again left off and painted
separately.
Finally the kit .30 cal machine gun mount was replaced with the etched parts
in Step 13. The mounting post was also detailed using etched parts and
thin rod. Etched supports were also added to the mounting post.
Assembly of the kit itself was very straight forward, the fit of parts was typical
Tamiya with no traps or surprises encountered. With the Eduard update
set, you only need use the parts you want to add, even using only a few parts
will enhance the kit, while with more added the detail will obviously be enhanced.
Painting
and finishing:
The model (and parts kept separate during construction) were
airbrushed with Humbrol Super Enamel Olive Drab (No.155). When dry, the
decals were applied. All decals are the rub on type so it is not necessary to
gloss the model first. The only water slide decal was the data blocks on the
dashboard glove box. This was applied with white glue after soaking off the
decal in the usual way. This method is useful for small decals on vehicle models
as it eliminates any silvering without having to gloss it first.
The large hood star is a Verlinden item, while the rest of the markings
are from the new DecalStar Jeep dry decal sheet. DecalStar is
a decal manufacturer from Japan producing small decal sheets for 1/35th vehicles.
The markings are good quality and come off the backing sheet with very little
pressure, therefore care is needed not to loose them before they get to where
you want them. By leaving the hood separate, it was easy to apply the "USA" and
vehicle numbers. I fact the numbers came off the backing sheet with finger
pressure alone, which was very handy to go around the curve of the hood.
After the decals were applied, I gave the model a final coat of clear Matt to
seal the decals. Being rub-on, I could do this as soon as the decals were on,
without the need to allow the decals to dry (as with waterslide decals). After
the Matt had dried (at least 24hours), I attached all the separate assemblies
(seats, windscreen, jerry can, spare wheel, hood and tools) before final weathering
was done, except for the wheels, which were left till later so I could add the
dust etc. to the wheel wells. I also masked off the wiper pattern on the windshield
with masking tape cut to shape. Pat the tape a few times on your finger to reduce
it's stickiness, this makes it easier to remove later.
I then gave the model a wash of thinned Raw Umber Oil paint to highlight the
detail. The dust effect was airbrushed on using a suitable earth colour (this
colour depends on the terrain it will be displayed in). The word here when airbrushing
dust and dirt is 'subtlety'. Don't over do it, or you'll only end up with a
brown Jeep. Once this was dry I gave a final light drybrushing with a lighter
colour to highlight some of the raised detail, again subtlety is the key.
The kit bags hanging from the sides are from the new 'Tamiya Allied Vehicles
Accessory Set'. and other gear in the back is from bits and pieces from the
spares box. Again don't forget the straps holding the gear to the vehicle. The
gear was added after the washes but before the final drybrushing and dusting.
(they get dirty too!)
The kit was a joy to build, as are all of Tamiya's recent armour releases.
I also intend to build another Jeep with full engine detail at a later date.
References: