
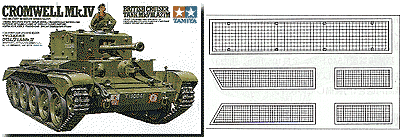
 Kit # 35221 1/35 British Cromwell Tank Mk.IV #35222 Cromwell Photo Etched Grille Set Review by Terry Ashley |
 |
Kit # 35221 1/35 British Cromwell Tank Mk.IV #35222 Cromwell Photo Etched Grille Set Review by Terry Ashley |
|
 |
| Click for larger view |
Construction:
Step 1 is the rear hull plate
which fits together without problem to form the rear exhaust overhang. The design
of this section allows good bolt head detail to be on all inner and outer panels.
Step 2 is the wheels and drive sprockets which trap a poly cap between the inner and outer halves. Just a word on the road wheels. The detail on these is brilliant, with a fine weld seam between the wheel disk and outer rim, there is even the three lubricant holes with raised lip around the center. The end cap is a separate piece to give good definition. The inside wheels also have this brilliant bolt and weld seam detail even though it can’t be seen when the wheels are on the model. The lightening holes on the drive sprockets are also there and very well done.
Step 3 is attaching the front and rear hull plates and the suspension arms. These arms have a locating hole and small pin to make for precise fitting at the right height and angle. If you wished to model the tank going over rough ground it’s a simple matter of cutting off the pin and positioning the arm at what ever angle you wish.
 |
| Click for larger view |
I left off the road wheels in Step 5 to allow better access to the wheels and hull during painting was weathering. Obviously this means leaving the track till last as well. The track is single length in the new style by Tamiya. They have excellent detail and can be glued using normal plastic cement.
Attach the top and bottom hull sections together in Step 6 after opening up the holes for parts A16 if you’re building a Centaur as mentioned in Step 4 above.
Step 7 is the front hull plate, which again has excellent surface detail. The besa machine gun includes the inner breech section and fits into the front plate with a ball mount allowing full movement. The driver's front hatch is in two pieces, the main round door which can be shown open or closed and also the center wicket door which again can be open or closed. A very nice touch.
 |
| Click for larger view |
Steps 9-11 is attaching all the small fittings to the hull top. It is here I used the extra set of etched metal screens (Kit No. 35222) they are in stainless steel and have good detail. Attach these to the side engine intakes (along the side of the hull) and to the rear exhaust outlet. All other fittings are straight forward, although I did leave off the front and side fenders as many Cromwells had these missing. I also left off the tools until after painting was finished (remember to attach these before weathering). Also note the you only use part D17 if building a Cromwell, this is the external track tensioning tool and was not carried on Centaurs with internal tensioning.
Steps 12-17 is the turret construction. You get a full breech for the 75mm gun which is trapped inside the front plate to allow movement. The rest of the turret assembly is very straight forward with no fit problems at all. In fact the only filler I used on the whole kit was a very small amount on the gun barrel seam. The turret sides are separate pieces attached to the inner turret. This allows for excellent definition of the large bolt heads and pistol ports. All hatches are separate pieces with separate padding on the insides. Another nice touch is separate covers for the commander’s periscopes, so you may have them opened or closed. I added wiring to the side search light and some small bolt heads to the hatch hinges. ( I may have overdone the use of the word ‘separate’, but this is an indication of the detail which is everywhere).
Finally in Step 18 is the fitting of the separate driver’s top hatches again with internal padding and the towing cables.
The two big options in the kit are shown in Step 19, these being the Hedgerow cutting device and the Normandy cowl. If you choose to fit these remember to do so in Steps 3 and 9, you are reminded of this in the instructions. I left both these options off on this model to show the etched screen on the rear, but rest assured I will be building more Cromwells / Centaurs making full use of these options.
 |
| Click for larger view |
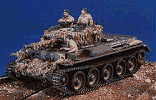
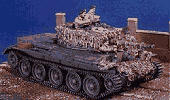
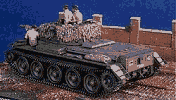
Figures and Base:
The crew figures are from all over the place, two are from Tamiya,
the Commander and the guy sitting in the side opening hatch who is much modified
to fit. The driver is half of Ultracast's Commonwealth Tanker (#35011)
and the second turret figure is part Verlinden and Cromwell figures.
All were painted with oils for the flesh tones and Humbrol enamels for
the uniforms.
The base is a vacuform street section from Polish company T.M.Productions.
It is very simple and quick to just add some paint , a bit of rubble and any
other objects for a simple presentation base.
Conclusion:
This latest release from Tamiya of the Cromwell is not only
a very welcome release but also lifts the state of the art of kit production
to new levels. Not only for the quality of the mouldings, the level of detail,
the ease of construction, but also the obvious degree of research that has
gone
into producing a top shelf model of a very complex subject. I would recommend
this kit to anyone, it is very simple to build and you can leave the filler
tube well alone, the fit of parts is brilliant. From the alternate parts
(track
tensioning etc) and the layout of parts on the sprues ( the gun is separate)
it is a sure bet that Tamiya will release a 95mm Centaur in the future, with
possible other versions.
Also check out
the:
Royal Marines Centaur 95mm conversions using
Accurate Armour's update sets.
References: