

Panzerkampfwagen III Ausf.L (Sd.Kfz.141/1)
1:48 Scale - Kit No.32524
Review by Terry Ashley
The kit represents an early or late production Ausf.L with features such as no visors on the turret sides or gun mantlet and the spaced armour on the front of the turret and hull plus the revised orientation of the engine deck intake covers.
But you have to be careful as there are separate hull side escape hatches and bullet splash guard in front of the turret with the instructions showing to fit these but they are only applicable to the early type so you should decide which version you want beforehand as these parts are not used on the late Ausf.L.
The standard of moulding is again excellent with clean parts and few pin marks present with the only ones visible after assembly are on the inside of the cupola hatches and small ones on each track link.
The kit consists of 213 parts in light beige plastic and the now standard die-cast metal lower hull as well as the decal and instruction sheets and a selection of screws and poly caps.
Lower Hull:
The
lower hull has the axles, return roller mounts, idler mountings and suspension
bump stops all included in the casting with additional plastic parts of the
final drive housings which trap a poly cap inside and the two shock absorbers
for the first and sixth axles, the axles also have the correct offset for the
torsion bar suspension and the first return roller is in the correct forward
position. Sprue A (x2) is from the previous StuG III B (kit #32507) meaning
there are quite a few parts not used with this kit which can be consigned to
the spares box.
The detail on the two part drive sprockets and new spoked idler wheels is very good as are the road wheels with the holes in the wheels and nice hub details as do the return rollers and look very good for the scale. The road wheels, return rollers and idler wheel are all glued to their respective axles/mountings while the drive sprocket is attached by pressing its axle into the poly cap trapped inside the final drive housing which does allow you to remove the sprocket at any time and of course to rotate the sprocket to line up with the drive holes in the tracks as they are fitted.
The tracks are again link and length in the same plastic as the rest of the kit and the top track run is moulded with the track sag between the return rollers for a nice appearance once fitted with the shorter sections and single links for fitting around the drive sprocket and idler wheel and as there is no side skirts you could fit the track at any time or early on as per the instructions. The track guide teeth should have the lightening hole included but are moulded solid and unless you want to spend hours drilling out each link it’s probably something you’ll have to live with.
As mentioned above the instructions indicate to add the hull side escape hatches with the aid of a neat little template/jig to fit the hatch in the right position but this is only used on early Ausf.Ls with later types not having the escape hatch so take care for the version you are building.
The plastic rear hull plate has the Ausf.L type exhausts with the upper deflector included and towing shackles with the plastic parts fitting precisely to the back of the metal hull.
Upper Hull:
The upper hull is moulded in one large piece including the fenders
with separate superstructure front and side panels for the inclusion of good
detail, separate engine deck intake covers with one front inspection hatch
and one engine deck hatch separate to allow the upper hull to be screwed to
the metal lower hull and obviously you don’t glue these hatches on until
the upper and lower hull are joined.
There should be six small lifting hooks on the upper hull but these are missing apart from the one centrally at the front which is just a raised tab without detail and you will have to add these hooks.
The fenders have dot pattern tread plate and strangely two of the tools are moulded with the fenders with all other tools are separate parts while the bullet splash guard in front of the turret is also a separate part but this should only be fitted for the early Ausf.L and left off for the later type. There are two large locating holes in the upper hull for the splash guard that will have to be filled on the late type and again the instructions show this to be attached but don’t indicate for the early version only.
The side mounted engine intakes are moulded open without any attempt at the covering screens which is probably good as there will no doubt be etched screens released and Tamiya has pre-empted this by leaving them open to make your life easier. But you will have to add the screens if you don’t plan on getting any etched detail sets for the kit.
The separate side superstructure panels have nice vision port details with the left side having a vision slot and the right without as it should be and these panels fit snugly to the superstructure sides.
The 20mm spaced armour at the front of the superstructure is nicely detailed with one piece for the upper support brackets but the thin metal bracket cover is missing and again this will probably be included in the inevitable etched set.
Other details include all the tools (except the two on the fenders as above), fire extinguished and four part jack are separate parts with moulded on tool clips as are the front headlights with separate blackout fronts, the NOTEK light and small fender mounted position lights and rear tail light. The two brake cooling intakes on the front plate are also separate parts of the correct later type and the right aerial trough is a single part that is a little basic with the tow cable coil on the rear engine deck also separate with moulded on clips.
Turret:
The turret shell is in one piece with a separate lower turret ring
and the turret features correctly no side vision ports and the correct location
of the signal port and ventilator with separate cover for the Ausf.L as well
as nice flush screws but these are slightly indented if you want to get really
picky but probably won’t be noticeable after painting.
The side hatches are moulded as one piece each side including the upper rain channel and this isn’t a problem as there is no interior to show off anyways.
The Commander’s cupola is in two parts, an upper and lower section that depicts open vision ports when assembled with separate split hatches which have small pin marks on the inside that are easy to deal with if you want to leave open when adding a tank commander figure.
At the back is a two part storage box as well as separate pistol port covers for good definition and separate grab handles above the side turret hatches and the two small brackets below the hatches. The two lifting hooks on the upper front turret sides are moulded in place and the two rear turret hooks are not there but covered by the storage box and are not visible.
The turret front panel has an inner movable gun mount held in place with poly caps and the outer mantlet with separate recoil housing front and gun collar with the four small bolt heads included. There is also the coaxial MG which will need drilling out for a better look with the 50mm L60 gun moulded in one piece with a separate tip and there is a small mould seam line to be sanded on the gun but that is all the cleanup needed.
The main feature of the Ausf.L is the 20mm spaced armour on the front of the turret and the outer mantlet has the correct features of the Ausf.L without the right side vision port and the correct lower contours. The side mounting brackets are included with the mantlet and you will have to drill a small hole in this on either side as this is missing while the upper mantlet panel (part S5) has the correct shaped cut-outs which is good as all three are different sizes and the centre one a different shape and these are captured well on the part.
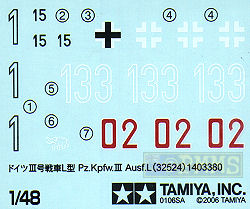
Decals:
The small decal sheet is typical Tamiya with the usual well printed markings
and thickish carrier film with markings for three vehicles.
Decal sheet
The Sprues
Click on thumbnail for larger view

Detail images

Close new window to return to review
Conclusion:
Overall a very nicely rendered Panzer III Ausf.L but you will have to watch
the mix of early and late features not identified in the instructions and it’s
interesting how Tamiya have left some parts bare in anticipation of the inevitable
etched sets to add some finer details.
Highly recommended
References:
 |
Achtung Panzer No.2 Excellent detail coverage of the Panzer III with the usual detail photos and drawings of all versions of the Panzer III. |
 |
Panzerkampfwagen III A good overall pictorial coverage of the Panzer III. |
 |
Panzerkampfwagen III A typical NV with good coverage of the Panzer III and the cebtre colur plates. |
 |
PzKpfw III in action #2024 The usual in action fare with photos and drawings of the Pz.III versions. |
Page created February 12, 2006