

Assembly is straight forward with two barrel parts fitting together to a fine tolerance and the rear collar fitting equally well and just a small dab of cyanoacrylate is all that is needed to hold the parts together.
The rear muzzle brake brass collar and etched collar ring may need enlarging slightly with a fine needle point file to fit the barrel and it is best to file the etched parts while still attached to the fret for easy handling with test fitting often to get a good fit.
The inner muzzle brake grommet may also need some minor filing to fit inside the one piece muzzle brake but this varies between sets with the part in this set required a bit of reduction while that in set 35 L-26 (Early barrel) not requiring any filing.
The two etched detail ring parts fit easily in place on the grommet with a small dab of cyanoacrylate and it’s your choice if you add these before or after fitting the grommet in place.
The muzzle end cap fits precisely to the muzzle brake but you have to add two small notches yourself with a fine razor saw and extreme care is needed here not to destroy a good barrel by not getting the cuts even on both sides.
On the top of the muzzle brake is the small securing fittings with three very small etched parts and care is needed when fitting these while the fit of the barrel to the target kits requires no alteration and simply replaces the kit barrels and there is an engraved line on the barrel to indicate how far the barrel should be pushed into the kit gun collar.
Nothing could be easier with the only thing to watch is the orientation of the muzzle brake to ensure it lines up correctly in relation to the mantlet.
A simple update set to add a considerable more detailed barrel to any of the Tamiya Tiger I kit.
Highly recommended

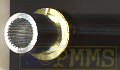
Image showing barrel rifling and assembled muzzle brake
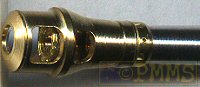
Assembled barrel

See the Tiger Tank Subject page for additional reviews for the Tiger series.
Thanks to Michael from Airconnection for
the sample barrel.
![]() carry
the full range of ABER update sets and barrels.
carry
the full range of ABER update sets and barrels.