

 This replacement metal barrel from ABER is designed for the recent Dragon Pz.Kpfw.IV Ausf.F2(G) (Kit #6360) and provides the initial 7.5cm KwK40 L/43 barrel with double baffle muzzle brake that was fitted to some late F2/initial Ausf.G Panzer IVs.
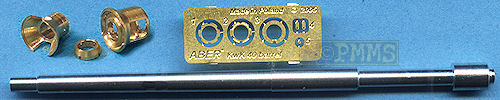
The set consists of the aluminium barrel with the muzzle drilled out to a depth of 6mm and includes fine rifling inside the muzzle. Plus there is three brass parts for the muzzle brake and collar along with 6 etched parts for the finer details.
The parts are very cleanly machined resulting in no cleanup at all required before assembly and the etched parts are also cleanly etched but are very small requiring care during assembly.
The metal barrel has the correct taper with the length matching the data in the references shown below to within accepted tolerances as does the size of the muzzle brake.
The muzzle brake is broken into three brass parts, the barrel collar, rear flared half of the muzzle brake and the forward section with bore hole, side gas holes and inner bracket all cleanly machined ready for assembly without any cleanup.
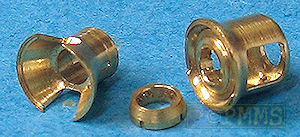
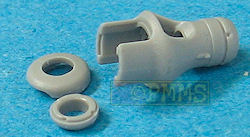
There are two small etched rings (etched parts 1,2) that have to be first glued together and you should ensure the outer indents line up with each other as below, this sandwiched ring is then fitted inside the outer muzzle brake section. This is a little fiddly as you have to slip the ring through the side openings at an angle with tweezers and then lay flat on the inner muzzle brake bracket, while ensuring this is located evenly over the bore hole glue in place with thin cyanoacrylate.
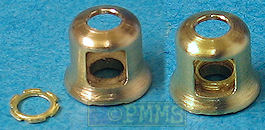
The fit of the two muzzle brake sections is perfect and the resulting join line all but invisible but you should ensure the side gas openings are lined up perfectly before securing in place with a quick dab of thin cyanoacrylate, you could also solder this join if you wished for a more robust join.
The small muzzle brake securing bracket on top of the muzzle brake is added from 3 very small etched parts that will require care in fitting to complete the muzzle brake assembly. Adding the collar and muzzle brake to the barrel required the end of the barrel be filed down in diameter a fraction to fit inside the collar, etched washer and muzzle brake, this is only a small amount and it is easier to file the barrel end than the insides of the three parts to be added to the barrel.
Once the barrel end was reduced enough for the parts slide on (test fit often while filing to avoid removing too much from the barrel end) the assembly went smoothly, but and a big BUT, do not attach the muzzle brake to the barrel until after you have fitted the barrel to the kit gun breech and the outer gun housing as you can't do this with the muzzle brake attached, just like the kit gun assembly.
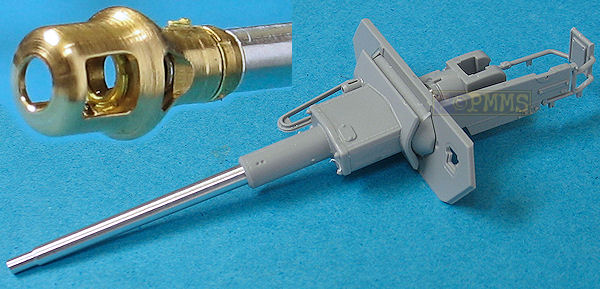
The aluminium barrel fits between the two Dragon kit gun breech parts exactly like the plastic kit gun with the rest of the kit gun breech, outer gun housing and gun collar assembled as per kit instructions with the metal barrel fitting exactly through the outer housing and collar for a trouble free update.
Once the gun assembly is complete you can then add the muzzle brake to the barrel ensuring the side gas holes are lined up correctly in relation to the barrel centre line.
and two image of fittings on the real muzzle brake

The
good fit of the barrel parts make for straightforward assembly and the perfect fit to the Dragon kit results in a simple update with considerable more detail than the kit barrel/muzzle brake assembly.
Highly recommended 9.5/10
| Panzer Tracts No.4 Panzerkampfwagen IV Thomas L Jentz Hilary Louis Doyle  |
Pz.Kpfw.IV AusfF2/G AFV Super Detail Photo Vol.5 Published by Model Art Co.Ltd.  |
Armour PhotoGallery #1 PzKpfw IV Ausf.G Sd.Kfz 165 Hummel Sd.Kfz 166 Brummbär  |
| Achtung Panzer No.3 Panzer IV  |
Ground Power No.106 March 2003 Ausf.G GALILEO Publishing Co.,Ltd  |
PzKpfw IV Ausf.A
to J Tanks in Detail 1 Ian Allan Publishing.  |