
Tiger I
Panzerkampfwagen VI
Sd.Kfz.181 Ausf.E (Latest Model)
AFV Club Kit No. AF 35079
Review by Terry Ashley
The kit as with many these days is multi-media with 226 parts in olive green plastic, 5 etched parts, a metal gun barrel, two springs for the rear idlers, poly caps for the wheels and soft vinyl full length tracks as well as the decal and instructions sheets.
The quality of the plastic moulding is very good with crisp details and only very few pin parks, those that are present are fairly shallow and should be easy the deal with. There is also some minor flash on some of the larger parts but again this is easy to remove and all but a couple of parts were warp or blemish free.
Lower Hull/Suspension:
The lower hull tub includes the sides, front and bottoms of the sponsons with
very good detail including the correct access panel details on the bottom
hull and the distinctive flanges between the upper hull and sponsons but
as with all Tiger I kits the round rivet heads are missing from the sponson
flange due to the constraints of injected moulding process but are easy to
add if you wish although after the wheels and side skirts are fitted this
area is all but hidden.
The front towing shackles are the correct shape for the late Tiger and the
tow eyes front and rear are the later round profile types.
There are some nice weld seams around the front panels and hull sides, while
at the rear the track pin retaining plate is moulded integrally with the hull
but again this is almost hidden when the wheels and track are in place.
The final drives have very good details and fit snugly into place but both are not the same with small differences for the offset torsion bars so watch the part numbers when fitting. There are also separate bolted panels for the insides of the final drive hull extensions while the suspension consists of separate torsion bars designed to operate as per the original. The first and last torsion bars rest against the hull bump stops to ensure the model sits at the right height while the others move quite freely and it will be easy to simulate going over rough ground.
The rear idler mounting has an internal fitting and spring designed the tension
the idler with the spring pulling it towards the rear and the idler axle itself
being held in place with a poly cap while the idler wheel is the correct later
600mm type.
I have my doubts about this system as the spring is stretched to twice its
length and holds the idler tightly at an angle facing the rear and not the
usual neutral down position. The strength of the spring is such that I simply
can’t
see any individual link track run staying together with the pressure needed
to move the idler and with the full length vinyl track it will be stretched
like
a rubber band long before it moves the idler.
The poly cap on its own holds the idler quite firmly and I think this will
be enough to alter the position of the idler if using an individual link track
set or even the vinyl track as this won’t be stretched tight in any
case to allow for the sag.
The drive sprockets have the later features of flat hub with small plates holding the bolts in place but the sprocket ribs have a concave profile instead of the slight convex profile of the actual ribs but do include the rim bolt head detail on both sides of the inner and outer sprocket with a poly cap being trapped between the two for easy fitting the front axle.
 The road wheels again have very good crisp details and feature the early
bolt head arrangement around the hub with the later arrangement having evenly
spaced bolts.
The road wheels again have very good crisp details and feature the early
bolt head arrangement around the hub with the later arrangement having evenly
spaced bolts.
Each set of road wheels has a small vinyl ring trapped between them for fitting
to the axles but these act differently from the “normal” poly
cap with the round profile tending to grip the axle firmly and it’s
difficult to get the wheels off once in place so it may be best not to fit
these until ready for final placement.
The instructions show the sequence of lowering the axles to fit each road
wheel assembly in turn and by following this there shouldn’t be any
problems.
The rear hull panel is a separate part that fits very well to the main hull
tub and has the correct layout of tools etc. for the late version and also
has the correct exhaust arrangement with the top flap being replaced with
top guard on pins and also has separate lower armoured covers and the soft
metal guards in plastic. These guards actually sit on small hull spacers similar
to the side skirts and not flush with the hull panel as per the kit but this
is easy to remedy by adding small section of plastic card for the spacer which
are about 1mm thick under each securing bolt on the guards.
The rear convoy light strangely is moulded with the rear hull panel and as
such lacks a bit of detail
The jack is in five parts with separate mounting clips while the correct style rear fenders have good detail on the top but are a little on the thick side and could do with some thinning if not replaced with etched items.
Upper Hull:
 The
main hull again has excellent surface details with nice weld seams and the
correct tool layout for the late version and has separate front crew
hatches, front ventilator cover and rear engine bay door. The hull includes
the large circular turret splash plate fitted to the late Tigers but recent
research has shown the bolt head arrangement is actually different from that
on the kit part but as the AFV Club part matches the drawings in the
MMIR Tiger Special they (AFV Club) weren’t the first to make
this error and it should be easy to fill the bolt holes not required.
The
main hull again has excellent surface details with nice weld seams and the
correct tool layout for the late version and has separate front crew
hatches, front ventilator cover and rear engine bay door. The hull includes
the large circular turret splash plate fitted to the late Tigers but recent
research has shown the bolt head arrangement is actually different from that
on the kit part but as the AFV Club part matches the drawings in the
MMIR Tiger Special they (AFV Club) weren’t the first to make
this error and it should be easy to fill the bolt holes not required.
All the tools and other equipment are separate parts with the tool clips moulded with the tools and could do with being replaced with etched clips for better appearance as with most kit tools and the moulded tow cables for the upper and side hull panels have nice cable texture and also have the securing clips moulded in place.
The two crew hatches are nicely detailed with separate outer periscope cover and inside a separate periscope, hatch locking lever and hinge details but there are a couple of shallow pin marks that should be easy enough to deal with. There are also hinge attachments for the inside of the hull as the hatches are designed to be open or closed after assembly if you wish.
The rear engine deck is especially well done with correct pattern grills
and texturing on the central rear section with the engine bay door as a separate
part.
The door has separate central cap minus the star knob which is correct for
this version and separate cover for the forward intake with the fit of the
door to deck being spot on. Also included are basic etched engine grills which
have a flat profile without the weaved effect but are passable if you don’t
want to buy additional screens.
The hull side panels have the mountings for the side fenders and also include the small square weld seam on the rear lower corner which is hidden when the fenders are in place but it shows the attention to detail that this is included, while the weld seams at the front are also well represented. The fenders have good outer details but could do with being thinned down a little on the inside for a better appearance.
The front hull plate is a separate part that has the driver’s visor moulded integrally in the open position as well as the MG ball mounting with full MG fitted inside the hull and a separate centrally mounted BOSCH light which is in two parts with separate base and all that is needed is the wiring added.
The front glacis is a separate part that includes the side fender extensions fixed in place and again could do with thinning for a better appearance while the armoured fillet in front of the driver’s visor is also a separate part with the correct screw head detail on the top.
The fit of all the main hull components is very good without any gaps apparent during test fitting but much of the excellent weld seam details on the hull front and sides will be covered up when the Zimmerit coating is applied and all the hull surfaces are smooth without any texturing presuming they will be covered with Zimmerit which you have to add using the method you best prefer but AFV Club have also just released a Zimmerit application tool specifically for this job and the instructions show this tool being used to apply the Zimmerit which looks quite straightforward.
The Turret:
 The turret is made up of four parts, two side wall halves, the lower turret
ring and roof and the turret sides have a subtle texturing effect not included
of other surfaces but this will be covered by Zimmerit in any case as will
the nice weld seams at the front of the side panels.
The turret is made up of four parts, two side wall halves, the lower turret
ring and roof and the turret sides have a subtle texturing effect not included
of other surfaces but this will be covered by Zimmerit in any case as will
the nice weld seams at the front of the side panels.
The roof has the correct layout for the late 40mm thick roof with the step
up between the sidewalls and the roof but the turret sidewalls are a little
thick and you will need to add weld seams around the top edges which will
help reduce the thick appearance.
Details on the turret roof include the later Tiger II type Loader’s
hatch, rain slits in the top of the cupola which also has open periscopes
as well as the top MG ring with MG support and a nicely detail MG plus the
additional periscope in front of the Loader’s hatch which has a separate
periscope for the inside and the armoured cover for the outside. Also included
are the three mounting points for the 2 ton crane jib fitted to later Tigers.
The Loader’s hatch has nice details on the inside with the two grab handles and central locking wheel but there are also a couple of shallow pin marks to be removed while the outer grab handle is correctly offset for hatches on the 40mm roof. The ventilator has a separate cover as well as a separate close in weapons position on the rear corner and the Commander’s hatch has a separate grab handle and can be fixed open or closed as it is the later swinging type.
The turret roof doesn’t have the weld seam across the centre which is correct for the later 40m roof but also the eight flush screw heads for the internal travel lock are not present.
Fitting the turret parts together provided a freight as the two side walls didn’t fit to the lower turret ring initially as the contours were off, but they did pull back into alignment when glued in place, it’s probably best to glue the front of the turret walls first and let dry before gluing the rear sections so they pull into place easier but remember to trap the mantlet between the two side walls as you can’t fit this later if you want the gun to elevate and the turret roof fitted okay once the sidewalls were glued in place.
The main gun is in turned aluminium with plastic muzzle brake and here you
get the choice of a traditional two part brake split diagonally or two new
multi-part muzzle brakes using slide mould technology to produce parts with
only a minor mould seams to be removed and very good detail. They include
the inner ring which it seems any self respecting German muzzle brake has
these days and assemble easily into a nice looking early or later muzzle brake.
On the inside there is a fairly complete gun assembly with separate breech
block and guard rails and the metal barrel slips into a cut-out slot in the
rear mantlet part A11 and you then slip the barrel through the main mantlet.
Just remember not to fit the muzzle brake before assembling the gun/mantlet
as the gun won’t fit in place with the muzzle brake fitted.
 The
88mm gun itself when compared to available plans measured out exactly right
lengthwise and in thickness and about the only thing missing is the
two small screw heads on the sides of the gun collar while the mantlet has
the late features of single telescope sight opening and a full co-ax MG that
fits next to the gun but of course you will need to drill out the MG barrel
for a better appearance. Update 13 March 2005: I have checked the
barrel length against another set of plans from the AJ Press Tiger
books and these show the AFV Club barrel length from the collar midway
down the barrel to the muzzle brake to be 3mm short. This highlights another
issue when comparing kits to
plans, there is no guarantee the plans themselves are correct and about the
only ones you can trust are actual blueprints or measurements from the real
thing. The recent ABER metal
barrels for the Tigers also have this extra length as do the Dragon kit
barrels (Tiger (P) and Tiger
I Initial Production) and it would appear these are
the correct length while the AFV Club and Tamiya barrels are
short.
The
88mm gun itself when compared to available plans measured out exactly right
lengthwise and in thickness and about the only thing missing is the
two small screw heads on the sides of the gun collar while the mantlet has
the late features of single telescope sight opening and a full co-ax MG that
fits next to the gun but of course you will need to drill out the MG barrel
for a better appearance. Update 13 March 2005: I have checked the
barrel length against another set of plans from the AJ Press Tiger
books and these show the AFV Club barrel length from the collar midway
down the barrel to the muzzle brake to be 3mm short. This highlights another
issue when comparing kits to
plans, there is no guarantee the plans themselves are correct and about the
only ones you can trust are actual blueprints or measurements from the real
thing. The recent ABER metal
barrels for the Tigers also have this extra length as do the Dragon kit
barrels (Tiger (P) and Tiger
I Initial Production) and it would appear these are
the correct length while the AFV Club and Tamiya barrels are
short.
The rear escape hatch is the correct shape for the later type with only two securing screws at the bottom and no bevelling of the door edges but the fit to the turret wasn’t good with sizable gaps around the edges that will require a bit or work for the hatch to fit properly.
A two part rear storage box which has nice top door and latch details is fitted to the rear of the turret and there are additional spare track links and mounting brackets for the turret sides to complete the assembly.
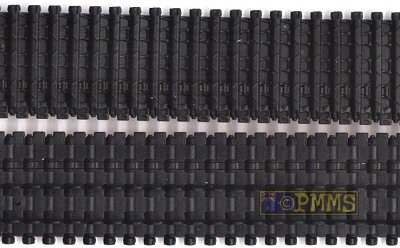
Tracks:
The tracks included are continuous length in glueable soft vinyl but while
the details are quite good for the medium they are lacking by today’s
standards with very little gap between the links and no holes in the guide
teeth.
You will also need to glue the tracks to the road wheels to achieve a natural
sag but due to the softer material they will sag to some extent. Overall the
tracks are passable but many will want to replace these individual link tracks
for a better appearance.
Decals:
The sheet is well printed and has markings for five Tigers all in the three
colour Dark Yellow, Red Brown and Green scheme finished in different patterns;
Conclusion:
Another excellent kit from AFV Club which captures the features of the later
production Tigers very well with the late type Loader’s hatch which
if I’m not mistaken is the first “late” Tiger I kit to
include this and also the rear engine deck and tool placement layout and
the 40mm turret roof with step up from the turret sides which are all correct
for the later type.
There are a couple of areas that require attention as with any kit and probably
the biggest letdown is with the tracks but the option of moving suspension
and the new muzzle brakes are nice additions.
Overall this will build into an excellent model of a Late Tiger I but it remains to be seen what Dragon offer when they release their Late Tiger and as mentioned when that kit is available a full comparison review will be done to highlight the features of both.
Highly recommended.
The Sprues:
 Thanks
to C.K.Pat from Tristar
Shop or
the review
kit.
Thanks
to C.K.Pat from Tristar
Shop or
the review
kit.
Page Created 23 February 2005
Updated 13 March 2005