

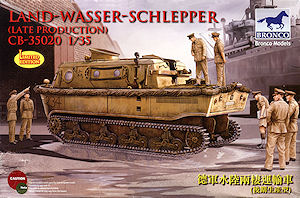
In 1936, Rheinmetall-Borsig AG received an order from the German army general staff to develop a fully-tracked amphibious tractor. After working with various other firms, the Land-Wasser-Schlepper was built. Powered by a Maybach HL120 V12 engine, the LWS could achieve 35km/hr on road and 12km/hr in water. The total weight was 17 tons and up to 20 soldiers could be accommodated.
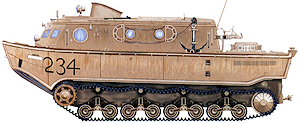
The normal function of the LWS was as a tug boat to be used during amphibious landings. In this role the LWS would tow an 18.000 kg capacity floating trailer. This trailer could carry supplies and equipment, including vehicles as large as the SdKfz.9 half-track.
The trailer could be towed on shore by the LWS and maneuvered for unloading. Development of the LWS proceeded quite slowly until 1940, when Operation SEELOWE (Invasion of England) was being planned. The seven pre-production LWS vehicles were extensively tested for amphibious assault across the English Channel. However testing showed that they could only be used in calm in-shore waters.
The lack of armor protection was also a concern. When SEELOWE was cancelled early in 1941 the LWS project was also ended. The LWS did serve in Russia and was employed during river crossings.
Following on from their LWS Mid Production (kit #CB-35015) Bronco Models have now released this kit of the LWS Late Production that differs from the early type with the fitting of 38(t) type suspension bogies and twin disc drive sprockets along with some other minor changes.
Having acquired a copy of the new Trojca LWS Land-Wasser-Schlepper book we now have more information on LWS dimensions as well as various 1:35 scale plans. But I’m sorry to say the information and plans in this book only complicate matters further as the overall dimensions stated are quite different than those included in other references such as the Darlington Productions book Rommel's Funnies by Thomas L. Jentz. As there is no surviving LWS to drag a tape measure over we have no way of substantiating the conflicting dimensions.
Further doubts are cast on the data in the Trojca book by the fact that the 1:35 plans don’t equal the dimensions listed in the book, for example the overall length is stated at 9200mm (9000mm) and no explanation is given for the two lengths? With the stated 9200mm (1:35=262.85mm) and 9000mm (1:35=257.1mm) the 1:35 plans in the book show 269mm in overall hull length for the Late Production model. The Darlington book incidentally states the length of the LWS at 8600mm (1:35=245.7mm) and width as 3160mm (1:35=90.2mm)
The width is shown as 3050mm (3000mm) but again there is no explanation of the two widths?
With the stated 3050mm (1:35=87.15mm) and 3000mm (1:35=85.7mm) we see the 1:35 plans in the book showing 86.75mm in width.
The length of the Bronco LWS kit is 252mm and width is 90mm, while the length of the Hobby Boss LWS kit is 245mm and width is 90mm which means both are shorter by some degree from the dimensions in the Trojca book. The Bronco kit is between 5 to 17mm short depending on what length you believe while the Hobby Boss kit is a whopping 12 to 24mm short depending on your length of choice.
Visually comparing the Bronco kit to the available photos I find it hard to believe those figures but the Hobby Boss kit is clearly too short and squashed around the front hull profile but to what degree is open to speculation.
The Darlington book states the road wheel diameter as 500mm (1:35=14.3mm) yet the Trojca book states the wheel diameter is 520mm (1:35=14.85mm). The 1:35 plans in the Trojca book have the diameter of the road wheels at 14.3mm which equals the 500mm in actual size?
The diameter of the water screws is stated as 780mm (1:35=22.3mm) in the Trojca book and 800mm (1:35=22.85mm) in the Darlington book but the 1:35 plans in the Trojca book have the diameter of the screws at 23mm, well I’m confused.
The drive sprocket diameter is given as 660mm (1:35=19mm) and the idler wheel at 710mm (1:35=21mm) with the Trojca 1:35 plans indicating 18mm for the drive sprocket and the idler 21mm in size.
You might say some of these discrepancies are due to the printing reproduction process but if that were the case the dimensions of the idler would also be different but it isn’t, so it’s back to square one.
So on to the kit.
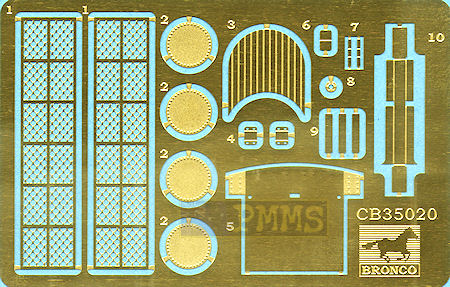
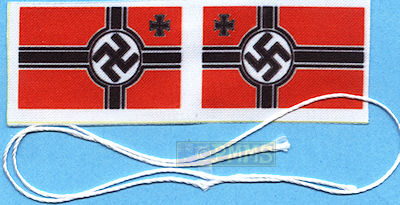
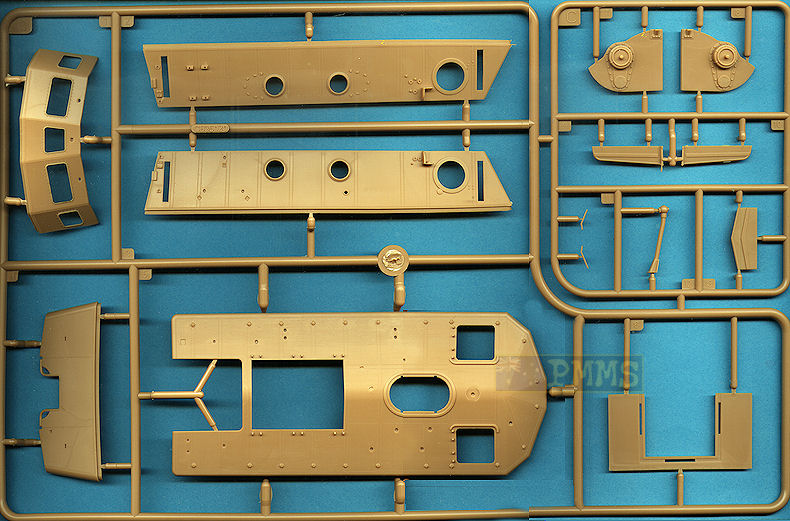
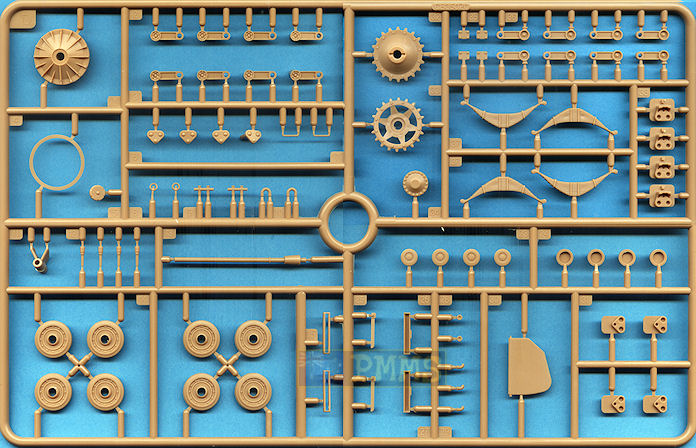
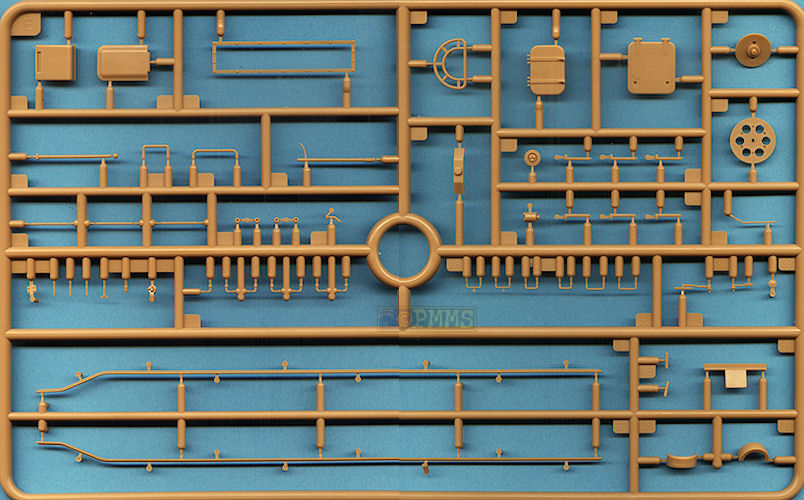
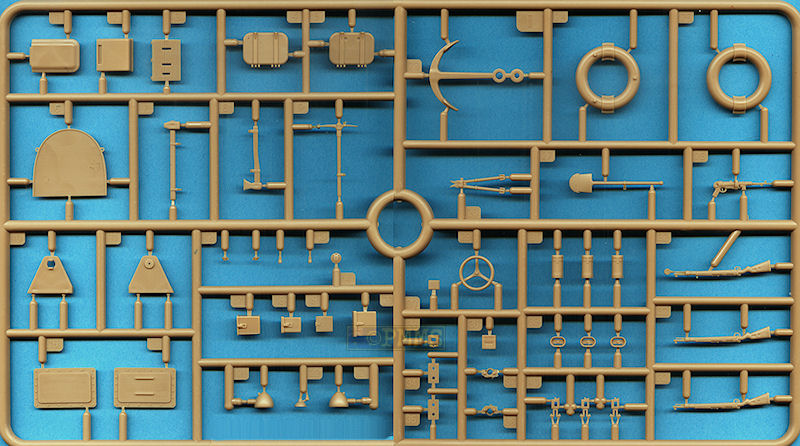
The kit consist of 506 parts in light beige plastic with another 280 individual plastic track links, 18 small butterfly bolts, 22 clear plastic parts, 16 in etched brass plus a short length of twine, a two sided fabric German flag, a 16 page instruction booklet and the small decal sheet. Also included in this limited edition kit is a set of resin “rope” bumpers for around the hull made up of 9 parts, these are actually the same resin bumpers as included in the Lion Roar set #LE35087.
Cloth flag and twine
Standard of plastic moulding is excellent overall with virtually no flash or pin marks to be seen with just some fine moulding seams to be removed from the parts, the track links while conventionally moulded only have the three sprue attachment burs to be cleaned before assembly.
The surface detailing is also very good with hundreds of extremely fine rivets along the hull and cabin sides that will come up well with careful weathering. One thing to watch with these fine details is to not remove them while cleaning the moulding seams from the hull tub in particular.
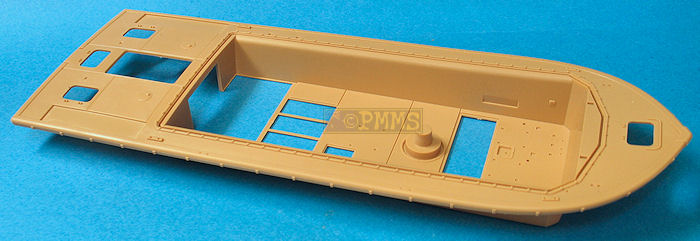
Included in the kit is a fairly complete interior with full driver’s station, central intake/observation funnel and central cable drum although the actual interior was mostly just a big open space to allow room the 20 troops that could be carried.
As this version is the same as released recently by Hobby Boss (kit #82430) some comparisons are inevitable but I’ll keep these basically to the suspension as the other areas of the kit were covered in the review of the Hobby Boss LWS kit which has been updated to reflect the newly obtained information in the Trojca book.
Also as much of the kit other than the suspension and track is the same as the first kit from Bronco, much of this review will also be from the initial review with updated comments where required as well as describing the new suspension/track.
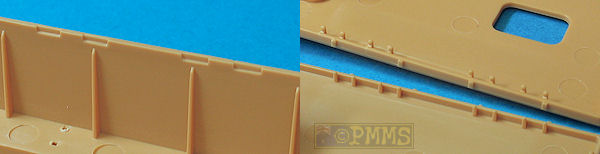
As with the first kit the initial step is to join the lower boat hull tub and upper top deck as everything else fits to these from here on. Firstly you have to fit the inner rear side step detail which is easy enough but to fit the hull tub and deck together will prove a little exciting.
There are 58 small pins around the underside of the top hull that fit into small indentations around the inside of the boat hull sides but the hull sides are slightly bowed inwards, not enough to notice visually but makes fixing the deck a challenge.
The best method is to glue the rear stern edge securely in place and then progressively ease out the hull sides slipping the deck pins into place and glue small sections at a time. You may have to slip you finger through the inside deck openings to flex out the hull sides but with care the pins slip into place as you go till you get to the front which needed a little coaxing to get the pins into position.
One thing to note is do not be tempted to cut off the deck pins as this will mean you can’t hold the hull top sides in the correct position but once you have got the hull and deck firmly glued together you can happily move on.
as mentioned above.
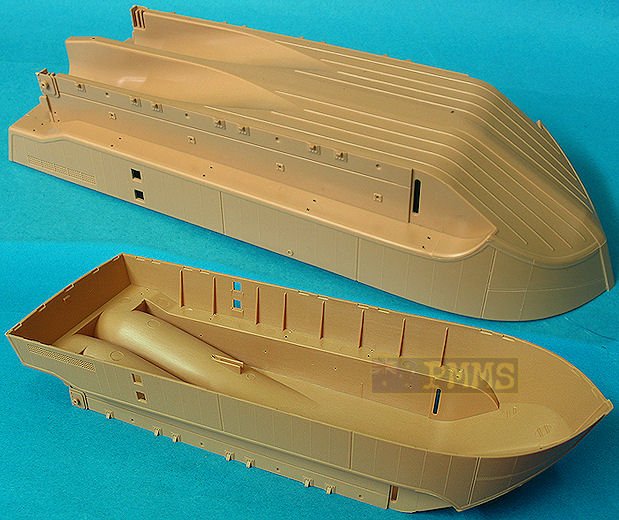
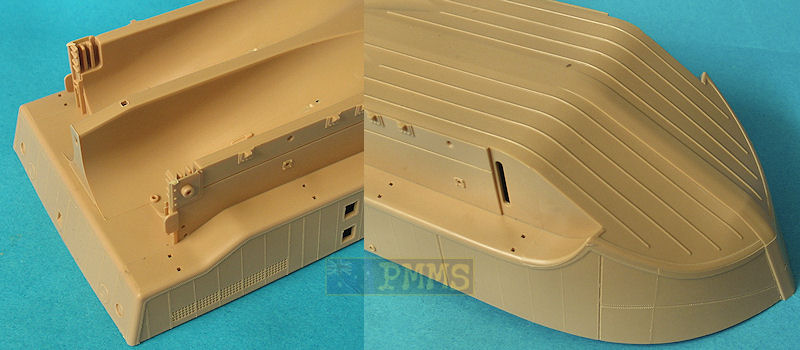
This is one large and impressive moulding with very clean and well defined details especially the many small rivet heads as mentioned above and included the large indentations on the undersides for the propeller shafts with all suspension parts separate for good definition.
The hull rivet detail has actually been enhanced along with the changes for the revised suspension mountings and the rivets are a little more pronounced and better defined than with the first kit and will add to the overall appeal.
There are a few fine mould seam lines around the outer edges of the hull and on the undersides to be removed but this should be very easy with a #11 blade as they are very fine, just be careful as mentioned not to remove any of the fine rivet detail in the process.
The final drive housing is a separate part that fits to the hull although there was a little minor trimming required to fit snugly along with the new twin disc drive sprocket. This has a solid inner disc and spoked outer disc with the correct 20 drive teeth as well as bolt heads around both sides of each sprocket. The centre hub on the outer sprocket is a separate part with nice bolt head detail and this forms the attachment to the final drive axle.
The Trojca book states the diameter of the LWS drive sprocket is 660mm (19mm in 1:35) with the Bronco sprocket being the correct 19mm (sprocket disc, not including the teeth) while the Hobby Boss sprocket is undersized at 17mm in diameter.
The other difference between the kit sprockets is the Bronco kit has a solid disc inner sprocket while the Hobby Boss kit has a spoked inner sprocket like the outer sprocket. Available images show the solid inner sprocket of the Bronco kit is the correct configuration.
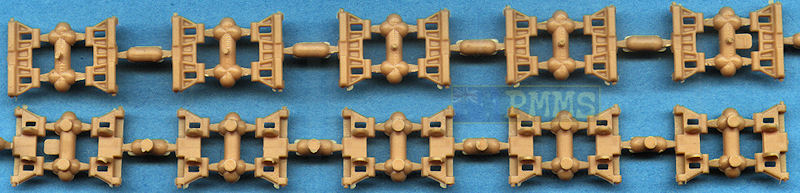
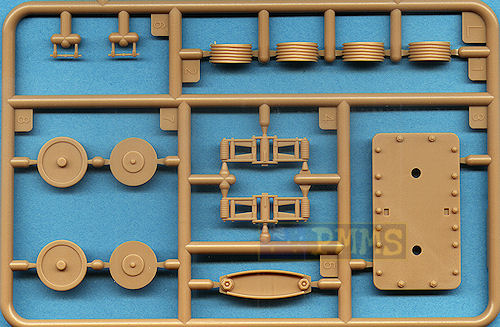
Each bogie unit is made up of 12 parts, the main spring unit with top bracket, 4 swing arms, the 2 road wheels and the hull mounting brackets that when assembled allow the suspension to articulate if you want to animate this for a diorama setting. You have to be very careful with the glue to allow the articulation and it may be easier to glue the bogie parts firmly together for more robust assemblies unless you actually want the articulation?
The road wheels are the same as the first kit and are the correct 500mm (14.3mm in 1:35) with nice rim detail on the outside but the inner side is devoid of any detail which shouldn’t be that noticeable except for the front wheels from some angles. The Hobby Boss road wheels are a little undersized at 13.5mm in diameter and are not as detailed as the Bronco wheels.
Additional items are the two part return rollers the same as the first kit and the 2 part idler wheels at the back which feature nice wheel detail and a separate outer ring for good detail definition. The stated diameter of the idler is 710mm (21mm in 1:35) with the Bronco idler being 21mm in diameter while the Hobby Boss idler is 19.5mm in diameter and also has a solid outer ring that lacks detail compared to the Bronco idlers.
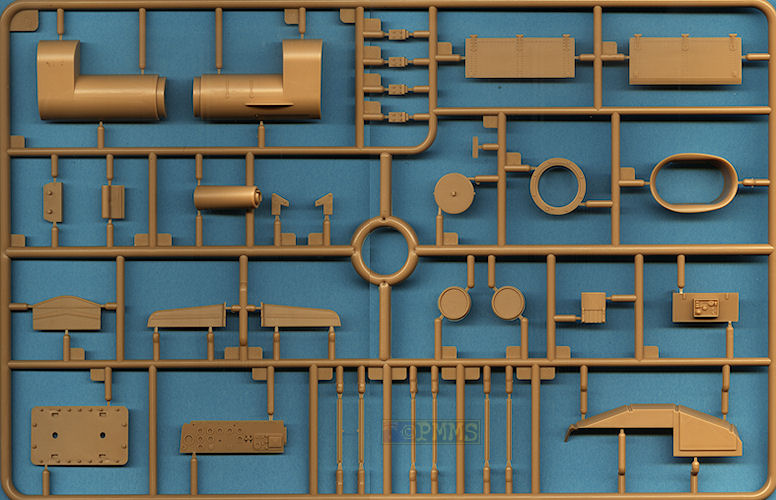
At the back are the two propellers, propeller shafts and rudders with separate mounting brackets that all fit together without any problems. One notable feature is the propellers correctly rotate in opposite directions to counteract the torque effect and as such you should be careful to fit the propellers on the appropriate prop shaft as indicated in the instructions.
The diameter of the water screws as mentioned above is a little conflicting with three different diameters shown between the data and the plans. The three sizes given in 1:35 scale are 22.3mm, 22.85mm and 23mm so I can’t say which is correct. But turning to the kits the Bronco screws are 20mm in diameter and the Hobby Boss screws are 19mm in diameter so both are smaller than the sizes stated. The other big difference between the kit screws is the Bronco screws have the correct counter rotating profile while the Hobby Boss screws do not and are the same direction on both which is incorrect.
The individual link track in the kit is designed to be glued together and not designed to be workable but are cleanly moulded with just some very minor flash and the three sprue attachment burs to be cleaned up prior to assembly. Detail on the links is very good and includes open guide horns and thankfully there are no pin marks on the inner face which often plagues this type of track link.
The main thing to watch is the track links are handed which means there are different links for the left and right sides (or port and starboard for the nautical term) and each group of two links on the sprues has one right and one left link but there is no other indication which is which.
Each sprue has 5 left side links and 5 right side links so you have to watch this after removing the links so you don't mix these up during assembly. The easiest way of identifying the links is the outer side has a larger pin bolt head than the inner side of each link and the larger pin bolt faces the outside of the hull when fitted in place so make sure you don’t mix up the pin bolts during assembly.
As the tracks links are glued together it is fairly easy to include the track sag as you fit the track lengths over the top return rollers and as the LWS has no fenders you can add the tracks at any time for ease of assembly and painting with the instructions showing fitting the track as the last assembly step.
The track on the Hobby Boss kit is full length vinyl and while the correct width is notable lacking in detail definition compared to the individual link track in this Bronco kit, but of course there is more assembly with the Bronco track than the Hobby Boss track.
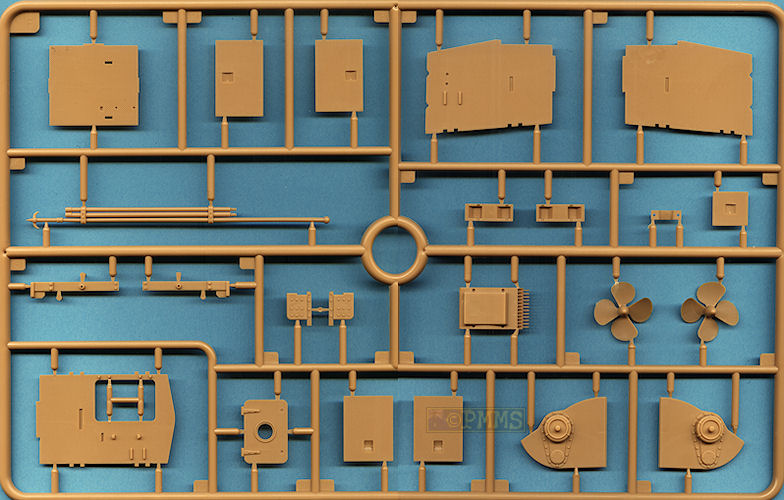
This is a single large moulding with again excellent details and the numerous separate inside floor panels/hatches and the upper deck hatches all fit into place without any trimming required along with the 6 part winch assembly on the stern. You can choose to show the hatches open if you with but there is no internal detail other than inside the cabin so leaving them closed is best but the option is there.
The two rear engine intakes are shallow troughs with etched intake screens and thin plastic outer frames that all fit together without any problems but you may want to paint the inside trough before fitting the etched mesh or even deepen the opening for a bit more relief?
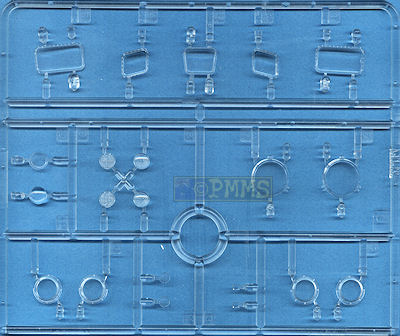
At the front are the two headlights with separate 2 part mountings and clear discs for the light ‘glass’ and all that is needed is the cable ducting to finish off.
The large cabin recess has the floor panels separate as mentioned and the rear access hatches also have the correct cross members under the hatch should you want to show these open with each panel/hatch having separate fine hand grips that will need care in handling and fitting.
This is made up of 5 main parts, the 4 sides and roof all with internal detail free of any pin marks as well as openings for the clear plastic cabin windows and separate roof access hatches, there is also additional ribs added inside the front panel for additional detail definition.
The fit of the cabin parts is good overall but the front panel needed a little coaxing to get a snug fit but once glued firmly in place there were no apparent gaps. One thing to watch is there are 4 large sprue attachments plugs on the lip of the roof and these will have to be removed along with the usual sprue attachment burs.
The openings for the front and rear turn indicators are fully open in this kit as their position is fixed on the late production model unlike the choice of position on the mid version. The turn indicators themselves are made of the 3 parts allowing the indicator to be deployed if you wish for a nice touch.
There are additional smaller fittings added to the inside walls without any problems and the separate hatches have additional separate fine grab handles and again can be shown open to expose the interior further if you wish with the fit to the cabin roof being very good if you choose to glue them closed.
The windscreen wipers for the front windows are in finely moulded plastic with blades for both inside and outside the windows which are usually lined up with each other and these will need care in fitting.
The top funnel is also a good fit to the roof and the pioneer tools all have moulded on tool clips which could be enhanced by replacing with any of the available etched tool clip sets and added to the outside walls are the large sea anchor and racks for the cable on the left cabin wall and a couple of 2 part life rings with etched mounting brackets.
The details included inside are the multi-part central winch assembly, smaller sidewall fittings including the three Kar98 rifle racks and nicely moulded Kar98 rifles and the forward driver’s controls consisting of separate foot pedals and gear levers and crew seats made up of 6 parts each.
The forward instrument panel coaming has a separate instrument panel with engraved dial faces and separate steering wheel and three smaller fittings for the panel and this sub-assembly fits neatly to the front of the cabin wall.
The central conning tower/engine intake is another multi-part assembly with additional etched parts inside the tower for added detail and the MP40 has a separate etched mounting bracket added to the outside of the tower with the only cleanup being the small join seams for the 2 tower halves.
Lastly at the back is the large square multi-part cabin entrance which sees the fit of the 4 main panels spot on not requiring any trimming and the separate cabin door is also a good fit with additional smaller details added to the door and sidewalls with the assembly fitting snugly to the separate floor mounting plate for a trouble free sub-assembly.
Added at the back are the entrance coaming and the large tow bar mounting on the rear cabin wall plus very thinly moulded hand grip rails around the outside of the cabin roof all of which fit together without any problems.
The fit of the cabin to the deck is very good with recesses around the deck and locating lips around the bottom of the cabin walls that result in a very snug and firm assembly with little chance of anything being in the wrong place. One cautionary note is you may want to temporarily position the cabin walls into the deck recesses while the glue is still tacky on the cabin assembly to make sure everything is lined up correctly.
As mentioned the kit includes the Lion Roar resin bumper set (#LE35087) and this adds a nice finishing touch to the kit which lacked this important detail on the first release kit as does the Hobby Boss kit. A full review of the Lion Roar bumper set can be seen here rather than me repeating it all again.
The 16 page instruction stapled booklet makes it easy to quickly flick between pages using one hand to find a particular step with the assembly sequences being exploded view line drawings that clearly show where everything goes, the only thing to watch is the myriad of solid lines from the part numbers to the parts that does get a bit busy and confusing at times trying to differentiate between the part outline and the number line. The bogie assembly drawing is an example of this and care is needed to study the illustrations before hand to fully understand where things go to avoid problems.
But overall they are easy to follow without any problems encountered providing you take the normal precautions of studying the steps and test fitting before gluing.
The small decal sheet is well printed with 2 balkenkreuz and markings for 2 different schemes with four view colour illustrations included with the instructions showing the position of the various markings.
Also included is a 2 sided cloth German Kreigsmarine flag that can be wrapped around the radio antenna and this includes the full swastika symbol and the choice is yours to use this depending on where the kit will be displayed taking into account the various regulations about regarding the display of this symbol.
Option 1: LWS Late Production belonging to German Kreigsmarine (Unit Unknown) finished in overall light grey.
Option 2: This represents the LWS captured by the British in North Africa in 1943 and extensively tested. It has the large number 234 painted on the hull port side only which is correct and not on both sides as with many illustrations of this vehicle. Also included are the blank number plates applied to the captured LWS and the colour scheme is shown as overall light sand.
The Hobby Boss kit also features this paint scheme and includes two 234 decals but the instructions only show this applied to the port side as it should so why they included a second decal to entice people to apply this incorrectly on the starboard side is a mystery?
There is another interesting point in that the Trojca book says the vehicle was finished in an overall light grey paint scheme and not the light sand as shown in all illustrations I have seen as well as the two kit instructions.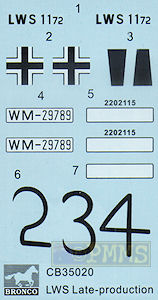
Clear parts
As with the first LWS kit from Bronco Models this is another superbly moulded and engineered kit with the revised later suspension being the notable feature along with the additional detail available from the individual link track.
The detail on the parts is very good notably the revised fine rivets on the hull and cabin walls as well as the interior parts with the inclusion of the resin rope bumpers a nice bonus.
While there are some dimensional issues compared to the available data some of the contradictory data in the Trojca book as well as against that in the Jentz Darlington book make it difficult to really pin down some dimensions. There is one undisputable fact between the Bronco and Hobby Boss LWS kits and that is the Hobby Boss kit is way too short in overall hull and cabin length and really looks a little like a squashed frog around the bow contours. The overall level of detail in the Bronco kit is also more refined than with the Hobby Boss kit in general.
Basically this means that even taking into account the few dimensional issues mentioned above this Late Production LWS kit from Bronco is clearly the best LWS kit available in 1:35 plastic at this time.
Highly recommended
See the Land-Wasser-Schlepper (LWS) Subjects page for other reviews of kits/update sets
Click on thumbnails for larger view

Detail Images

Close new window to return to review
| LWS Land-Wasser-Schlepper Type I/II Waldemar Trojca, Markus Jaugitz ISBN: 978-83-60041-35-2  |
Rommel's Funnies Thomas L. Jentz Darlington Productions ISBN: 0-9648793-6-0 `  |
| German Military Vehicle Rarities (3) Tankograd Wehrmacht Special No 4003  |
Die Rad- Und Vollketten-Zugmaschinen Des Deutschen Heeres 1870-1945Walter J. SpielbergerMotorbuch-Verlag Book10  |
Thanks to Bronco Models for the review kit.