

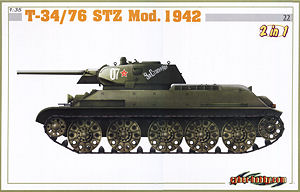
Following on from the early T-34-76 STZ model 1941 (kit #6355) Cyberhobby/Dragon have now released the more widespread T-34-76 STZ model 1942 depicting a vehicle produced in the Spring-Summer of 1942 at the Stalingrad Tractor Factory (STZ or Factory 264).
These particular vehicles has a number of features unique among the many variations seen on T-34-76s and for a truly accurate STZ model 1942 the kit should have all these included unfortunately the practice of including parts from previous kits means some are missed.
The biggest issue with this kit is the upper hull which is newly designed for the STZ Mod.42 and appears to have been designed by a committee with no one bothered to see if the parts from the previous T-34 kits would fit, and many don’t. For example you can’t fit the large rear engine hatch (with the etched screen) without cutting off the locating pins as they simply don’t line up with the holes in the hull.
The side engine intake grills have rounded top corners but the opening in the new hull has square top corners leaving a gap while the upper central engine hatch is a different shape from the opening in the hull as well as the etched panel added on top of the rear engine deck doesn’t fit without minor trimming. The rear engine inspection hatch will also need some trimming for a good fit while the front driver’s hatch fits to the hull opening okay so it’s not all bad news.
But the main issue is the fit of the upper and lower hulls which will require considerable work to get a decent fit and I have assembled two kit hulls with similar results on both; but more on this later.
The fit issues result from the fact the new STZ upper hull is different from previous Dragon T-34-76 hulls on the top plate (turret ring plate/engine deck and access hatch) which extends 1.5mm further back and according to the plans in the T-34 Mythical Weapon, Tank Power T-34 vol.IV and AJaKS T-34 in Combat Vol.II is now 1.5mm too long. This extra length results in the angle of the rear panel being different as well as the position of other details (the turret is 1.5mm too far back); hence the resulting fit problems when you try and fit this new hull to the original lower hull which is still the same length as in previous kits. That might sound confusing but basically the hull is overall the same length but the extra 1.5mm of the top details (turret ring plate/engine deck and access hatch) results in the different angle of the upper rear plate.
Other issues include the incorrect exhaust shrouds with the common 7 bolts while the STZ Mod. 1942 shrouds have 8 bolts and the etched screen on the rear engine bay door should have square corners not the rounded corners of the etched screens inherited from the earlier Mod.1940 and 1941 kits.
But the new STZ Mod.1942 welded turret offers a number of alternate parts such two roof panels with the bolted or welded hinges, two top hatches, two mantlet styles with the fit of the turret parts being very good unlike the lower hull, it’s just a pity the instructions don’t tell you which choices should go together.
There are actually three turret shells in the kit, the turret from the Mod.1940 (kit #6092) and that from the STZ Mod.1941 (kit #6355) as well as the new welded turret for this kit with the Model 1940 turret consigned to the spares box straight off. The new kit offers a choice of the Mod.1941 or Mod.1942 turrets, hence the 2 in 1 tag; but you should be aware that only one complete turret can be built as there are parts common to all (parts H4, H5).
As with most Cyberhobby/Dragon T-34 kits there are many parts from the previous kits including the STZ style road wheels, idlers and driver sprockets from the STZ Mod.1941 (kit #6355) and thankfully the drive sprockets now include the drive rollers so conspicuous by their absence in the previous kit.The kit:
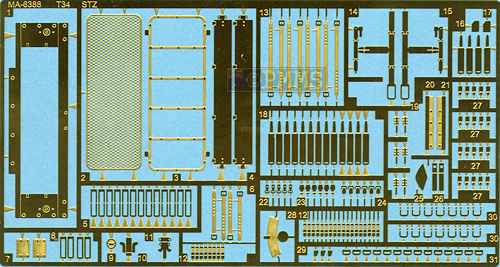
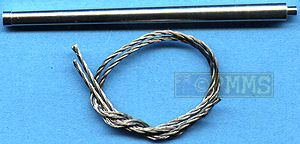
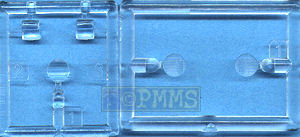
The kit consist of 396 parts in light grey plastic but over 100 are shown as not used with a further 90 individual track links plus a large etched fret and the metal 76.2mm barrel, a length of braided steel wire, 5 clear plastic parts as well as a small decal sheet and the instruction sheet which has thankfully reverted to the conventional line drawings instead of the photo sequences from the previous kits.
Standard of moulding is excellent throughout with clean crisp details and virtually no pin marks that can be seen after assembly due to the many small plastic nodes but you will need care removing these from some parts.
The level of surface details is also good with some nice weld seams, bolt detail and other detail nicely represented and the fit of the smaller parts mostly very good with a bit of work in a couple of places as will see but nothing that the average modeller can’t handle.
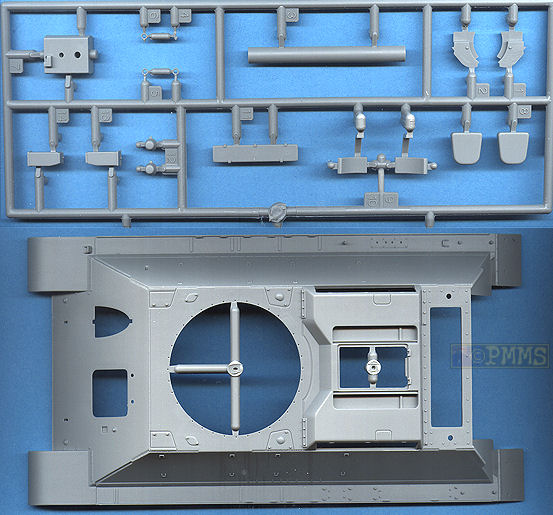
Lower Hull/Suspension:
This is basically the same tub from the previous T-34 kits (but includes some minor alterations for the new upper hull) with separate front and rear panels and includes the side sponson fillers.
The separate lower front plate has nice weld seam details and the lower rear hull panel includes the final drive bulges as well as towing hooks added to both panels with the fit to the hull being very good.
When fitting the rear hull panel note that the small fillets (parts C1, C2) are a different shape than shown in the instructions having a curved profile and not straight as indicated but this shouldn’t pose any problems as they are numbered correctly.
Inside the hull are the separate suspension channels with inner spring detail as well as a new set of separate axles (from kit #6355) with enhanced detail from the previous axles which are still included in the kit.
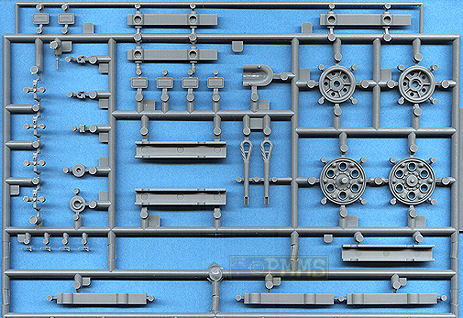
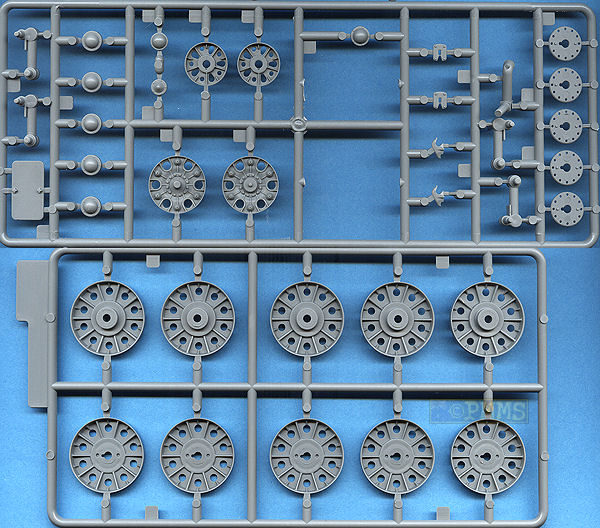
There is just one set of road wheels included in this kit, the later all steel road wheels that again have the correct detail for the “Stalingrad” STZ produced wheels as these differ from other steel wheels in not having the raised lip around the rim lightening holes as shown on the box art. The central attachment disc and hub cap are also separate parts that fit together easily.
The original 1940 pattern sprockets are still included but you should use the 1941 “Stalingrad” pattern sprockets for this kit that has a more contoured central section and U shaped fillets around the six drive roller attachment bolts. Thankfully Dragon has added the drive rollers missing from the first STZ kit to the drive sprockets to give a nicely detail set of STZ style sprockets.
Again there are two idler wheels provided, the original 1940 pattern wheel with rubber tyre and the 1941 steel idler and both have separate hub caps for better definition while the separate axles allow you to animate the suspension ride height if you wish for a diorama setting with the later steel idler being used here.
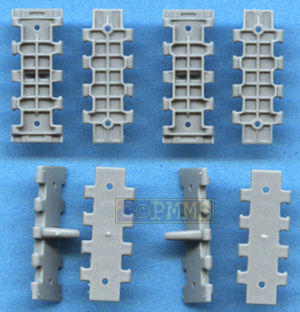
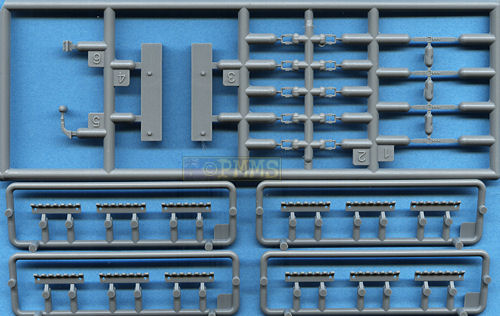
Tracks:
These are individual link “magic track” with the links having little or no cleanup required and are designed to be glued together and are not workable but the links have nicely defined link details and as there is no discernable sag on T-34 track assembly should be fairly straightforward.
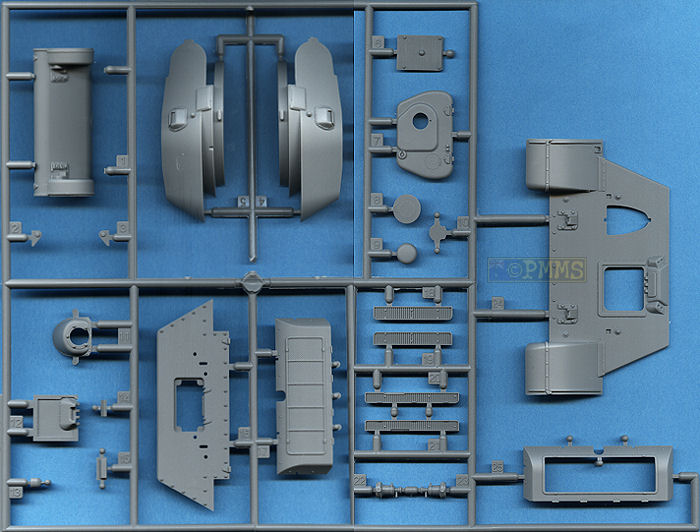
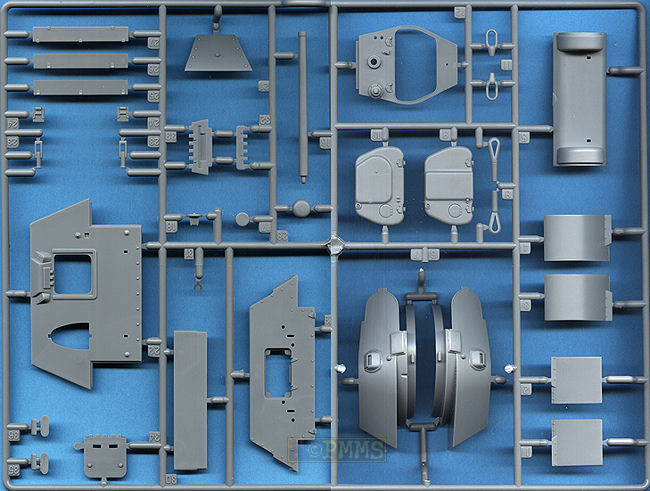
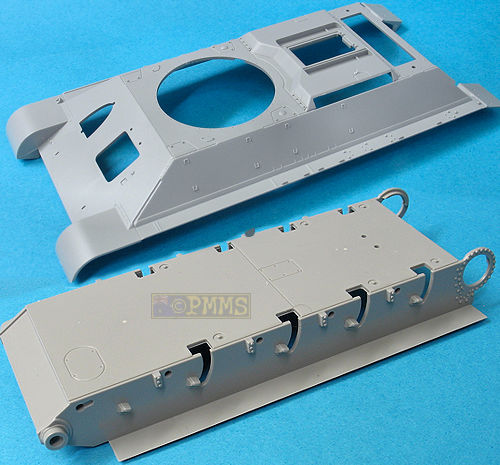
Upper Hull:
As mentioned this is newly tooled hull for this kit and appears to have been designed in isolation to the rest of the kit as there are many issues, both large and small that results in quite a bit of work needed to get his kit assembled.
As mentioned above the dimensions of the new hull are incorrect according to the three references listed which results in a number of the fit issues and why this was altered when the previous hulls were the correct dimensions is a mystery?
Apart from the dimension issues of the new hull the level of detail is well done with clean crisp detail although the stepped weld joins on the hull sides and glacis are too thin when compared to photos and could do with being enhanced.
There is no separate glacis on this kit with the MG coaming and driver’s hatch fitted directly to the glacis as well as the two towing hooks, head light and a small central fitting for additional sighting equipment (part R31). Watch the position of the as the instructions show it in the wrong position, it should in fact be at the top corner of the driver’s hatch hinge bracket almost touching the bracket and not away from it as indicated.
When assembling the driver’s hatch there are separate clear periscopes to add but you will have to open up the locating holes for these as they are too small and also note if you plan to show the armoured periscope covers closed then leave the clear periscopes out as you can’t close the covers with the periscopes in place.
The hull has the fenders moulded on but these are horrendously thick and will need thinning considerably if not replaced with etched fenders?
At the back is a new rear plate with interlocking side welded plates and the fit of these is not the best but using copious quantities of Tenax-7R is was able to fill this gap without too much trouble.
The exhaust shrouds are the standard shrouds from previous kits with 7 securing bolts while the STZ Mod.1942 has shrouds with 8 bolts but it’s fairly easy to fix this by removing the single top bolt and adding two evenly spaced bolts heads at the top leaving the six side bolts in their original position. Note on the two exhausts there is what appears to be a mould seam down the middle but this is an actual weld seam so don’t be tempted to remove this, also you will have to enlarge the hull locating holes for the exhausts to fit properly.
The fit of the rear engine access door will need a bit of trimming for a good fit but again test fitting will determine the extent required?
As with the previous kit there are two rear engine bay hatch covers, the original full plastic version and one with the opening for the separate etched mesh.
The etched screens with this kit have rounded corners from the earlier kits but the screens on the STZ Mod.1942 had square corners and there is little you can do about this other than wait for the inevitable aftermarket etched screens to fix this.
But if you are not bothered and use the kit screens as they come you have to cut off the moulded on raised frame before adding the new etched parts but unfortunately the instructions still don’t tell you to do this?
There are also two locating pins on the inside of the hatch cover that also need to be removed due to the etched panel/louvers added to the inner engine deck but again the instructions don’t indicate this, but it’s quite obvious that it won’t fit without cutting off the pins.
Removing the moulded on frame will require care so you don’t damage the surrounding bolt head detail, especially on the top hinges and the mesh can then be glued in place using cyanoacrylate. The frame is then added over the top of the mesh to produce a nice look engine hatch and there are also additional etched parts for the cover latches and central tail light fitted to these early model T-34s.
The etched louver panel on this kit has thankfully been reduced in size so the plastic hatch will fit so no alterations are needed here as with the previous kits other than to trim the small bolted brackets on the hull top so the etched louver panel will fit properly.
The separate etched louvers can then be added but to show these at an angle you will have to bend the end connectors before gluing in place to get the correct sit.
Also provided are the etched rear taillight assembly for the centre of the upper mesh door and four small etched retaining clips for the door, these are also in plastic if you want to take the simple route but the etched clips have better detail.
With the four side and top intake grills there are two styles provided, the original from the previous T-34-76 kits and those from the recent T-34-85 kits and it’s probably best checking reference photos will determine which is best.
Both style of intakes fit neatly into the hull cut-outs and there are no etched covers provided with this kit, but they are not really needed as the detail on the plastic intakes is perfectly adequate.
There is an issue here in that the side openings for the intakes in the new hull have square corners all around while the intakes have rounded top corners resulting in a small gap to be filled which is a little annoying.
Other details added to the hull are the box type fuel cells along the hull sides which come with etched attachments as well as the normal fender mounted storage boxes also with etched latches and hinges plus etched grouser tie downs and straps for the separate snow grousers supplied.
The steel wire provided is used for the tow cables that fit into plastic cable eyes and have etched securing brackets on the fenders.
As mentioned the biggest issue with this kit is the fit of the upper and lower hulls that is going to required considerable work to get a result due to the dimensionally issues mentioned above.
I have assembled two kit hulls with similar results although the second was a better fit as I learnt from the first the best methods of fitting but I don’t think most will have two kits to play with to get the fit right?
It’s best to start with the rear hull join and after gluing the side fillets (parts C1, C2) and the lower rear hull plate (part R5) firmly in place I then test fitted and after some manoeuvrings and minor trimming of the side fillets (parts C1, C2) as well as wishing I had another pair of hands I was able to get the rear hull join to line up (see images for explanations of all these issues).
The main problem was then the underside sponson joins where large gaps were evident and filling with pieces of plastic card would be the best option but being on the undersides these may be hidden from view a little? You can also squeeze the sponsons up to meet the hull securing with cyanoacrylate for a stronger join but there are still some gaps to fill and the overall fit is not the best you will see.
Moving to the hull front join, this required considerable test fitting and trimming to get a reasonable fit but there were still some smaller gaps to be filled, as well as the rounded nose cap (part C3) also requiring some trimming to get a good fit.
Basically this entailed trimming the angles of the hull side walls and front panel of the lower hull and adding small troughs inside the upper hull (again see the images for full explanation).
I had to make these same alterations on both kit hulls to get the front to fit properly which is something you shouldn’t need to do one would think?
To fit the front hull fillet (part C3) properly I had to trim the inside mating surfaces of the fillet which are rounded for some reason and after trimming them flat the fit was better but note that unless you get the front join of the upper and lower hull to join flush this fillet will not fit properly so you can’t skip the alterations needed unfortunately.
Update 21 December 2007:
There have been reports that some have been able to assembly the upper and lower hull parts from this kit with a "perfect" fit, so I went and bought a third kit, yes must be one of Dragons best customers.
I realised the mistake I made when assembling the first two kits was in following the instructions and gluing the rear hull plate (part R5) in place before fitting the upper hull and so tried this third kit by fitting the upper and lower hulls together before adding the rear hull plate.
At the front the join WILL NOT mate together no matter how much pressure you apply leaving gaps at the sides and fitting the nose cap (part C3) leaves large gaps.
Back at the rear by fitting the upper and lower hulls together without the rear plate (part R5) in place the sponsons mate perfectly, but there is still the large sponson gap at the front as before.
So now the upper rear plate (part R29) which does BTW have the correct number of bolts (22) for the STZ is fitted and this clips into place at the top of the fenders with just the side gaps to be filled which can be done with a generous application of liquid cement.
On fitting the lower hull plate (part R5) to the lower hull we find there is a large mismatch with the upper hull plate (part R29) which is the same as with the first two kits I assembled and some serious surgery is needed to get these parts to mate properly as outlined above.
Once the upper join is rectified there is still large sponson gaps underneath as noted above and these will need additional attention.
And so after now assembling three kits using different approaches the end result is the same, serious fit issues with the upper and lower hull parts and lets not forget the other detail issues noted elsewhere in this review if you want an accurate Mod.1942 STZ T-34. See additional images.
Given these reports of "perfect" fitting kits, including in some reviews I can only conclude these people have different kit parts from those in my three kits or we have some serious wool pulling going on here, I leave it to those who have tried assembling this kit to reach their own conclusions on that?
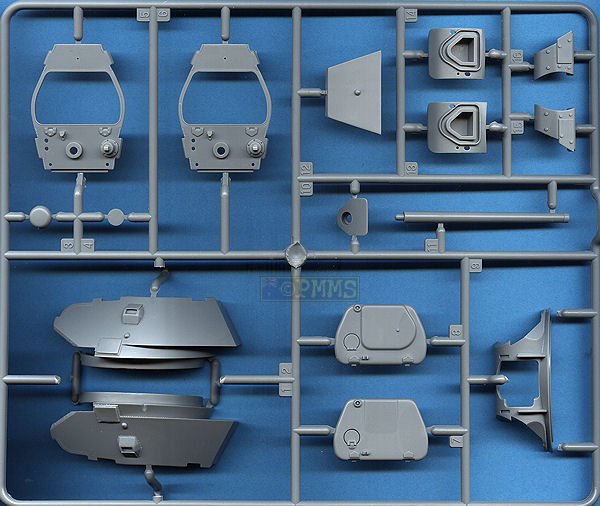
The Turret:
There is a new style STZ welded turret provided as well as the original 1940 turret shell which is consigned to the spares box and the new turret has mostly the correct features for the 1941/42 STZ turret while using the extensive main gun breech assembly from the previous kits.
Surface detail on the turret sides, separate front panel and roof is nicely done with quite good definition on some but other details are quite plain by comparison with the fit of the parts being very good overall and any just a few minor gaps which can easily be filled with liquid cement as you go. You may want to enhance the welds around the turret roof after fitting for a thicker appearance.
The gun shield and housing is made up of four parts which fit together well and have good bolt head details and you get the choice of three F32 76.2mm main guns, the original plastic gun in two halves, the single piece plastic barrel and the aluminium barrel which is drilled out slightly but has no rifling included, obviously the metal barrel would be the preferred choice here.
The detail on the gun housing is not as good as on the previous STZ kit as there are no welds around the mantlet join and you should also note the top join of the gun mounting is actually a weld seam on the real thing so enhancing this a bit will improve the look.
You can build the original 1941 STZ turret if you wish but make sure you use the correct one (part R12) and you also get the choice of two new turret hatches but only one is actually shown in the instructions (part R10) which again is the appropriate type for the early STZ turrets.
There are two new hatches provided, one with riveted hinges and one with welded hinges although there are no actual welds included on the welded hatch and you may want to add these for enhanced appearance.
The hatches are moulded commendably thin with the contours well done (apart from one issue) without any hint of pin marks and include additional etched parts for the interior details but to use these you have to trim off the moulded on detail and care will be needed with this.
On the hatch (part S7) the central raised section is way undersized and should in fact extend the full length of the hatch similar to hatch #R6 on the STZ 1941 kit but bevelling down to nothing just before the front of the hatch. The kit hatch only has the contour for half the length of the hatch and there is also no indentation on the inside so a fair amount of work is needed to depict this hatch correctly and using the other one supplied would be the easiest option.
As mentioned there is the full gun breech and mountings which gives you all the basic structures for a nicely detailed gun and there are additional etched parts for the inner visor mountings and the large top hatch will allow most of the detail to be easily seen.
Instructions:
These are the usual exploded view drawings thankfully and not those horrible photo sequence instructions and the usual careful study before gluing should avoid any problems.
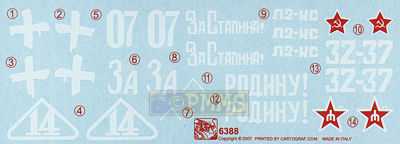
Decals:
The decal sheet just markings for four STZ Mod.1942 and three four STZ Mod.1941 vehicles with as selection of turret numbers and slogans as well as unit crests for a good selection of markings.
|
Conclusion:
I have to say this kit is a disappointment as the STZ Model 1942 has as mentioned some distinct features and while some are included others are missed with the level of detail on some parts a little plain.
The dimensional discrepancies may be overlooked by some as they are not that noticeable on the assembled model but the resulting fit issues will have you reaching for your bag of old fashioned modelling skills and for a current generation kit probably unacceptably so, that’s up to the individual I suppose?
But given the detail and fit issues this is not the STZ Model 1942 kit many would have hoped for but if you are prepared to put in some work a respectable kit can be built from the kit contents.
Recommended with reservation 7/10
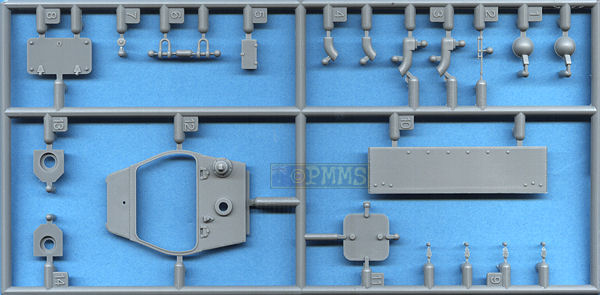
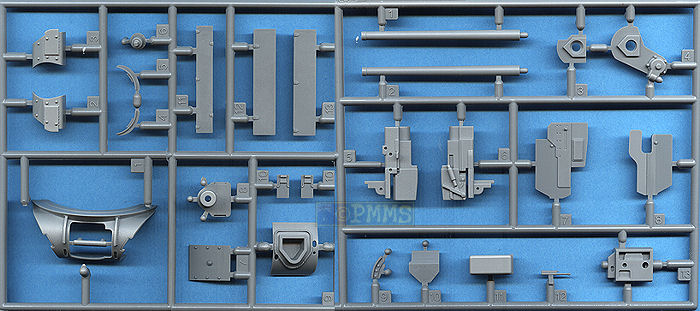
The Sprues:
Click on thumbnails for larger view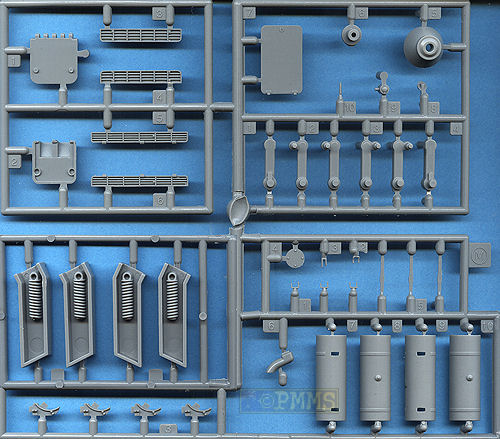
Detail Images
Click Browsers BACK button to return to page
| T-34 Mythical
Weapon by Robert Michulec Published by AirConnection  |
T-34 - Stalin's War Horse Model Fan Encyclopaedia #5 ISBN: 83-914521-4-X  |
T-34 In Combat Model Fan Encyclopaedia #6 ISBN: 83-914521-5-8  |
| T-34 Tank Power Vol.XXXV Wydawnictwo Militaria No.259 ISBN: 83-7219-259-6  |
T-34 vol.II Tank Power Vol.XL Wydawnictwo Militaria No.265 ISBN: 978837219265  |
T-34 vol.III Tank Power Vol.XLIII Wydawnictwo Militaria No.268 ISBN: 9788372192684  |
| T-34 vol.IV Tank Power Vol.XLIV Wydawnictwo Militaria No.269 ISBN: 9788372192691  |
Thanks to my credit card and the excellent service from![]() for
the review kit.
for
the review kit.