

| The Set: |
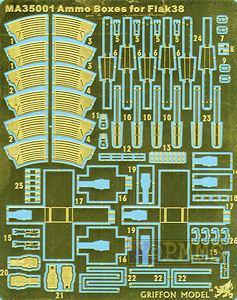
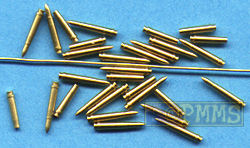
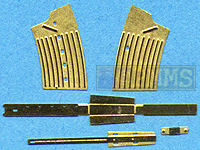
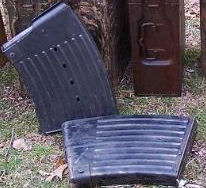
 Griffon Models joins ABER, Lion Roar and Voyager Models in releasing a set of etched 20 round Flak38 magazines and magazine boxes as well as 20 brass 20mm rounds and 10 brass cartidge cases with the set including six magazines of three different types, varying in detail only by the number of inspection holes in the magazine sides and edges.
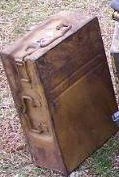
There is also two large magazine boxes which like the other sets has workable hinges as well as a bonus there is four brass magazine brackets for the sides of the 20mm Flak38 gun receiver which means you can add the brass magazine to any gun without worrying if they will fit the plastic bracket. A small length of wire is also included to make the box hinges.
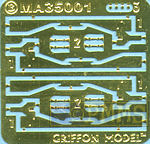
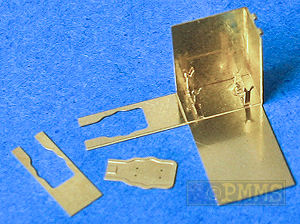
The set has two etched frets with the magazine and ammo box parts plus the brass rounds in separate small bags with the standard of etching being very good with nice surface relief on the magazine sides and ammo boxes with good etched relief on the parts and the usual engraved bending lines where required.
 |
  |
Magazines:
There are three different style of magazines included in the set, two with
the five small inspection
holes on one side on the magazine and one with a single inspection
hole as well as alternate spines with and without inspection holes so check the instructions to match
the appropriate sides and spine parts as it is easy to mix these up but I doubt anyone would notice in any case if mixed up.
Each magazine is made up of five parts each with well defined
details on the separate side sections that include the raised ribs and
inspection holes with the assembly basicallt the same as with the other sets.
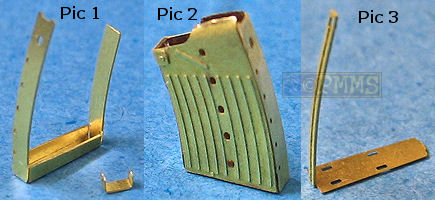
The base and spines (part 6 & 24) have small side sections that
need to be bent upward and it is very important to bend these as tight
as possible to the width of the two spine sections to minimise any gaps
after bending (Pic 1).
The two spine sections form the ends of the magazine and require
subtle curves added to correspond to the curvature of the magazine sides
and you will need to use the magazine sides (parts 1/3, 2/4 depending on the style being assembled) as guides
as no other indication is given (Pic 1).
The two magazine sides (parts 1/3, 2/4) require a small curves added inwards
at the top edge and these were added by laying the part across a small
drill bit and curved around with a small rod to give a smooth bend (Pic
2).
When attaching the two embossed side faces it is very important they
are glued (or soldered) perfectly square with the base to make sure the
two sides line up correctly (Pic 2).
This will have a marked effect on the final appearance if the two sides
are not lined up correctly at this point.
The two spine sections are then attached and it is probably best to solder
these to fill in any small gaps that are present but using thick cyanoacrylate
can be sanded after curing (Pic 2).
Finally the base and larger spine rib is added and again it is important
this is lined up perfectly square on the base to ensure the rib sits evenly
along the magazine spine (Pic 3).
The small “U” section at the top shorter magazine side is
bent around to secure the join to the sides (Pic 2).
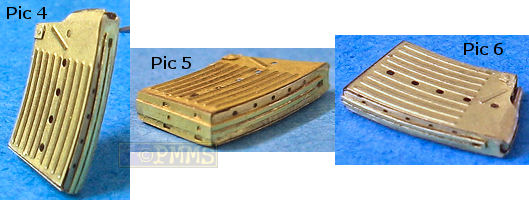
As mentioned soldering would be the preferred assembly method allowing
any gaps to be filled and filed smooth easily and giving stronger joins
(Pic 4-6).
The assembled magazines certainly look excellent with very well defined
details but will require careful positioning and bending of the parts during
assembly for best results and you can then add as many 20mm rounds as you
wish but just gluing two at the top with thick cyanoacrylate is sufficient
for the right visual effect.
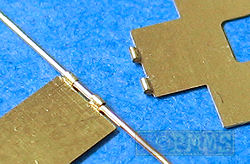
Magazine Assembly
Note small gaps that can be eliminated with careful bending and filed smooth after soldering.
Assembled Magazine
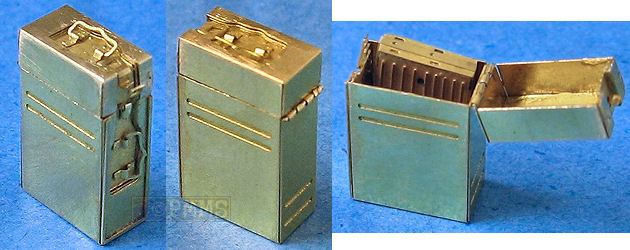
Ammo Boxes:
These boxes are the larger square type and are more complicated than those in the other sets with each box made up of 24 parts each with the two main parts being the ammo box and the box lip both of which are bent to form the box shape with additional fine parts for the carry handles, latches and hinges.
On the insides of the boxes are two small brackets use to sit the magazines on and these need to be added before bending the boxes to shape but if you don't intend to show the boxes open these could easily be left out.
The are small indentations on the insides of the larger sides for the smaller sides to sit into forming a very tight join resulting in virtually no gaps if you are careful with the bending and using solder to seal the joins will allow easy filing if any is needed. The examples for this review have been assembled using cyanoacrylate for speed and this can also be used to fill any small gaps and sanded after curing depending on your preference.
Two small extensions on the box and lid are bent to form the hinges with the 0.5mm wire provided used as the hinge pin. By bending the hinges around the wire will allow you to form the right diameter curve without any problems also ensuring each segment to be bent the same making the hinges work perfectly. Always insert the wire through the hinges if you have to re-adjust there alignment or position to ensure they stay round and lined up with each other.
The indentations in the lid and box end for the carry handles and latches are made up of two parts each that fit inside the main parts and these require care to ensue they are lined up correctly with the main lid and box and also that they are firmly pressed together eliminating any gaps between the parts.
The small grab handles on the lid and box side are provided with the handles and the small attachments as separate parts and you form these over the handles. I found it easier to form the attachment brackets to shape by bending over thin wire before adding to the boxes as this didn't apply any pressure to the boxes. This allows the handles to move easily after assembly to vary their position for a bit of animation but this will take a bit a care due to the small size of the parts.
The latch on the lip has two small parts with the separate clip fitting over the curved attachment on the box if showing the lid closed or left loose if the lid is open.
The assembled boxes are again excellent with good fit of the joins and well defined detail with the working hinges making showing the boxes open or closed a breeze but again the end result depends on the workmanship during the process as any small ms-alignment will magnify as you move on, especially in the alignment of the box and lid once the hinge is joined.
The full 20mm rounds and shell cases are nicely formed with the shell cases hollowed out for a good look. The 20mm rounds have nice details including the small ridge around the base which is missing from some other rounds and are the right size and look especially good when used in the magazines.
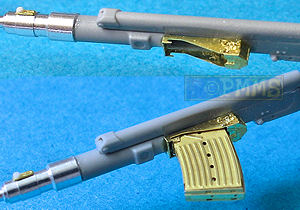
Included in the set are four magazine attachment brackets for the sides of the 2cm Flak38 receiver and this is easily bend to shape with three small fittings added. To fit to any Flak gun you simply cut off the plastic receiver bracket and add the brass replacement which is easy enough to do.
The etched bracket is the exact size for the brass magazines in this set as you would expect allowing you to use them with any available Flak38 gun.
| Instructions: |
| Conclusion: |
The ammo boxes again are superb when assembled but the assembly is more complicated than other sets with the end result making for very well detailed ammo boxes.
Highly recommended 8/10
See a quick comparison of the 2cm magazines and ammon boxes from ABER, Griffon Model, Lion Roar and Voyager Model here.

If you are the copyright owner of these images please contact me and I will add due credit, thanks
| References: |
 |
s.F.H.18 |
 |
German Heavy Field Artillery
|
 |
Hummel Sd.Kfz.165 |
 |
Ground Power No.70 |
Thanks to ![]() for the review set
for the review set