The Update Set:
The set consists of 11 large etched frets (145mm x 85mm) and
2 smaller frets (110mm x 65mm) and these are in different thicknesses with
thicker metal for the body panels and other larger details and thinner sheets
for things like the storage boxes and smaller details and this variation
in thickness gives good definition to the parts when assembled.
Also included are;
- 39 parts in light cream resin,
- A turned M2.50cal barrel and machined brass cooling jacket
- 20 x .50cal full rounds and
- 20 x .50cal shell cases
- A short length of fine chain
- A preformed oil pan for the engine
- Driver’s instrument decal
- Clear sheet for the windscreen
- 6 varied lengths of thin wire and plastic rod
- A length of braided copper wire for the engine wiring
- A large 14 page instruction sheet to help put it all together
The standard of etching is again excellent with good relief where needed
and clean crisp etching on parts with finer details plus many very small
parts that will require care and soldering would be the best method of
assembly for the larger components.
The resin parts are cleanly cast with just very small casting blocks
to be removed but there were a couple of small air holes present with the
overall detail being very crisp and well defined especially on the engine
parts.
Obviously with the set of this size and complexity some experience working
with etched parts would seem essential as would having a good etched bending
tool and soldering facilities handy.
Of the 13 etched frets, 1 is for barbed wire leaving 12 frets for the
model details and of these 3 are devoted entirely to the body panels and
another 2 have some body structure parts which leaves about 70% of the
set parts for the smaller details and these can just as easily be used
to detail up the Dragon kit like a “normal” detail set if you
don’t want to use the metal body panels.
But using the resin and etched parts on the existing kit body parts will
require a fair bit of surgery to remove things like the moulded on rear
compartment seats and other details so there is a lot of work required
whichever rout you choose.
Front body and Cab:
Assembly starts here and the floor section has a number of bends in different
directions requiring care as its easy to get ‘trapped’ when
bending these and the fitting of the firewall is a rather tricky as there
are no actual locating points and it just “sits” on the front
of the floor pan till soldered in place and will test your patience and
skills early on.
Added to the floor are separate tread plate sections plus the Driver’s
foot pedals and some of the gear levers plus the front radiator louver
operating lever, there is also a new resin gear shift to replace the larger
of the kit levers but this unfortunately misses the ‘extra’ bend
on this just as the kit lever does.
The two crew seats have 3 part etched bases with resin cushions that have
excellent detail and you use the modified kit backrests to finish the seats.
The cab side panels have inner bolted trips added and these must be fitted
correctly as they form the only means of lining up the sides with the floor
and bulkhead and its important to get these all lined up correctly as any
small miss-alignment here will be magnified as you progress with the assembly.
The outer body panels have the panel lines engraved and the many attachment
screws etched in place including the screw head slot but as is the want
of etched parts these are also flat and lack the domed shape of the actual
screws as opposed to the kit screws which have the dome shape but not the
screw slot.
The windscreen frame is next and again some nifty bending is required
which is complicated due to the bevelled side sections which overlap the
edges when you put the part into your bending tool and care is needed.
Added to this is the clear windscreen sheet trapped between two etched
screen frames and again you have to take care not to mar the clear sheet
when using the cyanoacrylate as soldering here will just melt the sheet.
There are also separate windscreen wipers and on the inside some small
wing nut fittings to finish off.
Fitting the screen to the assembled cab sides will see you having to make
sure everything is lined up correctly as the only attachment guides is
the fit of the previous side panel/firewall join which again highlights
the need to get this right at the start, sorry if that sounds repetitive
but this is important.
The outer armoured windscreen shield is a separate part with workable
hinges and the armoured vision port covers also slide within their attachment
brackets allowing these to be positioned open or closed as required and
the three support posts when the shield is open are from thin plastic rod
and small etched brackets.
On the inside is added the instrument panel which has the outer panel
in etched with excellent relief details and the dials are on the supplied
decal that fits behind the etched panel and attached to the kit panel after
shaving off the raised detail.
Instrument panel

The front radiator panel is made up of numerous parts with each louver
as a separate part allowing these to be positioned at any angle but again
some careful bending is required and the fitting of this to the body sides
will depend on how straight these were assembled earlier.
Also at the front are new etched bumper mountings and the bumpers for
both the front roller and the winch style bumper with just the front curved
section of the winch bumper (parts C18, C17) and the roller from the kit
used with all other parts in etched metal. For the roller side mountings
you have to make the small springs from the thin wire provided and this
is easily done by winding the wire around a drill bit shaft to get the
required length spring.
The engine hood panels are next and these have the central T panel with
the four hood doors separate with small three part hinges that can be made
workable so the hood folds up like the real thing. Care will be needed
making the hinges as they are very small and you have to ensure all three
on each join are attached evenly and tightly so there are no spaces between
the hood panels.
If your elected to use these doors on the Dragon kit after cutting out
the plastic hood doors the etched doors are the exact same size and the
kit doors and fit the plastic T section perfectly but you will have to
add thin plastic sills inside the door cut-outs for the doors to sit properly
once attached.
The hood T securing clips are made up of three very small etched parts
attached to thin plastic rod and while fiddly look quite convincing and
again could be used on the Dragon kit itself.
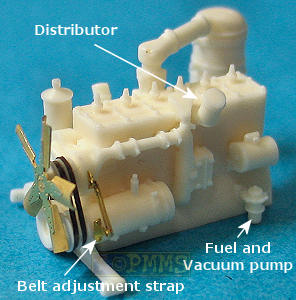
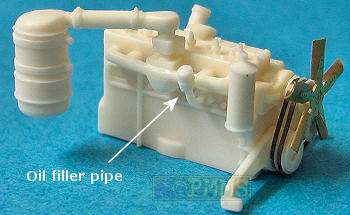
If you show the engine bay doors open there is a new resin engine to replace
the plastic kit item and this is superbly cast with excellent detail definition
as well as being more complete with accessories such as the Distributor,
Fuel and Vacuum Pump and Oil Filler Pipe included which are all missing
from the Dragon engine.
The only thing to be added is the spark plug and other wiring and the
braided copper wire supplied is use for this by using the individual wire
strands for the wiring.
The front radiator fans are in two flat etched parts you sandwich together
but you have the add the curve in the blades and slightly twist these for
a better look while the two fan belts are also in etched strips and these
should be annealed by running through a candle flame so they can be better
curved around the belt pulleys.
Assembled Engine
To add this to the kit lower engine sump pan you have to cut off the thin
locating ridge for the kit engine and just glue the resin engine in place
with the lower cross member support a perfect fit into the same chassis
locating ridges used by the kit part A36 so fitting is very easy.
Added further back are the side crew doors and these again have the screws
depicted with the screw slot but flat profile and have the upper folding ‘window’ as
a separate part with the main door hinges and top window hinges that again
can be made workable so you can position the doors open or closed as you
wish.
Additional detail for the doors include the door handles, inner latch
made up of 5 parts, a number of small added bolt heads, separate map case
that is used on the early M2 and for the top window is the sliding armoured
cover for the vision port which actually slides inside the two mounting
plates again allowing this to be positioned open or closed as you wish.
Other parts for the cab assembly are the three part side steps and a few
reinforcing bolted strips more for the detail than actually securing the
parts together while on the right side is the larger ‘box’ under
the door made up of 6 etched parts and you add the kit fenders which have
to be cut from the kit body pan which is easy enough as well as the axe,
shovel and pick brackets and tie downs provided to add to the kit tools.
Added to the fenders are the etched head light bush guards for either
the M2 and M2A1 style and resin rolled tarps stowed here with these being
nicely textured including etched tie downs and securing straps for a good
appearance.
While here I will mention that there are 120 very small tie down cleats
provided to add around the bodywork as required and these have embossed
detail including the rounded attachment points instead of just being plain
flat metal. You are also provided with a metal ‘jig’ to bend
these to the required shape before fitting to the model and give a very
good appearance. There are also 180 small bolt heads to also use as required
about the model to add additional detail.
Rear Body:
There are different body panels for both the M2 and M2A1 so take care to
use the right ones depending on the version you are building as well
as two completely different setups for the weapons rings of the M2 with
the full skate ring and the M2A1 with the forward pedestal mounting and
the instructions are divided into separate sections for each.
These are thankfully nearly all flat panels not requiring much bending
apart from the lower floor section which is made up of five large parts
that have some easy and complex bends required and you will have to carefully
plan the bending order to avoid getting trapped with nowhere to go on a
couple of these and again fitting the segments together will need care
to ensure everything is lined up correctly before adding the upper compartment
walls. The locker doors in the floor are all separate parts with nice tread
plate pattern and more of those workable hinges allowing them to be opened
as well as other tread plate panels for the floor.
The large side walls again have the slotted screws with a flat profile
and with additional internal frame bracing sections to add detail and also
to form the outer frames for the two side storage lockers. The outer edges
of these inner frames have to bend at right angles to act as the locating
lips when fitting to the bottom body pan but the instructions don’t
actually say to do this and it was only when working out how to fit the
side walls in place did this become known, so take note.
The doors for the storage lockers have workable hinges and top latches
with fine chain for the pin while the inside lockers are etched boxes with
the different size boxes for the M2 or M2A1 provided as well as the radio
box that uses the kit radio and at the back the fuel tanks are also made
up of 6 etched parts that will require careful bending for the tank curve
and using the kit tanks as a guide would be helpful.
Additional detail is the long rod grab rails along the front of the bench
seats as well as the seat cushions in resin with very nice cushion texture
included plus on the outside about 30 of the small tie down cleats to be
added.
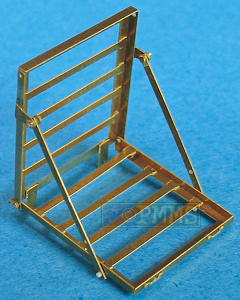
The most notable inclusion at the back is the large storage racks used
on the M2A2 which are missing from the Dragon kit and these are quite complex
assemblies with the upper and lower frame separate as are the 4 slats inside
each frame and the two frames can be assembled so they fold up adding a
bit of choice for the final configuration.
Assembled Rear stowage rack
The support arms when the racks are lowered have small rod pins that allow
the arms to be slipped on and off depending if the final position and you
are provided with resin bedrolls with excellent definition as well as etched
securing straps and more of the fine tie down cleats to attach these too.
Weapons Rings:
The M2 ring uses the
Dragon kit skate ring (part K24) as the basis and
you have to trim off the outer frame leaving just the upright skate ring
to which is added a new etched outer frame and 20 small fillets and mounting
brackets, these are finer than the kit parts but requires a fair bit
of work.
For the M2A1 there is an additional lip around the top of the body panels
that requires careful bending and the pedestal mount uses the inner ring
only from kit part C17 with the other parts in etched metal and getting
the subtle curves of the pedestal walls can best be done using the kit
part as a guide.
Additional items for the body sides is the jerry can rack in front of
the doors which has the body mount and the actual jerry can mount rack
with etched retaining strap which requires you to use the kit jerry cans
after trimming off the plastic strap.
Along the rear sides are the mine racks from three etched parts and resin
mines to fill the racks or you can stow other equipment as required based
on photos of the vehicle you are building.
Added at the back are the two steps and taillight “boxes” made
up of 5 etched parts each with additional etched bolt heads with the kit
tail lights being used along with etched tie downs for the kit machine
gun ground tripods stowed on the rear hull and steps.
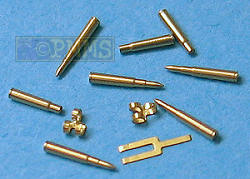
M2 .50cal Machine Gun:
The M2 .50cal Machine Gun included in the
Dragon kit gets
an extensive update which consists of a turned brass barrel and machine brass
cooling jacket that is extremely well done along with brass .50cal rounds
and empty shell cases and additional etched parts for the cradle and ammo
boxes.
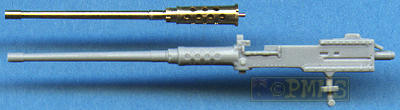
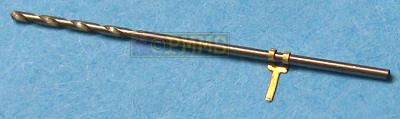
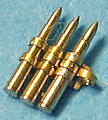
Barrel parts
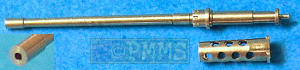
The main parts are the turned brass barrel that has a drilled out muzzle
and captures the subtle taper of the barrel with the cooling jacket as
a single machined brass part with the cooling holes as well as the indented
ridges either side of the jacket.
The cooling holes are cleaning drilled but there was one that needed some
fine excess brass removed but this virtually ran away in fear when I moved
the X-Acto blade over it while the cooling jacket fits
very snugly over the barrel ready for fitting to the receiver.
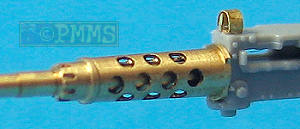
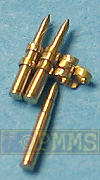
Assembled brass barrel showing improvment over plastic barrel
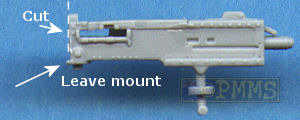
To fit the brass barrel you have to cut the plastic barrel from the Dragon gun,
which I might add is a very good gun to start with except for the cooling
jacket which lacks detail as do most plastic .50cals except for the recent
example from Tacsa.
When cutting off the plastic barrel, take care as the lower round cradle
fitting must remain intact and this will require some careful trimming
to avoid damaging this detail. Once removed you just drill a small hole
for the brass barrel pin and fit in place, all very easy.
Modifying the Dragon kit .50cal MG
Additional etched details include the top foresight and the rear ranging
sight which will require the plastic detail to be removed first which is
easy enough. The rear firing handles have new etched brackets that again
require the kit parts modified but I didn’t think the effort here
gave much advantage over the kit handles so it’s up to you to use
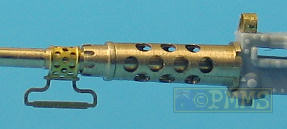
this or not? The barrel changing handle is also included as a fine etched
part that you bend around the barrel but the handle is a little 2 dimensional
as is the want with etched parts but you can build this up with applications
of white glue for a better 3D look.
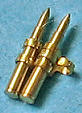
Assembled gun with metal barrel

Two views of the brass cooling jackets with and without the barrel
changing handle and etched foresight
The entire gun cradle and ammo box is replaced with etched parts that
require no alterations to the kit parts but some careful assembly will
be needed but nothing difficult for anyone with experience working with
etched parts.
Also included are a dozen brass .50 cal rounds and empty shell casings
which were released recently as a separate set #LAM047 plus fine etched ‘clips’ to
make the full ammo belts using the brass rounds.
View showing the brass rounds and etched belt clips
Assembly of the clips in basically the same as with the Mission
Models .50cal ammo
set of a few years ago where you have small etched Y shaped
clips that you bend around the .50cal rounds and these fit together with
the rounds holding the clips together.
It is easiest to bend the clips around an appropriately sized drill bit
as this holds them firmly pressed against your work bench while bending
the clip fingers but make sure you bend these at right angles or they won’t
fit together properly later.
Bending the clips around a drill bit for easy of handling
After bending a few clips these are fitted together and the .50cal round
slipped through joining the clips in the process and you just continue
this to form the full ammo belt which really does look very good after
assembly and is massive improvement over the flat 2D .30cal ammo belts
also included with the set.
Assembly of the ammo clip belts
The .30 cal kit machine guns also get etched cradles and ammo boxes that
replace the kit parts but nothing is provided for the barrel cooling jackets
but using any of the available barrels will improve these also.
There are a few additional resin packs with etched straps to use as required
to finish as well as the large fret of barbed wire which can be rolled
up and added as storage as this is often seen stowed on the front radiator
cover.
Instructions:
The 14 page instruction sheet has exploded view drawings showing the assemble
steps but due to the complexity of some assembles care is needed and careful
study of the instruction essential.
When bending some of the more complex pieces getting the bend order right
will reduce frustration but this is not always easy and using a good etched
bending tool will certainly help and again I used the original Etch
Mate for bending the parts during this review.
Conclusion:
This is a massive update set and one thing is for sure, it is not for the
inexperienced modeller and an engineering degree wouldn’t go astray
if you use the full set of body panels to basically rebuild the
Dragon
kit.
As mentioned above about 30% of the parts are used for the body panels
leaving the remainder to make up the many detail updates such as the detailed
engine, driver’s cab interior, front radiator louvered cover and
hinged engine compartment doors and most importantly the rear storage racks
with the excellent .50cal added for good measure.
And while the full body rebuild may be too daunting for many the set still
has plenty to offer with the numerous other details to use as an extensive
detail set for the Dragon kit proper.
Adding the many individual detail updates in the set will require no more
skills than would be needed for any other detail set of this type and it’s
only if you want to tackle the full body rebuild will you see the additional
skills needed come into play.
There is one detail conspicuous by its absence and that is the exhaust
pipe support bracket for the right bogie unit which is surprising and this
is left to you to make possibly from left over etched fret framing?
I found a lot of very useful items in this set even without the full body
panels but there will be some alterations required on the Dragon kit
parts to use these as a “normal” update sets but will add considerable
detail to the kit whichever way you decide to go and will certaining provide
a challenge if you go for the full body.
Highly recommended for more experienced modellers 8/10