

Introduction:
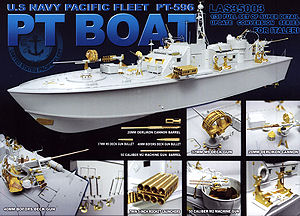
Lion Roar continue to releases their large “Super Detail Sets” for those who want to give the particular subject a real all in one going over and this set for the recent Italeri 1:35 scale Elco 80’ Torpedo Boat PT-596 (kit #5602) is no exception.
The Update Set:
The set comes in a large box 280mm x 210mm x 50mm with the following contents;
5 x frets of etched parts approx. 150mm x 80mm
2 x frets of etched parts approx. 110mm x 90mm in thicker metal
2 x frets of etched parts approx. 110mm x 70mm
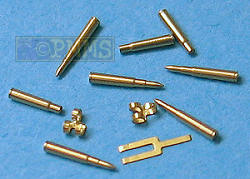
1 x brass 40mm Bofors barrel
1 x two part brass 20mm Oerlikon barrel
4 x two part brass Cal.50 perforated barrels (aircraft type)
16 x brass rocket tubes
25 x brass 30mm rounds
24 x brass 40mm rounds
3 x brass water screws
1 x sheet photo film dials/windows
3 x lengths plastic rod 1.0mm x 120mm
1 x length plastic rod 0.8mm x 120mm
2 x lengths of copper wire .05mm x 120mm
1 x length of copper wire .03mm x 120mm
1 x engraved metal name plate
1 x 7 page instruction sheet
The etched frets are in various thicknesses to better represent the details provided and the standard of etched being extremely high with clean crisp detail that include embossed relief and the usual engraved bending lines where required and engraved locating lines where multiple parts fit together to make the assembly job easier.
Added to this are the metal barrels also machined to a high standard, most notably the 20mm Oerlikon barrel in two parts and the aircraft type Cal.50 perforated barrels.
The majority of the set is for the Boats weapons fit with just a few parts for the Boat proper and these include various hatch hinges, latches and handles that require the moulded on detail to be removed before hand as do most of the update parts in the set.
The three screws are provided in formed brass that is much finer than the plastic items in the kit with the largest makeover being for the bridge control panel. Much of the moulded on detail from the kit panel (part 40C) has to be removed with the etched panels and details then added. The instrument panel dials are printed on photo film and additional wiring added from the thin wire provided with the only details preserved from the kit panel being the wheel and the throttle levers.
Close new window to return to review
As mentioned this is where the majority of update lies and Ill go though each weapons system to describe the updates, some of which are quite substantial.
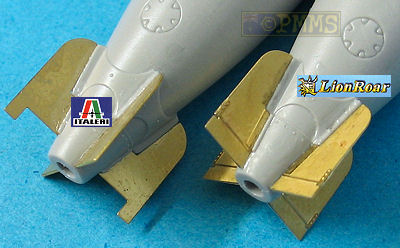
Torpedos:
These have the simplest updates with new etched fins that have better defined details than the etched kit fins with the new etched fins simply replacing the kit items for a very quick update.
The torpedo racks are also extensively detailed with the two upright racks completely replaced with etched parts along with the thin plastic rod provided and these may be the trickiest and intricate assemblies in the set other than the 37mm cannon magazine (see below).
There are a number of small sub assemblies that fit together for the final racks and providing you take your time and test fit there shouldn’t be any major problems and you can show these with or without the torpedos loaded.
The two eight-tube 5” Rocket Launchers mounted either side of the foredeck on later Boats are basically fully replaced with brass and etched parts with just the modified mounting posts (parts 31E, 32E, 33E) and base plate (parts 34E) remaining from the kit.
For the base plate you remove all the moulded on support details but keep the central round mounting with the supports replaced with the etched parts provided with no problems during assembly.
The Italeri kit mounting posts are assembled as per instructions with the outer detail removed and the large locating pin that fits into the kit launchers is also removed, these posts have a few large pin marks to be filled before proceeding.
The actual Rocket Launchers are made up of the etched parts and brass tube for the launcher tubes but there is a minor issue during assemble that needs a little attention. The two side panels (etched parts B18, B19) have engraved lines on the inside for precise locating of the two inner tube mounting plates (etched parts B6) but these engraved lines don’t go all the way across the inner panel (B18) due to the indented locating point for the kit mounting post and this means that parts B18 do not sit flush. To get around this I filed a small indent into the edges of parts B18 to correspond with the section on part B18 without the engraved lines, thus allowing the parts to mate flush.
The remainder of the assembly is straightforward but you should fit the rear cross panel (part B39) before the brass tubes as this will allow you to fit the tubes up against this ensuring they line up evenly as the front.
One thing to note is the assembled brass launchers are designed to be glued to the mounting posts meaning they can’t elevate like the kit launchers and so you have to choose the elevation required as you glue these in place. You should also use thick cyanoacrylate or 2 part epoxy to secure the launchers to the mounting posts as the assembled launchers with the 8 brass tubes are quite weighty and a good bond is needed for them to stay in place.The end result is superb looking launchers but as with the kit there are no actual rocket projectiles to add to the tubes.
Close new window to return to review
The two hydraulically powered twin Cal.50cal MG turrets fore and aft are again almost entirely replaced with etched parts and while this assembly requires a fair bit of work the end result is quite impressive.
The turrets are made up of 27 individual etched parts with some that will require careful bending especially the curved framework (etched part C4) and a few parts are layered together and it’s important these are lined up correctly while being glued together with thin cyanoacrylate.
The Cal.50 machine guns themselves get new brass barrels that consist of the outer perforated cooling jacket and as these are the aircraft type barrels are basically larger versions of the Cal.30 MG barrel that just about everyone in the brass business does a set for.
Assembly of the barrel is very straightforward with the kit barrel cut off and the wire provided used for the inner barrel inserted into a small drilled hole in the receiver and the cooling jacket added over the top. The muzzle is included with the cooling jacket so the end of the wire “barrel” is not visible after assembly.
Additional items for the guns are the top aft and foresights to add nice details to the guns, the barrel in particular adds considerably to the final appearance especially in the twin mounts and added to the mountings are finely etched feed chutes but the ammo belts are just flat 2 dimensional etched belts and lack any real definition.
It is a pity the individual .50 cal rounds and empty shell casings with etched belt clips from the M2/M2A1 Super Update Set (#LAM35002) are not included here as these would be far better than the flat etched .50 ammo belts provided. These rounds are available separately in set #LAM047 but not the belt clips if you wanted to go that extra step.
which would have finished off the kit Cal.50s nicely if included.
Note; these are not included in the PT Boat set.
This again gets a fairly substantial makeover with the standout being the two part brass barrel with the barrel having well defined cooling fins and the separate outer jacket with the large holes that fits over the top for an excellent representation of the 20mm Oerlikon barrel.
To add this to the kit gun you simply cut off the kit barrel and drill a small hole for the barrel pin and fit in place.
Added to this is the detailed ammo magazine drum which requires you to carefully remove all the moulded on detail from the kit drums and this does take a bit of work to preserve the main drum and there are some sink marks exposed that will also need filling.
You then add back the etched and wire details with additional short lengths of plastic rod for the drum ribs and again the end result has far more detail definition than the plastic kit drums.
There are some additional details added to the gun such as the top magazine clips and side details with the legs on the gun mounting also replaced with etched parts that simply replace the plastic kit legs.
Close new window to return to review
The Oldsmobile 37mm M9 Automatic Cannon gets another huge makeover with the entire magazine replaced with etched parts as well as the brass 37mm rounds added to this.
On the cannon itself there are some minor alterations required by cutting out the centre section to take the new etched magazine feed box but other than that it’s the entire new magazine.
This is made up of 13 etched parts plus the 24 37mm rounds and some careful bending is required for the perforated magazine chute (etched part A12) as this needs a couple of right angle bends at one end and then the curve to follow the contours of the end plates (etched parts D4, D15).
There is a small indent along the insides of the end plates that the perforated chute sits into and it’s best to solder these parts together due to the stresses during and after assembly that could see joins with cyanoacrylate just pop apart.
The main thing when soldering is to use small amounts of solder and have the soldering tip very hot. Using a “cold” tip is a recipe for disaster and of course you will need some form of jig or similar to hold the parts together while soldering as the parts get extremely hot very quickly during the soldering process.
To solder the main magazine I firstly bent the magazine chute to basically the right contours and then ‘spot soldered’ this first to one end plate and then the other ensuring the whole assembly was square.
After this spot soldering to get the basic joins I then ran small amounts of solder along the remaining joins in small sections at time remembering that the heat could ‘pop’ one of the spot solders if you hold the soldering tip on the part too long.
After soldering the main magazine any excess solder can be filed away and then the remaining parts can be added using cyanoacrylate as the main magazine structure will take stresses involved.
Firstly add the 37mm rounds to the magazine ensuring they are at right angles to the magazine along the perforated chute, you will notice that there are not enough rounds provided to fully fill the magazine leaving an empty space at one end, but then not all magazines are full while in action.
After adding the rounds the five securing strips (etched parts A16) can be added and then the two lengthways strips (etched parts B43, B44) which go under the securing strips making for easier fitting. You will have to trim these to the correct length after test fitting as they are slightly longer than required.
After assembly the magazine can be attached the lower feed box which in turn is added to the kit cannon as is the Italeri kit metal barrel with the gun mounting also replaced with an etched part for a better appearance. The small brackets on the base plate (part 7F) can be replaced if you want to add these but there is not a lot of difference between these and the kit parts so you could save yourself a bit of work leaving the base as is.The overall appearance of the etched magazine is worth the work needed to assembly successfully and will add greatly to the kit details.
Close new window to return to review
The main part here is the turned brass barrel and as the Italeri kit comes with an aluminium 40mm barrel you ask why the new one? Well the new barrel has better defined collar and flash suppressor neck detail as well the suppressor cone has thinner sides and is hollowed out deeper than the kit barrel which does add up to a better detailed barrel.
Most of the other gun details are for the smaller items that require you to cut off the moulded on detail before hand but take care when adding back the circular side mounting plates (etched parts E2) as these have be evenly placed on both sides or the gun or the gun will not sit evenly between the trunnions. When gluing the plates its best to temporally fit a drill bit through the gun and plates to ensure they line up correctly and you also get the brass 40mm rounds to add to the top feed chute for a good appearance.
Substantial updates are provided for the gun base and platform with the rear “floor” section having nice tread plate pattern that is missing from the kit part. Most other details on the platform simply replace the kit parts with some requiring the moulded on detail be removed first but nothing difficult.
At the back the ammo racks also get replaced with etched parts that again require you to cut off the moulded on racks and you can add the brass 40mm rounds to these as required. To form the 4 round clips there are small brass clips that help hold the brass rounds together.Overall the additional details add more definition to the assembled Bofors and platform than the kit parts provide.
Close new window to return to review
These are in the form of a seven page sheet with exploded view drawings of the various assembly sequences and I found them to be quite clear and easy to follow but of course careful study of the sequences before hand and test fitting will lessen and problems along the way.
Conclusion:
This is a massive update for the Italeri PT Boat and as mentioned concentrates mostly on the weapons with just some basic updates for the Boat itself and the resulting assemblies are very impressive but needing some careful assembly along the way.
To use the old cliché “for the experienced modeller only” is probably an understatement and some experience with soldering as well as working with complex etched assemblies will certainly be of benefit but there shouldn’t be anything out of reach of the less experienced if care and patience is used.
It would also be very handy if Lion Roar was to release some of the weapons sets such as the aircraft type Cal.50 MG, the 40mm Bofors and especially the 20mm Oerlikon separately as these could have useful applications for other kits.
Highly recommended 8.5/10
References:
 |
PT Boats in action ISBN: 0-89747-312-4 |
 |
WWII US War Department Technical Manual CD-ROM TM9-252 40mm Anti-aircraft Gun (Bofors) Easy 1 Productions #T006 |
 for his assistance in acquiring the review set.
Hobby Easy have the full range of Lion Roar update sets available.