

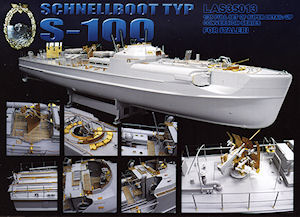


Lion Roar continue their “Super Series” multi-media update sets with this extensive set designed for the Tamiya kit of the German Flakpanzer IV Wirbewind (kit #35233).
The Flakpanzer IV "Wirbelwind" (Whirlwind in German) was developed in 1944 as a successor to the earlier self-propelled anti-aircraft gun Möbelwagen and while primarily designed as a self-propelled anti-aircraft gun it was also very effective against unarmoured ground targets.
The Wirbelwind was mainly built using refurbished Panzer IV Ausf.F/G chassis with the standard gun turret removed and replaced with an open-top, nine-sided turret which housed the quadruple 2cm Flakvierling 38 L/112.5 A/A gun mount. The turret had to be opened topped due to the heavy smoke generated by the four 2cm guns although a closed top design would have been preferable.
The 2cm shells used proved less effective against aircraft than the larger 3.7cm shells and the Wirbelwind was eventually replaced by the Ostwind also with an opened topped turret housing a single 3.7cm FlaK 43 L/89 gun.
The full multi-media set has many very small and intricate parts as well as the larger parts that will need care removing from the frets and in filing the attachment bur as well as during assembly and this set is not for the inexperienced modeller. Some previous experience working with etched and resin parts as well as soldering and the use of a good quality etched bending tool would be of assistance in getting the best result from this extensive update set.
The set contents are;
|
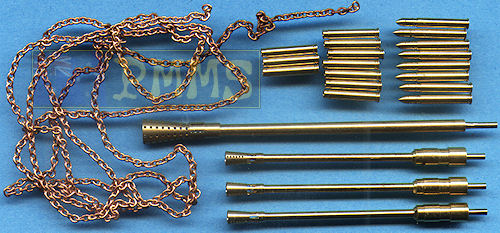
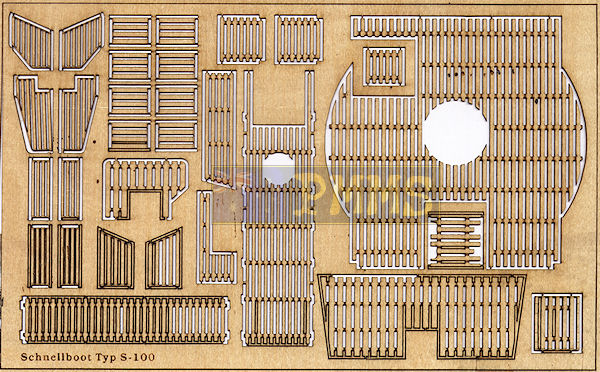
Metal, laser cut wood and etched parts
Click on thumbnail for larger view
Close new window to return to review
Quality of the etched parts is very high with clean crisp detail including some embossed detail and the usual engraved bend lines where required to aid in assembly. There are various thicknesses in the frets to add more definition to the parts such as quite thin parts for tool clips, fenders and other items while the frets for the turret parts are thicker brass that not only adds strength to the assemblies but gives a better scale appearance.
The gun receiver parts in light cream resin are also good quality with just the small casting blocks to be removed before assembly.
There is some surgery required on the Tamiya kit to take the new etched parts such as removing the moulded on fenders from the upper hull, cutting away some moulded on equipment mounting brackets and the removal of the plastic turret walls from the turret base which is the only part of the kit turret used with this conversion. There are also some smaller moulded on detail to be removed from the 2 cm Flakvierling and it’s best to modify the required parts before adding the etched update parts to avoid any damage later.
There is also some dimensional issues with the brass turret walls which is covered in more detail below but other than that things shape up fairly well.
All the tool clips and brackets are replaced with etched items requiring the moulded on brackets to be removed from the kit tools beforehand and the smaller tool clips can be shown open or closed if you wish.
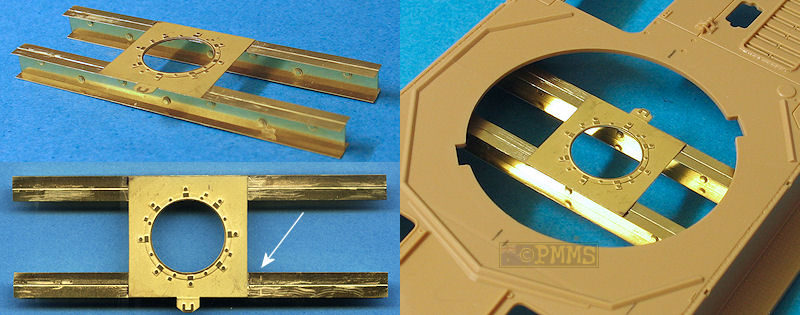
The only internal detail are the large mounting beams across the centre of the hull fighting compartment and these are made up of 4 large brass beams bent to form and joined to form the I beams with 28 separate bolts heads to attach plus the top mounting plate for the gun mounting.
There is a small issue here in that the mounting plate is located centrally on the beams but the Panzer IV turret ring is offset to the left and you will have to relocate the mounting plate (part E1) 2mm to the left of centre on the beams, not a big task. While the metal beams are more detailed than the kit parts you will be hard pressed to see this after the gun mounting is in place.
The beams have to be positioned 3.5mm below the hull top deck to allow clearance for the plastic turret ring when attached and to make this easier I added two strips of 3.5 card on the inside of the hull to ‘sit’ the beams on ensuring they are located correctly
the relocated central mounting plate.

Click thumbnail for larger views
The kit fenders are totally replaced with etched parts and are quite extensive sub-assemblies that as mentioned need the kit fenders cut away from the upper hull beforehand.
The main fenders have the frames separate which require careful bending using a good etched bending tool due to the narrow full length side frames which bend down the middle and unless you can grip these firmly while bending there can easily be problems.
Added to the top of the frames are the separate tread plate sections as per the original fenders and these have nice tread plate texture on both sides as well as underside fender supports and additional fillets between the fender and upper superstructure once this is fitted in place over the fenders.
The front fenders flaps are separate parts with small hinges that can be made workable if you wish with the large hinge “pin” made from the copper wire provided while at the back the fender extension/mud flaps have separate frames and fender top like the main fenders. The hinges can again be made workable with the use of the copper wire pin and the inner side of the fender is bent in a Z shape which needs a little care while bending.
The fender frames are attached to the Tamiya kit lower hull with the upper tread plate sections and side fillets not added until the upper hull is attached to ensure proper alignment as the tread plate fits over the top of the fillets attached to the hull sides.
At the back the join fillet between the upper and lower rear hull plates is in two sections with 15 additional small bolts heads added and again it’s best to add this after the upper and lower hulls have been joined together.
Other hull items include the exhaust mounting brackets which require the moulded on exhaust brackets be removed first and the spare road wheel box on the left fender made up from 9 etched parts and a length of copper wire supplied. There is also the two spare 2cm barrel boxes carried on the fenders and this too is made up of etched parts with small hinges that can be made workable if you wish along with etched latches plus the support bracket and straps for the wooden jack block.
On the hull top, three sections of the turret splash guard are replaced with etched parts to depict the correct hollow inverted V profile of the guard and you again have to cut away the moulded on plastic guard to add the etched parts.
There are a number of smaller details added around the gun mounting such as details on the sight arm, hand wheels and the large box at the front of the main pedestal mounting, and the lower mounting plates as well as the gunner’s seat details.
The gun sight is completely replaced with 10 very small etched parts and a short length of plastic rod which adds considerable detail definition to the sight with most details added to the two side gun mounting plates (parts F21, F22) and again you have to cut away some of the moulded on detail before adding the etched parts.
The lower elevation gear is quite detailed with 5 delicate etched parts that will need care in handling to avoid damage as well as about a dozen smaller brackets plus the curved front gun shields. These will need careful bending, the curve is quite shallow but due to the cut-outs for the gun barrels they tend to want to bend at the narrow parts next to the cut-outs that can result in an uneven curve if not careful.
The 2cm guns are again completely replaced with the resin receivers and brass gun barrels plus smaller details such as the magazine guide and the inner etched mounting plate to which you attach the gun and in turn attach the mounting plate to the main gun mounting plates (parts F21, F22).
But from there things get rather tricky as the instructions are of little use trying to work out how the guns and their mountings actually fit together. The instructions are vague to say the least and compound the problems by showing in the illustrations the Tamiya kit guns and not the resin ones included in the set.
The etched mounting plates are also shown around the wrong way in the illustrations and to make matters worse and the instructions also don't tell you the guns on the right side are mounted upside down with those on the left side mounted upright, that is with the gun top cover actually on the top while those on the right side have the gun top cover on the underside, if all that makes sense?
This is so the magazine feed chute faces out from the central pedestal on both sides and looking at reference picture of the Flakvierling 38 will show what I mean.
The barrels are basically 4 of those from the Lion Roar 20mm FlaK38 Barrel set #LB3515 and have the barrels the correct length with nicely hollowed out flash suppressor and while there is a hole already in the front of the resin receiver this will have to be drilled further to add the barrel as it is not deep enough for the barrel pin. (see the full barrel review for further details).
Also included are twelve 2cm 20 round magazines and six large magazine boxes which again are basically the same as those with the Lion Roar 20mm FlaK 30/38 Ammo Boxes & Ammo set #LAM040, assembling in the same manner, so check that review for full assembly details.
The magazines and ammo boxes have excellent details to add additional detail to the kit but there are no actual 20mm rounds included with this set as there are with set #LAM040 so they will have to be sourced from one of the available 20mm Flak38 ammo sets.
This is the largest section of the update set and requires the most work as well as being the most visible feature on the finished kit so getting this right will have a major impact on the whole project.
There is a dimentional issue to begin with in that the upper walls of the brass turret are too short by 1.5mm when compared to the 1:35 plans in both the Nuts & Bolts and Panzer Tracts books listed below.
The lower wall sections are the correct height which leaves the overall height of the brass turret 1.5mm short and there is little you can do about this other than replace the upper sections with brass plate of the correct height.
Before fitting the brass turret you firstly have to cut way the plastic turret walls from the lower turret half (kit part G21) leaving just the octagonal base, you also cut away the lower mounting beams from part G21 to be replaced with the etched beams mentioned above. Take care to leave the bolts around the turret ring as while cutting away the turret walls.

Click thumbnail for larger views
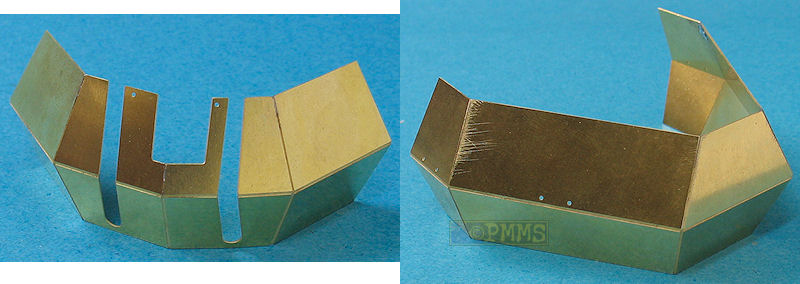
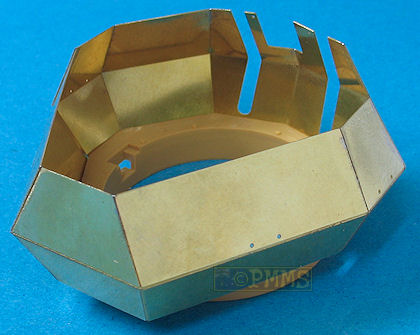
The brass turret walls are in two sections, the forward four panels and the rear five panels with these being bent two ways to form the vertical and horizontal bends using the kit base plate as a guide to get the angles right. The actual Wirbelwind turret walls are 16mm thick which equates to 0.45mm in 1:35 scale with the thicker brass parts being 0.50mm (give or take a fraction) for a good scale appearance.
One thing to note with the brass turret walls is that the accepted convention of bending "into" the engraved lines is not the case here with the turret walls having to be bend "away" from the engraved lines. Unfortunately the instructions don't tell you this so unless you are vigilant it is very easy to bend in the wrong direction resulting in the front sight opening being on the wrong side, so take note.
There is a good reason for this because there are separate etched weld beads added along the engraved lines after assembly but more on these later.
Bending the turret panels to mate with each other will take some care ensuring the lower angles are correctly aligned with the plastic base plate and it is best to solder the turret joins together as these are just butt joins and using cyanoacrylate here could see the joins come apart later.
Still to be joined together.
Click thumbnail for larger views
Of course you will do the soldering with the plastic base plate removed or it will get rather messed up from the heat, to say the least.
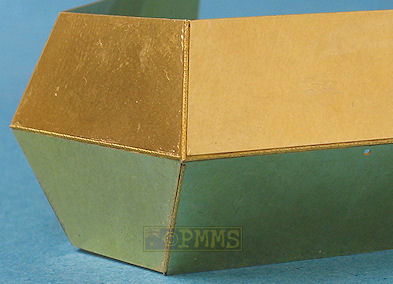
Added on the inside of the front section are the four reinforcing plates and these again are best soldered in place for added strength, the other advantage of soldering is you can clean up the join with light filing without compromising the strength of the join.
The upper central vision flap has small hinges that can be made workable with the copper wire provided allowing you to show this open or closed and there are also small upper clips to hold the flap in closed position.
You should add the inner reinforcing plates before joining the rear turret section to give more working room but you may want to leave the vision flap until after the full turret assembly to avoid damage.
The rear turret section is also bent to shape in the same manner as the front by bending the panels away from the engraved lines and again using the plastic base plate as guide to get the angles correct you can solder the joins for added strength. Again with the plastic turret base removed to a same distance.
Getting all the angles right and especially joining the front and rear sections together is a daunting task as there are no locating ridges or the like to ensure proper alignment and once the parts are soldered together there may be some further minor alignment required to get the angles all correct.
Once you do get the turret fully assembled there are separate textured etched metal weld beads to add along all the engraved lines at the joins and these fit in place quite easily and should look okay once painted? All the welds are seated into the engraved lines except for those where the front and rear turret halves join but this shouldn’t be that noticeable on the finished turret?
Click thumbnail for larger views
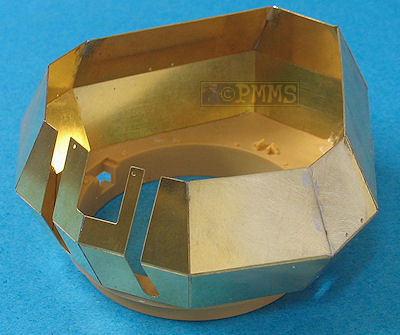
There are four grab handles made from the copper wire provided added to the rear turret sides and inside are two racks for 8 magazines each added to the rear walls and these are made up of small etched parts with separate etched mountings and if you use all the 20mm magazines provided in these racks the lack of 20mm shells probably won’t be an issue.
I made an error initially in that the turret does not fit directly over the plastic kit turret ring as shown in the images below buy should sit "above" the turret ring as depicted on the Tamiya kit turret before you cut away the plastic walls.
There may need to be some additional work to ge the turret sitting above the plastic ring as the base on my assembled turret was slightly larger than the plastic turret ring whihc led to the initial fitting error. I will update the photos when refitted correctly. sorry for any confusion.
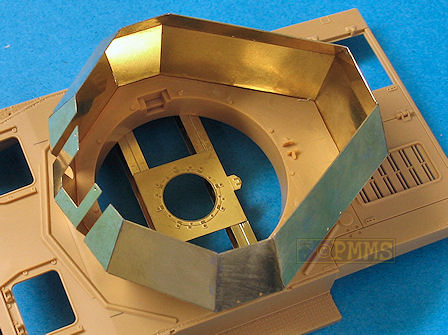
Click thumbnail for larger views
The 8 page instruction sheet has exploded view drawings showing the assemble steps but due to the complexity of some assembles care is needed and careful study of the instruction essential. There were some steps very difficult to understand such as the gun assembly and the turret bending sequences as mentioned above and you will have to have some reference pictures to work by here to work out where things actually go.
When bending some of the more complex pieces getting the bend order right will reduce frustration but this is not always easy and using a good etched bending tool will certainly help and I used the EASYbend for bending the parts for this review.
The instructions are lacking in some important information in certain areas and this can cause problems for the unwary.
This is another extensive update in the Super Detail series from Lion Roar with plenty of additional detail to add to the aging Tamiya kit, most notably the full etched fenders, the full replacement resin/brass 2cm guns and the full turret from brass plates for an impressive model at the end of proceedings but there is the dimensional issue with the upper turret walls as noted above which you may or may not want to address?
As mentioned the set is not for the inexperienced modeller but if you utilize the full set and also use care and patience as well as advanced analytical skills you will get an impressive result but the turret assembly will take some effort as mentioned.
The lack of clear instructions can lead to problems in a few areas for the unwary which can spoil the whole experience.
Highly recommended for experienced modellers only 7.5/10
 Flakpanzer IV Wirbelwind (Sd.Kfz.161/4) & Ostwind Flakpanzer IV Wirbelwind (Sd.Kfz.161/4) & OstwindNuts & Bolts Vol.13 |
 Flak
Selbstfahrlafetten and Flakpanzer Flak
Selbstfahrlafetten and FlakpanzerPanzer Tracts No.12 |
 German
20mm FlaK in WWII German
20mm FlaK in WWII1395-1945 By Werner Müller Schiffer Military History ISBN: 0-88740-758-7 Soft cover |
 2cm
FlaK38 2cm
FlaK38Muzzle Reference images |
Thanks to ![]() for
the
review barrel.
for
the
review barrel.