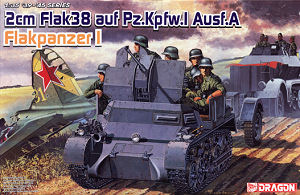
Flakpanzer I
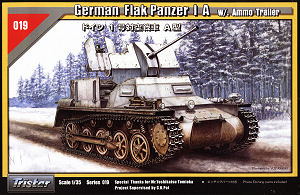
1:35 Dragon/Tristar Kit comparison
by Terry Ashley
As we know there were only 24 actual vehicles built and to have two state of the art kits available makes this comparison more interesting and we should note from the start that both kits are very good and will build into excellent models with the main differences being mainly in the finer detail and engineering of the kits.
As none of the 24 Flakpanzer Is survived the war reference is very thin on the ground with just a handful of known photographs to go on but the base Panzer IA vehicle and 2cm FlaK38 are both well documented and so we can compare these sections of the kits with some confidence.
For this comparison I have referred to the references listed below as well as available Flakpanzer I photos from various sources, this includes the 1:35 plans from the Achtung Panzer, Ground Power and Panzer Track books.
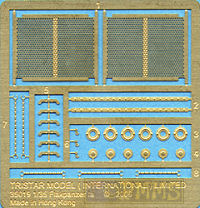
Kit Contents:
The Dragon kit has 343 parts in light grey plastic plus another 216 for the
individual link track with 16 clear plastic parts, three small etched frets,
three pre-formed brass parts plus the decal and instruction sheets.
The standard of moulding is excellent with virtually no pin marks to contend
with due to the now standard plastic “nodes” on the parts which
will require care when removing from the finer parts. The pre-formed brass
parts are for the upper superstructure panel and two parts shell basket with
the superstructure panel also including raised weld beads for a nice appearance.
The Tristar kit has 311 parts in light beige plastic with another 192 individual track links, six clear parts plus a small etched fret and the decal and instruction sheets. The standard of moulding is good overall but a few parts have some fine flash and some quite exaggerated mould seams that will need cleaning. This gives the impression on some parts such as the lower hull parts and inner floor section that the edges are not smooth but clean up okay without much trouble.
Dimensionally both kits match the available data well but there are a few areas that have minor discrepancies which I will mention along the way but most are around the 1mm difference so not a lot, except for the rear engine deck (more on that below).
 |
  |
 |
Lower Hull:
 The
lower hull is engineered differently with the Dragon kit having a conventional
tub with separate front and rear panels while the Tristar kit has the hull
floor and two side panels separate with additional front and rear hull panels.
This does require additional assembly with the Tristar kit and care is needed
to keep any join seams to a minimum but the extra detail on the hull parts
pays dividends with the interior.
The
lower hull is engineered differently with the Dragon kit having a conventional
tub with separate front and rear panels while the Tristar kit has the hull
floor and two side panels separate with additional front and rear hull panels.
This does require additional assembly with the Tristar kit and care is needed
to keep any join seams to a minimum but the extra detail on the hull parts
pays dividends with the interior.
There is no interior detail on Dragon hull tub while the Tristar parts have interior detail on the floor and both side panels which helps with the level of interior details included.
Dimensionally there is a small difference in the hull height with the Dragon hull being 19mm tall while the Tristar hull is 18mm and this matches the three available 1:35 plans perfectly, this additional 1mm is noticeable on the front and rear panels which are 1mm taller on the Dragon panels than on the Tristar panels.
On the Dragon front plate there are the 8 lower bolts and weld beads at the final drive join and under the front of the panel but the small fittings on the front of the final drive housings are not included.
The Tristar panel also has the 8 lower bolts and small fittings on the front of the final drive housings but there are no welds beads included.
Along the sides, both kits have the upper bolted fender flanges with suspension bogie and return roller mountings while the bolt arrangement around the drive sprocket mountings is different with the only info I have being a line drawing in the Achtung Panzer book showing the arrangement as on the Dragon kit.
The rear panel sees the central circular plate being 1mm in diameter undersized on the Tristar kit and correct on the Dragon kit while the bottom of the panel on the real Panzer I is curved to join the bottom plate. Both kits have this curved feature but the Dragon hull has the curve slightly too rounded when compared to photos while there is a panel join line between the lower hull and rear plate on the Tristar kit that will need filling for the smooth finish but the curved profile is included as it should be.
At the join of the rear plate and upper engine deck there is the join lip on the Tristar kit as with the basic Panzer I and other similar German vehicles such as the Panzer IV but the Dragon kit does not have this lip with the engine deck butting against the lower plate. I don’t have any actual photos of this area on the Flakpanzer I but making an educated assessment based on the basic Panzer I engine deck we can reasonable assume this lip would still be on the Flakpanzer join.
Other details added to both rear plates include the large trailer towing hitch
that includes nice spring detail with the Dragon kit being better detailed
in giving you the standard towing hitch with the trailer hitch added while
both are moulded together on the Tristar kit. The jack block and lower rack
are separate parts on both kits with the Tristar kit having etched block brackets
while the Dragon kit has the lower step in etched brass and both give you fine
etched pin securing chain for the tow hitch.
Both have separate tail and convoy lights as well as small T brackets on the
upper edges.
Overall the details on the Dragon hull are slightly better but the additional 1mm in height is there with the Dragon hull if you want true accuracy while the Tristar hull has interior detail which comes into play later when assembling the interior.
Suspension/Running Gear:
 The
bogie units and road wheels on both kits are all but identical as you might
expect as they are fairly simple affairs and if depicted correctly will be
the same, the only minor differences being the first Tristar road wheel ahs
two small grease nipple bumps which aren’t on the Dragon wheels and the
support bracket for the front wheel spring is a separate part on the Dragon kit and moulded with the hull side panel on the Tristar kit, not big deal.
The
bogie units and road wheels on both kits are all but identical as you might
expect as they are fairly simple affairs and if depicted correctly will be
the same, the only minor differences being the first Tristar road wheel ahs
two small grease nipple bumps which aren’t on the Dragon wheels and the
support bracket for the front wheel spring is a separate part on the Dragon kit and moulded with the hull side panel on the Tristar kit, not big deal.
The drive sprocket on the Dragon kit has bolt head detail on both sides while only on the outer side of the Tristar sprocket for a better look with the Dragon sprocket. The idler wheels are as single part on the Tristar kit while the Dragon has the wheels in three parts, the main wheel and the two out rims that when assembled give a nice indent around the rim. The only problem being the Dragon wheel is 1mm to big in diameter with the Tristar wheel being the correct diameter compared to all three sets of plans and so while the Dragon wheel is better detailed is too big if this is of concern.
The Dragon suspension is marginally better with the added detail on the drive sprocket but let down by the oversized idler wheels so they come out about even overall.Tracks:
 Both
kits have individual link track designed to be simply glued together to form
the track runs. The Panzer I links are quite petite and both capture this well
with the indentations on the sides of the guide horns added as a consequence
of moulding the open tooth hole.
Both
kits have individual link track designed to be simply glued together to form
the track runs. The Panzer I links are quite petite and both capture this well
with the indentations on the sides of the guide horns added as a consequence
of moulding the open tooth hole.
The actual link has a curved profile when viewed from the side and this is nicely depicted on the Tristar links but the Dragon links have only a very small curve which is less than it should be even on these small links.
Due to the sprue attachments on the Dragon links there is
no track pin detail on the outer ends of the links while these are included
on the Tristar links
and there is quite a bit of cleanup required on both kit links making things
a little tedious.
The Dragon links have very small pins that fit into slits in
the next link that help a little to hold things together but both will need the
glued to be and allowing to 'go off' a little before fitting around the sprockets
etc.
Overall the Tristar links are better defined being finer and having the correct curved profile and end pin detail on the link but being so small the flatter profile Dragon links may not be that noticeable on the finished kit.
Interior:
 As
mentioned the Dragon hull tub has no interior detail while the Tristar tub
has details included on the floor and side panels which gives the Tristar interior
a nice base to build from.
As
mentioned the Dragon hull tub has no interior detail while the Tristar tub
has details included on the floor and side panels which gives the Tristar interior
a nice base to build from.
The raised floor panels in the Dragon kit don’t have any tread plate and
the step between the left and right sides is not there making for a very plain
looking floor while the Tristar kit has nice tread plate pattern and the correct
step between the left and right floor panels.
Both the transmission and gearboxes are in multi-part assemblies but the Tristar parts are considerably more detailed with additional small parts on the transmission and gearbox which are moulded integrally with the Dragon transmission and the final drive covers have fine bolt head details on the Tristar parts but are quite plain on the Dragon parts.
The small plate for the driver’s foot pedals is the wrong shape on the Dragon part but correct on the Tristar plate with both having tread plate pattern included while the foot pedals are small separate parts for the Dragon kit but moulded with the plate on the Tristar kit.
Both include a two part driver’s seat and separate steering levers as well as the forward battery case which has a separate lip and battery detail on the Dragon kit and moulded with the lid closed on the Tristar kit.
On the rear bulkhead the Tristar kit has a separate central circular panel and better defined details and includes the prominent starter motor with tread plate cover which is missing altogether from the Dragon kit.
While we are here the driver’s instrument panel is attached on the underside lip of the glacis while it is situated part way up the superstructure panel on the Dragon kit. While I don’t have photos of the Flakpanzer I interior the instrument panel on the standard Panzer I is located under the glacis as depicted on the Tristar kit and fitting it part way up the superstructure would see the driver banging his head on the panel. Therefore and educated assessment would indicate the Tristar kit has it correct.
Overall the Tristar interior is considerable more detailed with the Dragon interior being quite plain and missing major features such as the floor step, tread plate as well as the rear mounted starter motor.
Upper Hull Front/Fenders:
 The
glacis plate is a separate part with additional separate 60cm access panel
on both kits but this is about 0.5mm to deep on the Tristar kit but most other
features are very similar as you would again expect. Note you also get the
older Panzer I kit glacis with access panel moulded in place with the Tristar kit but the instructions show to use the new one.
The
glacis plate is a separate part with additional separate 60cm access panel
on both kits but this is about 0.5mm to deep on the Tristar kit but most other
features are very similar as you would again expect. Note you also get the
older Panzer I kit glacis with access panel moulded in place with the Tristar kit but the instructions show to use the new one.
Both have the headlight with clear plastic lens as well as the NOTEK light and shovel, axe, fire extinguisher on the left fender and the multi-part jack with wire cutters and crowbar on the right fender. Both kit tools have moulded on tool clips and brackets but the Tristar kit has small etched clips fittings (not the full clips) to add finer detail. The Dragon kit does include alternate tools without moulded on tool clips to use with aftermarket etched clips as they are not included with the kit.
The horn is hollowed out on both kits using slide moulds and both have separate front mounted towing hooks as well as the correct short ventilator ducting pipe on both as the Flakpanzer I didn’t have the long pipe of the standard Panzer I.
Both kits also have separate fenders with fine tread plate pattern on the tops only but the Dragon fenders are 1mm shorter in length than the Tristar fenders and these match the plans in Achtung Panzer and Panzer Tracts while the Dragon fenders match those in Ground Power, interesting. The Tristar fenders have a separate outer lip which needs care fitting with the lip being included with the Dragon fenders.
Both kits have separate front and rear fender extensions with bolt head detail which is more pronounced on the Dragon fenders and looks a little overdone when compared to photos while the Dragon fenders include the front attachments moulded onto the main fenders.
There is not a lot to pick between the two here as both have some pluses and minuses so come out about even.
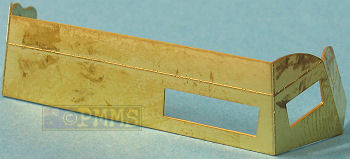
Superstructure:
 The
cut-down Flakpanzer I superstructure is in two parts in the Dragon kit with
the lower angled panel in plastic and pre-formed brass upper panel while the
superstructure is a single plastic part in the Tristar kit.
The
cut-down Flakpanzer I superstructure is in two parts in the Dragon kit with
the lower angled panel in plastic and pre-formed brass upper panel while the
superstructure is a single plastic part in the Tristar kit.
The bolt heads along the front of the lower panel are raised on the Dragon kit but should be flush fitting screws as depicted on the Tristar kit, this is easy to cut off the raised bolts on the Dragon kit and scribe the round screw heads.
The brass upper section on the Dragon kit is a little tricky to fit but once attached has a uniform plate thickness including raised weld beads on the front and sides which are in the correct position while these are positioned too high on the Tristar panel.
The curved top angle of the small side extensions to the superstructure are too square on the Dragon panel with the correct curve on the Tristar part while the Dragon side extensions also include the square profile weld beads not on the Tristar part.
Both kits have separate multi-part vision ports for the front and sides of the superstructure which are entirely in clear parts on the Dragon kit with just the vision blocks as clear parts on the Tristar kit. This is not an issue and just the way each has depicted the parts while the detail on the inner visors are slightly more refined on the Dragon parts and also the handle grip on the visor opening lever is on the wrong side with the Tristar parts but correct on the Dragon levers. The outer visors on both kits can be positioned open or closed as you wish.
As mentioned earlier the Dragon instructions show to add the driver’s instrument panel part way the lower superstructure but this should be mounted on the glacis lip.
Overall the superstructure is better represented on the Dragon kit with the upper brass section with correctly positioned weld beads and visor detail.
Engine Deck/Exhausts:
 The
rear engine deck is one area which is not shown in any available photos as
its mostly hidden by the side exhausts and the low angle of the photos but
we can make some educated assessments based on the known engine compartment
and exhaust dimensions.
The
rear engine deck is one area which is not shown in any available photos as
its mostly hidden by the side exhausts and the low angle of the photos but
we can make some educated assessments based on the known engine compartment
and exhaust dimensions.
The engine deck is one single piece in the Tristar kit with the cooling holes at the side and back added using slide moulds while on the Dragon kit the side panels are in etched brass with a hollow section underneath to give perspective but this results in a join line between the top deck and etched parts that will have to be eliminated.
Updated September 8:
Additional information received shows
the rear vent holes are correctly depicted on the Tristar deck
but the Dragon deck
omits the outer hole on the bottom row.
The main difference is the Dragon deck is 2mm shorter than the Tristar deck which is the same length as the standard Panzer I engine deck and as we know the dimensions of the Panzer I engine compartment and inner engine bulkhead placement we can deduce the upper deck of the Flakpanzer I would still match these dimensions as depicted in the Tristar kit.
The upper deck detail of fuel filler caps and intake grills is much of a muchness between the two with just the forward raised cover being shorter on the Dragon deck due to the 2mm difference mentioned above.
Both kits include the spare barrel box on the rear deck and the raised panel at the back to form the rear of the fighting compartment when in action with the Tristar kit providing additional fine etched chain for the sides of this panel.
The two fender mounted exhausts are split in two parts in both kits with the textured engine pipe and fishtail exhaust outlets included and the Dragon outlets have slight indentations added using slide moulds to depict the open pipes with the Tristar outlet being plain.
The Tristar exhausts include the lower fender attachment brackets which aren’t on the Dragon exhaust with just small locating lugs on the bottom of the exhausts and due to the length issue above the Dragon exhaust pipe is also about 1mm shorter to fit to deck outlets.
Both kits provide fine etched brass heat cover grills for the exhaust with the Tristar parts including the centre frame that is not included on the Dragon covers, note this frame goes to the inside when bending the Tristar covers to shape.
Both the etched covers have small ‘feet’ that you bend inwards to attach them to the fenders and the Dragon parts are slightly too large and I had to cut them down to fit around the exhaust. Also the Dragon cover don’t have the small lower cut-outs to fit over the exhaust mounting brackets as these aren’t included while both the mounting brackets and cut-outs are included on the Tristar parts.
Overall the Tristar engine deck and exhausts are better depicted based on known information with just the open holes on the Dragon deck sides and hollowed out exhaust outlets giving a nice impression.
Gun deck:
 The
full width gun deck on both kits have the separate locker cover and folding
side extensions that can be depicted raided or lowered as you wish.
The
full width gun deck on both kits have the separate locker cover and folding
side extensions that can be depicted raided or lowered as you wish.
The Dragon deck and side panels have tread plate pattern included but the Tristar parts are plain without any tread plate as they should. There is also a seat cushion provided in the Dragon kit but you have to wonder where people would put there legs when sitting on this other than open the locker cover and hand their legs through here?
The gun mounting ring is also a separate part on both kits with four small attachment hand wheels added with the only difference being this is attached to the gun platform on the Dragon kit and to the bottom of the 2cm gun on the Tristar kit with the detail on the small hand wheels better depicted on the Tristar kit.
The gun decks simple fit across the hull and fenders between the superstructure and engine decks on both kits much the same as it does on the real thing with the Dragon deck being better detailed with the inclusion of the tread plate not on the Tristar deck.
2cm FlaK38:
The Dragon gun is mostly
the same as with kit #6288 with a few minor updates most notably the trailer
wheels which now have the more common tread pattern on the tyres and revised
wheel rim details while the Tristar gun is taken directly from kit #35010 except
that the outrigger base is omitted and the ammo trailer included instead.
The 2cm FlaK38 kits were covered in detail with the 4 way 2cm FlaK38 Comparison Review posted earlier and I will summarise here the main points between the Dragon and Tristar guns.
Main
Gun Cradle:
 The
breakdown of parts is very similar on both kits but the two large side cradle
panels sees the Dragon 1mm taller than the Tristar cradle which matches available
plans and there is a slight profile discrepancy with the rear contours on the
Dragon cradle when compared to actual photos which is basically due to the
additional 1mm in height.
The
breakdown of parts is very similar on both kits but the two large side cradle
panels sees the Dragon 1mm taller than the Tristar cradle which matches available
plans and there is a slight profile discrepancy with the rear contours on the
Dragon cradle when compared to actual photos which is basically due to the
additional 1mm in height.
Both have the left side traverse gear box as separate parts and the left side 20mm ammo clip rack moulded as three separate parts on both with the X stamping on both sides on both for good definition.
The Dragon kit has the weld seams around the cradle but the sprue attachment points scar the seams and you may want to do a minor repair job for an even appearance and the mould seam line on the Tristar cradle could be left to simulate the weld seams.
The notable thing with the Dragon cradle is the top bearing sections are separate parts that allow better detail definition to be included and the top shield support arm has the space between the support and cradle completely open on both kits for good definition.
Both kits also include the elaborate inner bracket on the right hand cradle side that while not easily seen after assembly is a prominent feature when looking into the insides of the cradle. While both brackets have the correct number of holes included and represent the brackets well when compared to photos the Dragon part has slightly better defined details.
The traverse and elevation quadrants again have similar parts breakdown on each kit and there is not a lot of difference between the kits in these areas other than the Dragon traverse box has another of those excellent star hand wheels added.
The main gun sight is broken down into smaller parts on both kits for better detail definition as well as having the gunner’s foot rests with the correct two half moon brackets.
The Tristar kit has alternative parts to allow the gun to be positioned in neutral 0° or 40° elevation position while the Dragon kit has additional parts for four barrel positions of 0°, 20°, 40°, and 60° elevation allowing a bit more variety. Corresponding alternative sight braces are provided to fit the sight in the correct orientation appropriate to the barrel elevation.
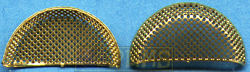
An extra detail included in the Dragon kit only is the mesh spent shell case with etched mesh and pre-formed lower mesh section with plastic frames as often seen on 2cm guns. The rigid etched mesh will benefit from annealing with a flame to make it more pliable to get as better “sag” and using your fingers to form the contours will also help. The pre-formed lower etched parts are a little thick and look a bit over scale but should be okay after painting.2cm FlaK gun:
 The
actual gun dimensions from the FlaK38 Technical Manual are; full length of
the gun (housing and visible barrel including flash suppressor) is 2252.5mm
which equals 64.357mm in 1:35 scale and the visible length of the barrel
with flash suppressor is 995mm being 28.429mm in 1:35 scale.
The
actual gun dimensions from the FlaK38 Technical Manual are; full length of
the gun (housing and visible barrel including flash suppressor) is 2252.5mm
which equals 64.357mm in 1:35 scale and the visible length of the barrel
with flash suppressor is 995mm being 28.429mm in 1:35 scale.
This shows that the Dragon kit barrel is the correct length with just a minor discrepancy in the overall gun length with the Tristar barrel 2mm longer and the housing 2mm shorter as a consequence although the overall length is correct and this difference in housing and barrel length can make looking at the barrels a little confusing as they sort of offset each other and correcting the Tristar gun with an aftermarket barrel is a simple solution.
Both kit guns have the lower cradle as a separate part as well as the circular bearings with nicely defined details around the lower sections.
Gun Shields:
 The
Tristar shields are designed with the two large front shields in one piece
including the inner shield fillet with bolt head details on both sides and
the hinge and shield support details also included and are quite uniformly
thin for plastic shields and look quite the part without any pin marks to
contend with.
The
Tristar shields are designed with the two large front shields in one piece
including the inner shield fillet with bolt head details on both sides and
the hinge and shield support details also included and are quite uniformly
thin for plastic shields and look quite the part without any pin marks to
contend with.
The Dragon shields also come in plastic only with the main shields having the upper and lower sections separate as are the fillets and also include the details on both sides although they are quite thick with the edges bevelled to give the thinner look.
The small upper shield is in plastic with bevelled edges or etched metal in
the Dragon kit and the same superbly thin plastic shield in the Tristar kit
with the shield added to the front of the gun plastic in both kits.
The plastic shields in the Tristar kit are clearly the better option as they
are some of the best shields done in plastic and rival etched shields in appearance.
Turntable:
 The
lower turntable is again similarly depicted in both kits with nice tread plate
pattern on both kits with the small joining bracket at the lower front in three
pieces on both for good definition.
The
lower turntable is again similarly depicted in both kits with nice tread plate
pattern on both kits with the small joining bracket at the lower front in three
pieces on both for good definition.
The gunner’s seat is in three parts in each kit with the lower mounting separate on the Dragon kit but included with the seat on the Tristar kit with the small hand wheels better defined on the Dragon kit.
Sd.Ah.51 Trailer:
 The
trailer is a different type in each kit so is not a direct like for like comparison
apart from the trailer frame which is moulded in one piece in both with the
fenders attached and separate wheel springs.
The
trailer is a different type in each kit so is not a direct like for like comparison
apart from the trailer frame which is moulded in one piece in both with the
fenders attached and separate wheel springs.
The wheels in the kits are tackled slightly differently in design with the Dragon having the wheel rim and front half of the tyre in one part and the inner tyre section separately. This allows good detail on both sides of the rim with the contours being very good front and back and also the better inner detail which includes the tyre valve on the inner rim which fits into the hole in the front rim when the parts are fitted together for a nice appearance.
The Tristar wheels are moulded as a single piece with a different tread pattern which can be seen in some photos and offers a nice alternative. The rim contours and detail inside and out are well defined and there are no pin marks to be removed even given the one piece moulding.
It’s hard to give outright points for the wheels as they offer different details with the inner rim details on the Dragon wheels being slightly the better with well defined outer hub details while the Tristar wheels offer an interesting alternative tread pattern with nice rim details.
The Dragon trailer uses the standard FlaK38 platform attached to the trailer frame with a small four part ammo box fitted in place of the gun platform while the Tristar trailer has a single large box mounted directly to the trailer frame with a separate top that can be shown open in you wish.
This Tristar box is quite detailed with the lower box just having one end and the top as separate parts with additional small panels with fine grab handles, lower springs and shovel for the top lid.
Incidentally you still get the gun platform in the Tristar kit to use if you wish or save for other projects.
Both configurations are correct but the larger box would appear more appropriate for the Flakpanzer.
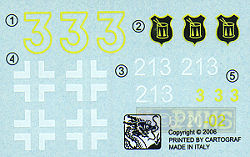
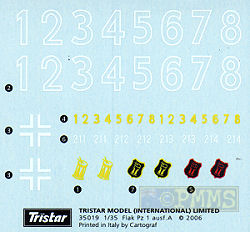
Decals:
The small Dragon decal sheet has markings for two
Flakpanzers with two additional unmarked vehicles shown on the instruction
sheet.
Three of the schemes are marked for Flak Abt.614 and one for an unidentified
unit but as Abt.614 was the only unit to use the Flakpanzer I this notation
is a little puzzling but you can just take it being for Abt.614.
The small Tristar decal sheet is well printed with very
thin carrier film cropped extremely close to the printed image and should help
during application.
There is a selection of vehicle numbers with the instructions showing markings
for just two vehicles but with small numbers for vehicle No. 211, 212, 213
and 214 from the unit below;
Conclusion:
As stated at the start we are looking at two very nice state of the art kits
with the differences being very minor overall apart from a few areas. The interior
of the Tristar kit is clearly superior with far better detailing throughout
and the upper gun deck and superstructure of the Dragon kit again better detailed.
Most other areas see pluses and minuses for both kits which offset each other to a degree such as the suspension where the Dragon drive sprocket is better detailed but the idler is 1mm to big; similarly with the lower hull where the Dragon hull is 1mm too tall while the Tristar track is better represented.
It is interesting that despite claims to the contrary both kits include the lower rear plate curve only you have to actually assembly the Tristar parts to best see it.
So overall whichever kit you choose you will end up with a very nice model and if we could combine the best from kits both we would have the ultimate Flakpanzer I.
References:
|
Panzer Tracts No 1-1
Panzerkampfwagen I Kleintraktor to Ausf.B |
Flak at War |
| Ground Power Magazine Issue #071 April 2000 GALILEO Publishing Co.,Ltd.  |
Pz.Kpfw.I/Pz.Kpfw.II and variants Achtung Panzer No.7 Dainippon Kaiga Co.,Ltd..  |
| German 20mm FlaK in WWII 1395-1945 By Werner Müller Schiffer Military History ISBN: 0-88740-758-7  |
Tamiya Photo Album 4 Tamiya Plastic Model Co. Krupp Protze Flak30, Flak38  |
 Thanks
to CK Pat from the Tristar
Shop for the review kit.
Thanks
to CK Pat from the Tristar
Shop for the review kit.
Page Created September 3, 2006