
M4A3 Sherman
105mm HVSS
1:35th Scale
Comparison review by Terry Ashley
Part 1
Hull
The single piece cast transmission cover has subtle cast texture including fine casting numbers on the top right corner and separate bolted strip with the tow shackle brackets moulded in place with separate hooks added with the fit to the hull tub being very good for both the transmission cover and real plate.
The rear plate has the engine door moulded in place with separate idler mountings and exhaust outlets added. There is also a single part upper exhaust deflector which is fitted to the top of the rear plate under the hull overhang.
The Dragon hull is a large conventional tub with underside detail that includes the return roller and idler mountings on the side panels as well as the upper sponson inserts with separate rear plate and front transmission cover. There are actually three different rear plates from the various kits included so you should make sure you use the correct one (part A1) for this kit with this having the idler mountings and exhaust outlets added, there is also a four part upper exhaust deflector which is quite detailed when assembled and fitted to the top of the rear plate under the hull overhang.
The single piece cast transmission cover has subtle cast texture included with separate tow shackle brackets and hooks added with the fit to the hull tub being very good for both the transmission cover and real plate.
As mentioned you are provided with the M1A1 Dozer Blade with the Academy kit and this is made up of multiple parts that include all the major structures including the hull mountings and hydraulic piston but don’t have any weld seams or some bolt heads seen on the real thing. There is an issue with the width of the dozer blade with Hunnicutt stating the M1A1 blade is 138inches wide which is 99.423mm in 1:35 scale but the Academy blade is just 95.5mm wide being 4mm too narrow based on that information. This may not be that noticeable on the final kit but is worth knowing if you want an accurate dozer assembly.
One thing to watch if fitting the blade is that the suspension mountings fit to the first two bogies on each side replacing the bogie caps (parts E3) which the instruction don’t show you till step 16 while the bogies are assembled in step 1 and no indication is given at step 1 that you may have to leave off parts E3 if fitting the dozer blade later.
Upper Hull:
The Academy upper hull is basically new with numerous differences from the hull
in the recent M4A2 “Russian Army” kit and not just the rear hull
angle but it still has the perennial trenches for weld seams with separate
crew hatches and engine deck as well as all the smaller details such as fuel
filler caps, ventilators, lifting eyes and tail lights with the details cleanly
moulded and the hull angles front and back being correct for the M4A3.
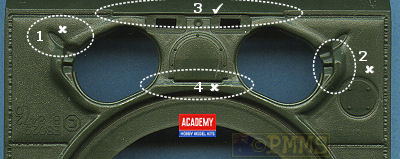
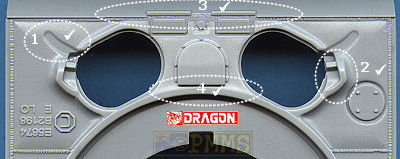
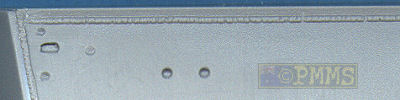
There are some minor detail issues in that the contours around the front crew
hatch hinges is not correct (1, 2) and the hull section in front of the turret
ring behind the ventilator is squared off (4) which I have not seen on a Sherman
hull.
These details are all correct on the Dragon hull which is much better represented
in this area than the Academy hull.
The area (3) shows details that can vary between hulls with images showing the
configurations on the Academy and Dragon kits
and another difference is that the Academy kit has separate
periscopes between the hatches while they are moulded in place on the Dragon kit.
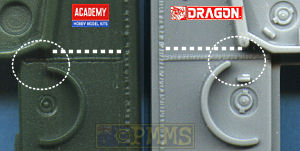
As with everything Sherman there are variations and the fuel filler guards are a good example as some photos show the guards extending to meet the turret ring splash guard while others show a gap between the fuel and turret guards while another variation has a small fillet guard welded to fill the gap between the fuel and turret guards.
One thing that appears constant in photos is that the weld seam is further forward meeting at the rear corner of the turret splash guard than depicted in both kits. The gap when present is also closer to the turret guard due to the kit welds being positioned as they are.
But these are only minor issues and some may leave
things as is due to the work involved in moving the welds and extending the
guards.
(Updated
Dec. 6, 2006)

The engine decks on both kits are separate parts with the two engine bay doors also separate with louver detail on both sides but the grab handles are moulded on and you may want to replace these with thin wire for a better look. The Dragon kit has both the A2 and A3 style engine deck in the kit so again make sure you use the right one (part G7).
The fit of the Academy deck to the hull is good but some minor trimming will be needed on the doors for a snug fit to the deck with the fit of the Dragon deck and doors both being very good without any trimming needed.
Both kits have the typical M4A3 storage rack on the rear hull with separate side supports on both and is perfectly adequate but of course could be better detailed on both if you wish to do this. The Academy kit also includes the rear hull mounted troop telephone which again is applicable to the Korean War version only.
The Dragon hull is the single large moulding from the M4A2 kit with altered rear hull plate angle plus the separate crew hatches and engine deck as well as all the smaller details such as fuel filler caps, ventilators, lifting eyes and tail lights with the details cleanly moulded and the hull angles front and back being correct for the M4A3.
The M4A2 grouser covers at the back are still included and you should remove these (the instructions tell you to do this, so Dragon know about this) and these is also a fairly large mould seam across the rear hull where the new rear plate section was added from the M4A2 hull and you will also have to carefully remove this making sure to leave the surrounding detail intact.
Again we have raised weld seams around the Dragon hull but they are still unfortunately wrongly depicted. The weld seams on Sherman hulls have a flowing texture not the pitted style on the kit welds but you may be able to smooth these out a little to better represent the actual weld seams.
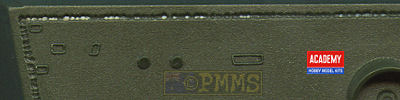
There are also numerous locating holes to be opened up on the Dragon hull for the tools which are moulded with the tool brackets included while the Academy kit also has the tools with moulded on brackets but these are simply glued in place on the hull but be careful as there are locating marks where the tools should go, not that it’s difficult to work this out.
On the Dragon kit the front fenders and the side extension fenders are provided in etched metal. You have to be careful with these parts as there are no engraved bending lines and using an etched bending tool would be advisable especially for the long side fenders.
The fenders are separate plastic parts in the Academy kit and while okay don’t have the finesse of the etched fenders with the Dragon kit.
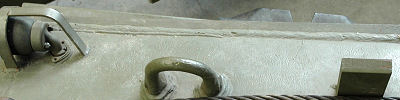
At the front both kits have finely moulded barrel travel locks with the Academy kit proving two, one open and one closed for a bit of choice and the bush guards for the light and siren on the Academy kit are in plastic and could do with thinning for a better look. Dragon provides both plastic and etched bush guards with the thinner etched guards being the obvious choice for better scale appearance.
The locating lugs for the barrel lock are located too far up the glacis on both kits but the Dragon instructions show you to cut these off and add the new lugs in the correct lower position but the Academy kit has them in the wrong position and you have to carefully cut off the lugs and reuse if you wish to fix this issue.
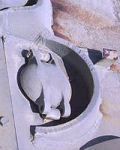
The hull.30 cal machine gun is just the outer barrel section and ball mounting on both kits with the ball separate on the Academy kit but moulded with the barrel on the Dragon kit which also has the muzzle indented with slide moulds while the Academy muzzle is solid.
On the Academy kit the crew hatches are cleanly moulded but there are a couple of pins marks on the inside if showing them open while the Dragon hatches are also cleanly moulded and free of any pin marks with both having separate periscopes that fit into separate periscope mountings with quite finely moulded periscope guards.
The Dragon kit provides the periscope in clear plastic while the Academy kit has normal plastic but this has more defined detail than the clear part. The hatch grab handles are separate in the Academy kit while moulded in place on the Dragon doors but you may want to replace both kits handles with thin wire for a better look as the Academy handles are quite thick and the wrong size.

One addition on the Dragon kit is a three piece first aid box for the left hull side which is a later modification and strangely this is missing altogether from the Academy kit while the Academy kit includes the hull front rear view mirrors sometimes fitted to Korean Shermans.
Review: Introduction
Part 1: Hull details (this Page)
Part 2: Suspension details
Part 3: Turret details
Page created December 3, 2006