
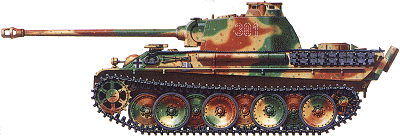
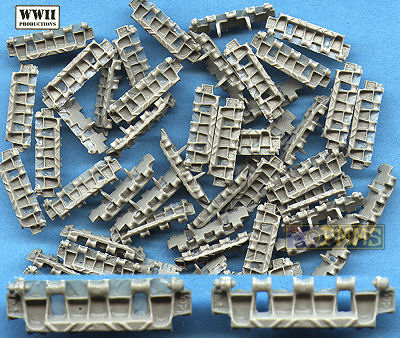
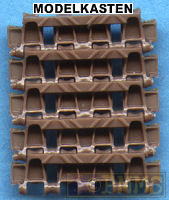
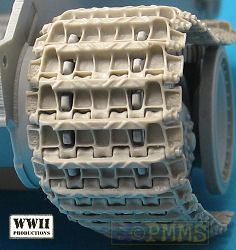
Panther Late Track
Track set comparison
1:35th Scale
Review by Terry Ashley
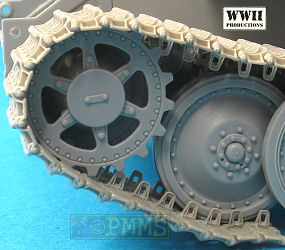
Two of the sets, the Dragon and Modelkasten are in injected plastic with the Friuls in cast white metal and the WWII Production in cast resin with all four sets having the links the exact same size in width and pitch as well as having the correct open guide horns with rib detail which makes for a good start.
The first thing we should note about the Panther tracks is they are handed, meaning the left and right track runs have a different pin arrangement where one track pin has a larger head than the other with the larger pin head facing outward on both sides under normal circumstances. This may not seem a big deal but if you want truly accurate tracks then this has to be taken into account.
All thee aftermarket sets include the correct left and right handed tracks while the Dragon Magic Tracks only come right handed meaning those on the left are not truly accurate, again some may not be bothered with this as it’s not that obvious unless you know what you are looking for.
The detail on all four track links is well done with the correct cast detail including the chevrons added to the link face and as mentioned includes the open guide horns with rib detail while only the Friuls and WWII prod links include the fine casting numbers on the outer edge of each link for greater detail.
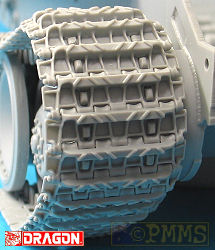
The biggest difference between the sets is the method of assembly with the three aftermarket sets all being fully workable after assembly while the Dragon tracks are designed to be glued together which means you have to get the track sag right before the glue sets.
Track Link Cleanup:
![]()
The Dragon tracks have the least cleanup required with the Magic
Track links
not needing any cleanup apart from a very small pour point on the inside which
can easily be ignored but there are eight additional links per side with separate
guide horns to go around the drive sprockets which do require some minor cleanup
of the sprue gate scar on the links and guide horns.
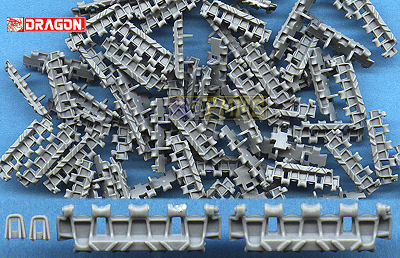
I did wonder why you need these additional links for the sprockets and on closer examination this is because the guide tooth hole in the Magic Track links is too small meaning they won’t fit exactly around the sprockets and therefore not entirely accurate but this will be very hard to notice on the assembled track runs.
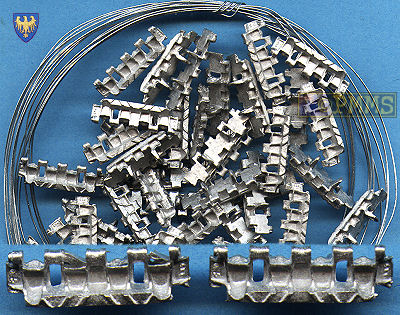
![]() Friulmodel:
Friulmodel:
There is some minor cleanup required on a few of the Friul links
(varies between links) with a bit of metal flash in some of the guide horn
holes and tooth holes which is easily removed with an old X-Acto #11
blade and
you may have to fully drill out the wire pin holes on some links before assembling
the tracks but other than that they are fairly clean. The tracks are assembled
by inserting lengths of wire provided which you have to cut to length before
hand and care is needed to cut these to the correct length before assembly.
![]()
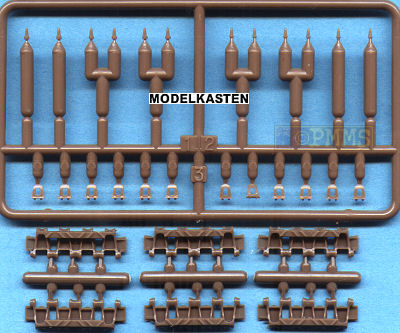
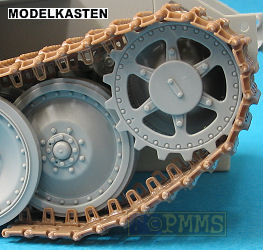
The Modelkasten tracks also being injection plastic require the sprue gate
scars to be cleaned from the links and the separate guide horns and as every
link has two separate guide horns there is quite a bit of cleanup required
before assembly.
Each guide horn has to be glued in place and allowed to dry before assembly
can begin with the links held together with two small pins provided separately.
![]()
On the WWII Production resin links there is quite a bit of resin film (flash)
to be removed from the outer link and inside the tooth and guide horn holes
with a sharp X-Acto #11 blade. While this seems a lot of work it actually
takes no more time than cleaning up the Friuls and MK links as there are
no separate track pins or guide teeth to worry about as they simply click
together.
Assembly:
![]()
Assembling the Dragon links is fairly straightforward with the links fitting
snugly together but they have a tendency to come apart with handing before
being firmly glued together. It’s best to glue sections of track together
and allow the glue to “go off” before fitting to the model, this
way they are less likely to come apart and can still be positioned around the
idlers and to form the track sag over the first two road wheels.
The separate links for around the sprockets will need the guide pins glued on and allowed to dry before assembly and these can be fitted directly to the sprockets with the other assembled links attached to these. Painting the tracks can pose a problem as you will either have to form the tracks and then remove from the model or paint before assembly which will be tricky as you have to leave the mating surfaces unpainted to allow gluing.
![]() Friulmodel:
Friulmodel:
Before assembly you have to cut the wire provided to the correct length which
is slightly less than the width of the track links, once you have determined
the correct length cut all the pins as this will make assembly easier if
you don’t have to go back and cut more pins along the way.
You may have to drill out the wire locating holes fully on some links and I found it easier to fit the drill bit into a pin vice leaving only enough bit exposed so it won’t go all the way though the link destroying the pin detail on one end and drill all the links beforehand so again you don’t have to do this during assembly. A few of my links had this hole already right through which was a pain and also my set had two sets of right hand track instead of the left and right but I presume this was a minor slip up during packaging as they are labelled left and right.
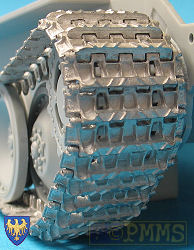
To assembly the links just fit them together, slip in a wire pin and secure with a drop of cyanoacrylate (super glue) into the pin hole with this resulting in fully articulated track runs which are the most robust of all the sets due to being metal and the pin going all the way through the links like the real thing.
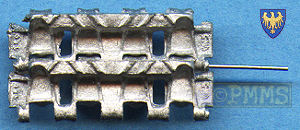
Being fully workable it is easy to paint the tracks separate and fit to the model at any time with the track sag taking care of itself.
![]()
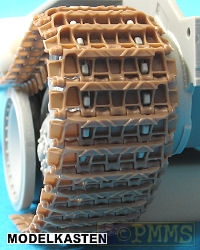
Modelkasten provide you with a small jig for assembling the tracks where you
fit five or six links to the jig and insert the end pins, these come on small
U shaped sprues with the pins the right spacing to fit into place but you
have to be very careful when gluing the pins not to actually glue the links
together.
After fitting the pins allow the glue to dry and then you have to be cut from their sprues with a sharp blade but again care is needed as the pin heads are inside the outer link leaving little room to work.
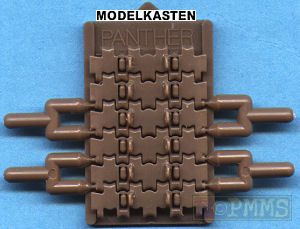
Again being fully workable it is easy to paint the tracks separate and fit to the model at any time with the track sag taking care of itself.
![]()
These links are designed to be clipped together with each link having a large
and small pin with corresponding locating holes included on the castings
and care is needed when cleaning off the excess resin film not to cut off
the locating pins.
Fitting together is simplicity itself by slipping one link over the larger pin and clipping the link over the smaller pin with slight thumb pressure, as the link pins are quite substantial it is less likely you will damage the locating pin during this process but take care in any case.
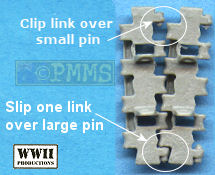
Assembling these links took about a third the time it took for the other sets due to this clip method and also being fully workable are again easy to paint the tracks separate and fit to the model at any time with the track sag also taking care of itself.
Conclusion:
![]() For
mine the pick is the WWII Production tracks despite the cleanup
which is really no more than with the Friul and MKs but
the assembly is so simple it will take about a third the time to assemble the
track runs than any of the others and the detail is better with the links being
handed and including the fine casting numbers on the links. As a bonus they
are of course fully workable for natural track sag and fit like a glove around
the Dragon kit
drive sprockets making them easily the best of this bunch.
For
mine the pick is the WWII Production tracks despite the cleanup
which is really no more than with the Friul and MKs but
the assembly is so simple it will take about a third the time to assemble the
track runs than any of the others and the detail is better with the links being
handed and including the fine casting numbers on the links. As a bonus they
are of course fully workable for natural track sag and fit like a glove around
the Dragon kit
drive sprockets making them easily the best of this bunch.
![]() The Friulmodel tracks
would be the next pick due to slightly less preparation than the MKs and
also being handed with the small casting numbers on each link. The assembly
can be made easier by cutting the pins the right length so you don’t
have to trim these later and some may prefer the heavier feel of the assembled
links. They are is course also fully workable for natural track sag but the
fit around the Dragon sprockets
was not a snug as the WWII
Prod and MK tracks.
The Friulmodel tracks
would be the next pick due to slightly less preparation than the MKs and
also being handed with the small casting numbers on each link. The assembly
can be made easier by cutting the pins the right length so you don’t
have to trim these later and some may prefer the heavier feel of the assembled
links. They are is course also fully workable for natural track sag but the
fit around the Dragon sprockets
was not a snug as the WWII
Prod and MK tracks.
![]() would
be bext as these have separate guide horns that need to be glued first
and the small separate pins to join the links making for the most tedious assembly
of the tracks. While the detail is good they don’t have the
small casting numbers on each link but they too are fully workable and fit
snugly around the Dragon kit sprockets.
would
be bext as these have separate guide horns that need to be glued first
and the small separate pins to join the links making for the most tedious assembly
of the tracks. While the detail is good they don’t have the
small casting numbers on each link but they too are fully workable and fit
snugly around the Dragon kit sprockets.
![]() Out
of this lot the Dragon Magic Tracks came last simple
because they are not workable, are not handed and the sprocket teeth holes
are too small except of the additional 8 links for the sprocket which require
you to glue on the separate guide teeth like the MK links.
Assembly is a little fiddley as you have to glue the links together and allow
drying before handling meaning you also have to get the track sag right before
the glue dries.
Out
of this lot the Dragon Magic Tracks came last simple
because they are not workable, are not handed and the sprocket teeth holes
are too small except of the additional 8 links for the sprocket which require
you to glue on the separate guide teeth like the MK links.
Assembly is a little fiddley as you have to glue the links together and allow
drying before handling meaning you also have to get the track sag right before
the glue dries.
But let me say the Dragon tracks are far superior to any other stock kit track available in Panther kits from the likes of ICM, Italeri and Tamiya plus earlier Dragon kits and do look good when fitted and if not being workable and the minor detail issues are of no concern then they will do the job very well.
So the final decision like many others is up to the modeller as to what level of detail and accuracy you want and of course finances as the aftermarket tracks cost about half that of the Panther kit itself.
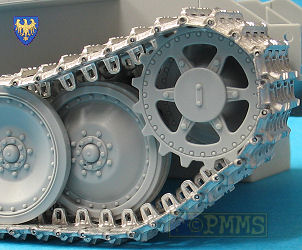
Assembled Tracks :

 |
Panzer Tracts No.5-3 Panzerkampfwagen "Panther" Ausfuehrung G by Thomas L Jentz and Hilary Louis Doyle ISBN 0-9744862-7-2 Published by Panzer Tracts, Soft cover, 68 pages. |
 |
Achtung Panzer No.4 Good photo coverage of the Panther, Japanese text. |
Thanks to my overworked credit card for the review sets.
Page created September 10, 2006