
|
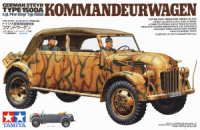
 s.gl.Pkw Steyr Typ 1500A/01 Kommandeurwagen 1/35 Scale - Kit No.35235 Review by Terry Ashley |

|
|
s.gl.Pkw Steyr Typ 1500A/01 Kommandeurwagen 1/35 Scale - Kit No.35235 Review by Terry Ashley |
The
Kit:
This new incarnation of Tamiya's excellent Steyr kit
of last year is not just a minor facelift, but is predominantly new. Apart from
the chassis, suspension, engine hood, front fenders, bumper and wheels the rest
is entirely new.
The kit comprises about 140 parts for the kit itself plus a few extra bits from
the earlier kit not used here. Moulded in the same beige coloured plastic, you
still get the usual Tamiya mesh for the engine grills. It would have
been nice for Tamiya to follow the precedent of the Dragon Wagon by including
etched parts in their kits. But the etched grill set (No.35226) is still sold
separately to replace the mesh provided. Six clear pieces for the windscreen
and side windows is included plus the 4 poly caps to attach the wheels
The chassis and wheels and are identical to the first kit. The chassis is moulded
in one piece to which you attach the engine bottom pan, the suspension, drive
train and exhausts. The wheels include separate brake drums, which trap a poly
cap allowing you to easily add and remove the wheels.
The main body is loaded with detail. The rear luggage compartment can have its
door positioned open or closed. There is a full interior including with the
spare tyre in it's own compartment. All four doors are separate and also can
be positioned any way you want. The doors are simply brilliant. Each is made
up of three parts, the outer panel and interior lining plus the clear 'glass'
which is trapped between the two. Just like the real thing, you almost expect
them to wind up and down. The doors have the handles and other detail included.
The seats have excellent texture with the two front seats having separate backs.
These are detailed with grab handles and small pouches. Two alternative tops
are included, a full 'cabriolet' top and folded top which fits nicely on the
rear body. It is very easy to interchange the two tops and the windows to vary
the appearance of the model. There are no permanent alterations needed for whichever
fit you choose.
The two figures included with the first kit (driver and standing officer) are
joined by a third sitting officer for the rear seat. Pennant flags are also
included for the front fenders as most of these vehicles were used as 'elite'
transport predominantly behind the lines.
Four vehicles are represented on the decal sheets, a late war overall yellow
vehicle with two colour cam and three overall Grey schemes, one of these is
depicted with white winter cam on the instruction sheet, but really the finishes
are limitless.


Construction:
I deviated quite a bit from the instruction sequences, mainly
to ease painting. These deviations will be explained during construction. I
also used some parts from the Eduard Steyr Update Set (No.35226) to add
details as a number of sections are common to both kits.
The chassis, suspension and wheels were built up per instructions. The fit is
excellent and it all falls together. The built up chassis assembly was painted
separately from the main body and attached just prior to final weathering.
The main body is next and again there were no fit problems. The rear section
has inside walls for the luggage compartment around which is added the rear
body section. The boot lid can be positioned open or closed. I left this unattached
till after painting. The driver's foot pedals were replaced with the Eduard
parts.
The front engine compartment and firewall/windscreen is built up separately
and then added to the main body. The dashboard is a separate piece in the kit.
I replaced the central instrument panel with the Eduard item and left
the whole dashboard separate until after the vehicle painting. The side indicators
were also replaced with Eduard parts and I replaced the kit windscreen
with a piece of thinner clear sheet, again left off till after painting. The
windscreen wipers were also added from the Eduard set. The mesh screens
inside the engine compartment were replaced with the Eduard items, as
they are better than both the mesh supplied and also the Tamiya etched
screens. To help overcome the empty space which can be seen through the screens
I painted the entire inside of the front section Matt black, as well the front
section of the lower chassis. This doesn't stop the 'see-through' effect when
looking from a low angle but 'hides' the insides when viewing from any other
angle. The completed front section was then added to the rear body section along
with the other smaller bits attached as per instructions. Again there were no
fit problems anywhere. The front bumper was also left off and painted separately.
The seats are next and these are really well detailed with excellent cushion
texture, separate seat backs with storage pouches and separate grab handles.
All the seats were painted separate and left out until after final painting.
The doors are the next main section and as mentioned above are just brilliant.
I carefully removed the plastic from the insides of the main door handles to
give a better appearance than the moulded on handles, this was done with the
tip of a 'sharp' X-Acto #11 and a lot of care.
Each of the 3 parts per door are unique and care should be taken when assembling
these. The separate windows have small cutouts along the bottom at different
points and will only fit into the their correct door. (The windows are designed
to be removable after assemble, so you don't need to glue these).
The fit of the assembled doors to the body was so good, no glue was need. This
allowed them to be snap fitted to the body when spraying the cam scheme, but
could then be removed and weathered separately. This also allowed better access
to the interior for final painting and fitting of the seats and instrument panel
after painting.
The choice of top hood is up to you, either the fully extended cover or folded
hood on the rear deck. Each can be interchanged at will, as no modification
to the kit is required for either option. Both parts have excellent surface
detail and come up a treat with drybrushing.
The rear jerry can holders had securing straps added from the Eduard
set.


Painting:
As mentioned, the kit was left in sub-assemblies for painting.
The seats were painted a dark leather colour, weathered and drybrushed and set
aside till later. The body, chassis and wheels were painted separately. All
painting was done with Humbrol Enamels. An overall coat of German light
yellow was airbrushed, followed by the cam pattern with red brown and green.
The decals were real easy for this kit, consisting of a numberplate front and
rear. I used white glue to attach the decals in this situation. Firstly crop
the carrier film from around the printer decals and dip in water to remove the
backing paper in the normal manner. Using white glue, smear a thin film on the
back of the decal and apply to the model. Lightly press with a soft cloth or
tissue to get the decal flat and remove any excess white glue and leave to dry.
Due to the decals being on smooth flat surfaces there is no need to gloss the
model and use decal setting solution to get the decal to 'sit' over detail.
This method saves heaps of time for small decals on armour models where the
decal has no transparent bits.
After the decals had dried I applied an overall coat of Matt varnish to seal
the paint work before weathering.
After leaving for 48 hours for the Matt coat to dry thoroughly, I applied a
light wash of thinned oil paint followed by very light drybrushing. As the vehicle
is a 'behind the lines' type vehicle used mainly for Officer transport, I kept
the weathering to a minimum as it would get more care than a 'active' vehicle.
Finally, all the sub-assemblies were brought together. The windscreen was added
using white glue as were the seats and the boot lid. The doors and top were
left unglued to allow for any variation I choose.
Conclusion:
Another superb kit from Tamiya, we have come to expect
nothing less these days. It's very easy to build and literally falls together,
again I left the filler tube in the draw unused. As mentioned, the final appearance
is totally different from the first Steyr kit and not just a simple facelift.
With the three figures included you almost get a diorama in a box. Highly recommended.
Wouldn't it be great to see the Mercedes Benz version of the 1500? It's that
same body except with a different nose and the three pointed MB star on the
radiator.
References: