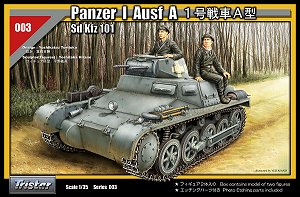
Panzer 1A Sd.Kfz.101
Tristar Kit No. 35003
1/35 Scale
Construction Review by Terry Ashley
I will basically
follow the construction sequence and highlight any problems along the way; I
have also added additional details from plastic card, rod and bits from the
ABER Pz.Kpfw.1 detail set (No.35065) and will explain these also.
It should be noted that the ABER set is designed for the Italeri/Zvezda
Panzer 1 and as the detail on the Tristar kit is far better than these
kits not all the ABER bits are needed.
Suspension
and Drive Sprockets.
The kit parts are
nicely detailed and fit together well, by following the instructions you shouldn’t
have any problems.
I felt some areas could do with some tweaking and started with the road wheels,
these have the lubrication points included but I added a small plastic card
disc (made with a punch and die set) to make then stand out a little more.
On the main suspension units I cut off the leaf spring securing bolts which
were a little underdone on the kit parts and replaced these with plastic card
and rod with Grant Line bolt heads for better definition and also drilled
out the centre of the axle hubs as these are hollow on most photos I’ve
seen.
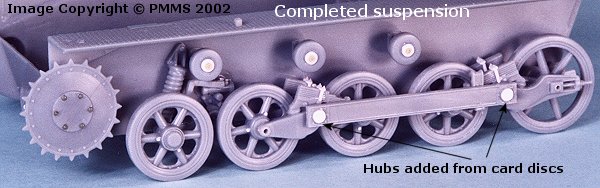
The return rollers
hubs have a raised centre section and I added this with more plastic card discs
with an etched ‘bolt’ centre.
The main bolts on the drive sprockets I also felt were a little small and I
replaced these with larger bolt heads taken from and old Tamiya M3 Lee
kit.
These old kits such as the M3 Lee and M3 Stuart which have many bolt heads included are excellent for cannibalising by cutting of the bolt heads with a shape blade and using elsewhere by attaching them with a small dab of liquid cement. One kit can supply you with hundreds of bolt heads of different sizes.
Finally the beam
between the two suspension units also should have raised ‘hubs’
where they attach to the units and again these were added using plastic card
discs.
The road
wheels are designed to rotate freely, but I glued these in place to aid in attaching
the tracks and also to ensure the added details remained visible.
Hull
Construction:
This is fairly
straightforward with only a few parts to make the hull proper. On the lower
hull is added the front plate which fitted nicely but take care to put it the
right way up with bolt heads to the bottom, this part will fit either way so
take note. The rear plate fitted without problems and there is also an internal
bulkhead to add. This can’t be seen after construction but does give some
rigidity to the lower hull but I don’t think it would cause a problem
if left out?
The upper hull is one large moulding but ensure you add the rear intakes grills
(part C13) from the inside of the upper hull before gluing to the lower
hull or you will have some fun fitting the grills.
I glued the main upper hull to the lower hull before added the front glacis
plate (part C19) as this had some minor fit problems. I had to trim small amounts
from both sides and the front to get a good fit between the front plate and
upper hull.
Trim small amounts only and test fit often, don’t trim too much at one
time because it’s a bigger problem to add some back if the plate is trimmed
too small.
All the hull hatches and vision ports are separate parts so you can choose to
show these open or closed?
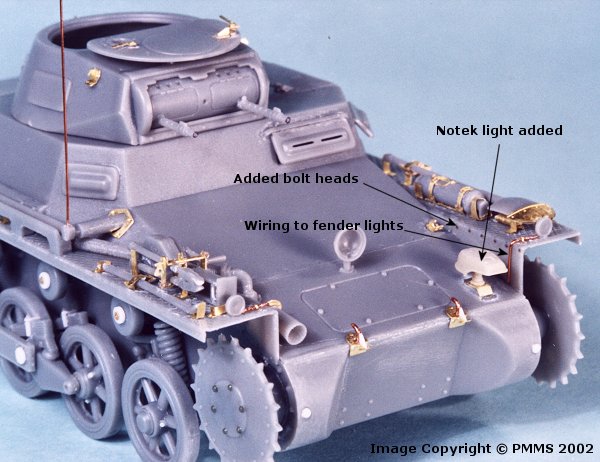
I added a row
of six bolt heads along the rear hull sides (behind the exhausts) as these were
missing but would be impossible for Tristar to include given the constraints
of the injection moulding process. These bolts were again ‘stolen’
from the old Tamiya Lee kit. They are very small and partially hidden
by the exhausts so may not be noticed on the finished model?
Another six small bolt heads were added inside the front fenders also using
the same method as above but are more noticeable than the rear bolts.
Wiring was added to the small front fender lights from thin wire and the Notek
light was added with a resin light from a Royal Models set on an etched
base made from a bit of left over brass. The Notek light was often fitted to
later vehicles as well as most Afrika Korps vehicles and as I will be finishing
the model in that paint scheme I decided to add this.
The rear exhausts were hollowed out by careful drilling and trimming with a
sharp blade as well as the right front outlet pipe being drilled out and the
aerial was repositioned in the up position with the aerial itself being replaced
with thin wire.
The plate fitted over the rear engine grills was thinned at
the edges for better effect as were the front section of the side fenders as
I left off the front fender extensions (these are rarely seen on operational
vehicles).
On the rear hull the towing shackle was thinned down for a more realistic appearance
and an etched chain added (not shown in photos).
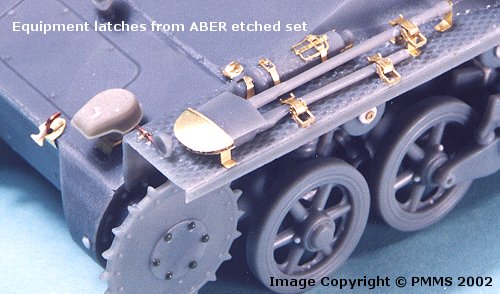
This completes the main additions to the hull; all the remaining detailing was
replacing some kit parts with items from the ABER etched set. These included
all the lifting points with the two hull front points being further detailed
with bits a thin card and wire. The front klaxon horn mount was replaced as
were all the tool attachments and latches. These latches are fairly time consuming
but do add to the final appearance, one thing I have noticed with the ABER
tool latches in they appear to be slightly over sized? I have noticed this on
other models I’ve added these bits too but is more noticeable on such
a small vehicle therefore I reduced some of the latches in size to better fit
onto the fenders.
The tracks and lens from the large front light were left off until after painting.
The
Turret:
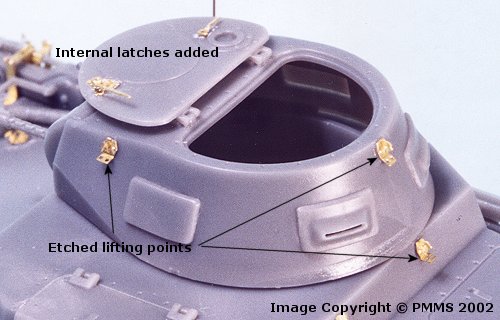
This again is very
simple in construction and went together without any problems. I drilled out
the MG barrels and added the lifting points from the ABER set as well
as the internal latches on the separate main hatch.
When drilling out barrels I find it helpful to mark the end of the barrel with
a black felt pen, this gives a better key to ensure your drill bit is centred
before drilling, nothing worse than drilling a hole only to find it if off to
one side. (see image above)
The vision ports are again separate so you can position these open if you wish?
The
Tracks:
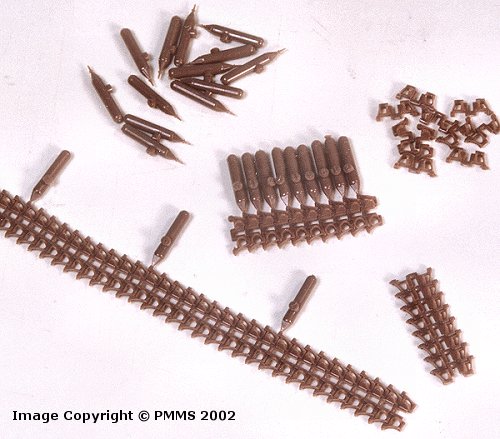
These tracks by ModelKasten are sensational and are specially made for this
kit. There are left and right hand tracks so take care when assembling to ensure
you use them on the correct hand.
The instructions show to lay the links out on a piece of self
adhesive tape and insert the connecting pins as you go. While this method will
work perfectly well I personally prefer another method for assembling separate
track links.
After removing the links from the sprues (and taking care of any cleanup needed?),
I assemble a short length of track (say 10 links) by holding the links between
my fingers, clipping the next link in place and inserting the connecting pin.
Apply a small amount of liquid cement to each connecting pin and cut off once
dry. Doing this in short lengths avoids a long length dangling out of your hand.
When you have enough short sections for one track, 8 in this case as there are
88 links per side; you can then join the shorter sections together to form the
one full track length.
As is said this is a personal preference and the tape method plus the use of
a custom made jig will also work, whatever method works best for you is the
one to use.
Return to the First Look review of the Panzer 1A with images of the Sprues, Decals etc.
Also see Brett
Green's building of this kit on Hyperscale:
Part
1 Construction
Part
2 Painting and Finishing
|
Panzer Tracts No 1-1 |
Panzer Tracts No 1-2 |
|
Ground Power Magazine |
Pz.Kpfw.I/Pz.Kpfw.II and variants |
| TANKS & ARMOUR: PanzerKampfwagen 1 & II Ian Allen Publishing 
|
AFV Modeller Issue 12 Excellent photo feature on the Panzer 1a  |
|
Military Modelling Magazine |
|
Page created 10 September 2002
Updated 14 September 2002