

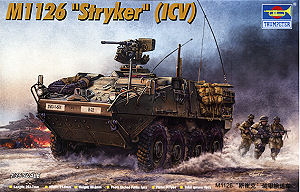
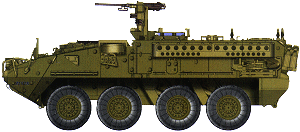
The M1126 Stryker ICV is based on the GDLS Canada LAV III 8x8 light armoured vehicle with the LAV III itself a version of the Piranha III built by Mowag of Switzerland and is a full-time four-wheel drive with selective eight-wheel drive armoured vehicle weighing approximately 19t. The basic Infantry Carrier Vehicle (ICV), the subject of this kit provides armoured protection for the two-man crew and a squad of nine infantry soldiers.
The armour provides integral 14.5mm protection against machine gun rounds, mortar and artillery fragments. In Iraq from January 2004, Stryker vehicles were outfitted with a 'cage' of slat armour which encircles the vehicle about 18in from the main body as protection against Rocket-Propelled Grenades (RPGs).
The ICV has a remote weapons station which can mount either a .50cal M2 machine gun, MK19 40mm grenade launcher or MK240 7.62mm machine gun and also has four banks of four M6 smoke grenade launchers.
The first thing to mention is the kit appears to be based on a pre-production or trials vehicle as it misses a number of features of the full production version most notably around the rear suspension and on the weapons station as we will see below as well as lacking the slat armour.
I will include throughout the review a number of reference photos of the real Stryker to illustrate the kit and to help those wishing to add additional details with these provided courtesy of Prime Portal where you can find extensive walk-arounds on all the Stryker variants.
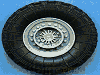
Vinyl tyres

Standard of plastic moulding is quite good overall with nice clean detail but there is a fair sprinkling of flash and some large pin marks about the place as well as quite prominent mould seams which will take a bit of effort to remove especially on the smaller parts.
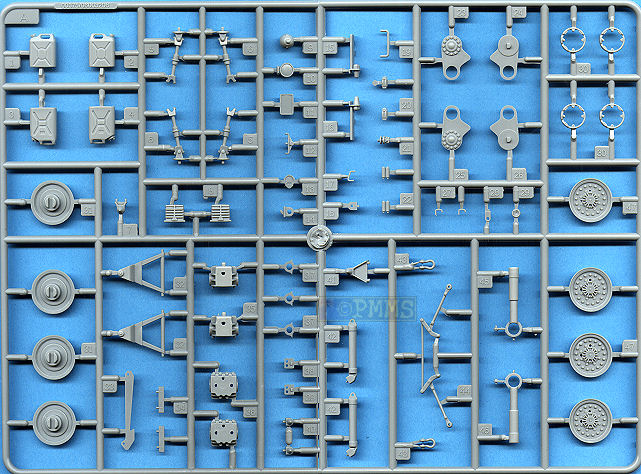
All the suspension components are separate with the four gearbox differentials made up of four parts each plus the short drive shafts, but take care when assembling the diffs as you have to attach part A8 to part A35 before fitting part A36 as part A8 can’t be fitted after.
The basic wheel mounts, axles and steering arms are provided but the front four wheels are fixed in place and it would take a bit of work to alter the angles of the wheels if you wanted to depict the steering.
At the back are the large shock absorber assemblies with outer covers but these are mounded solid and those on production Strykers are larger and fully perforated which would best be represented with an etched part.
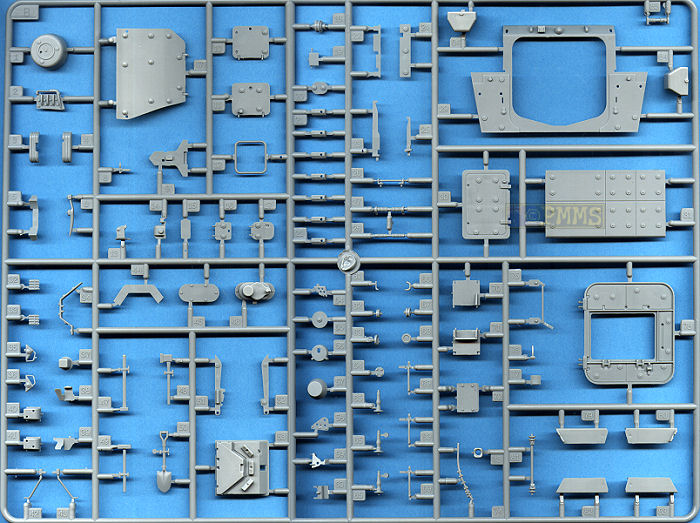
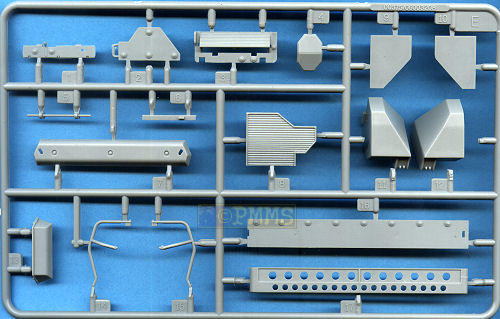
The large rear side panniers are also separate made up of four parts each to provide better definition than if included with the lower hull and at the back is the separate hull panel with separate squad entry ramp and smaller exit door.
Details on the rear panel is quite well done with most features included as well as separate door latches with inside details on the ramp and door but there are also some very prominent pin marks which will be difficult to remove as the raised detail would most likely be damaged in the process but as there is no interior fitting the ramp/door closed would be the best option.
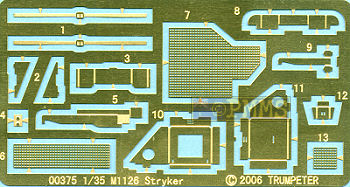
On each side are the large jerry can racks which are provided in plastic or etched parts which do look better as well as etched securing straps for the jerry and water cans provide but there are no attachment points on the rear panel to attach the straps too.
Also included are separate taillights and towing shackles although the taillight detail is a little basic but they should look okay.
The fit of the rear panel to the lower hull will need care as there are no locating lugs or pins so you have to ensure everything is lined up correctly as the glue dries but the fit is quite good without the need for trimming or filler.
The wheel hubs are two plastic parts with separate hub rings often seen fitted although there are also wheel hubs without the rings but this option is not provided although most in service vehicles have the rings fitted.
Detail on the hubs is basic at best with the outer ring of bolts too large and positioned too far inboard while the central hub is too small and the outer “star” ribs correspondingly too big plus the separate ring is far too thick and the inner oval cut outs too small for what are very basic representations of the Stryker wheels.
Assembly is straightforward with the wheel rims fitting neatly into the vinyl tyres without any play but you may have to open up the locating holes for the ring a little to get these to fit properly.
One feature of the hull is there are many small tie down loops attached to the round panel attachment bosses all around the hull but these are not included although it may be difficult to represent these accurately in plastic and small etched loops would be the best solution as they also have a flat profile ideal for etched parts. There are also a few if the attachment bosses missing or in the wrong place but most would not bother with this?
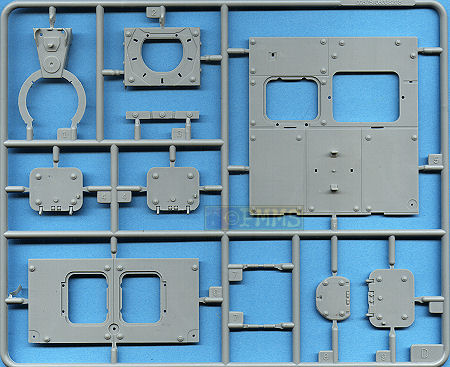
There are many sub-assemblies built separately and then added to the hull such as the Driver’s hatch with 12 parts, the Commander’s hatch and surrounds with 17 parts, the head light assemblies with 7 parts and the front mounted winch has 4 parts to give a few examples which all adds the very busy appearance of the Stryker hull.
Assembly of the Driver’s hatch will need care as there was a bit of flash on the parts and some mating surfaces needed smoothing but even so a bit of coaxing was needed especially in fitting part B34. But once assembled looks quite good although there are no internal details if you were thinking of showing this open?
The Commander’s hatch is much the same with the 7 separate periscopes in solid plastic with optional etched top fitting but again there are large pin marks on the inside of the hatch if you show this open.
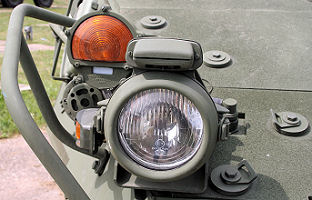
The head light clusters have all the basic components although the base plate being a complicated moulding has a fair bit of flash to remove and smaller orange indicator light doesn’t look much like the actual light plus the horn on the right side lacks any detail and is too big covering half the side position light. You may also want to add the myriad of wiring to the back of the light clusters for a better appearance while the large tube bush guard will need care removing the mould seam.
note, tie down loops on real hull and missing boss on kit hull next to headlight
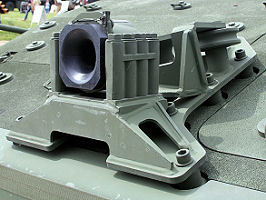
In the centre of the front hull (well offset slightly to the left) is the winch assembly but the base plate has a large pin mark and you should watch as the small pulley should be fitted at an angle which is provided for on the mounting pin. The whole winch assembly should sit on small mounting pins away for the hull and not flush as supplied in the kit which is easy enough the represent with small plastic card discs.

Some of the hatches may need minor trimming for a good fit and some of the mating surfaces of other parts require cleaning for a good fit and as mentioned the etched mesh for the engine intake grills is quite thick but may look okay when fitted and painted. On the inside of all the hull top and side hatches are more of those large pin marks to be removed but as most will show them all buttoned up this is probably not a problem while the large hull top hatches have separate inner latches if you do choose to show these open?
The two large wire cutters for in front of the Driver’s hatch and on the hull top are provided in plastic or etched parts with the thicker etching making these look very good.
On the upper rear panel there are the two antenna mounts but these are in the wrong position with the one shown fitted centrally should actually be on the right corner mirroring the one on the left corner and the central locating hole should be filled as this is not present on production vehicles. You can use part B64 after cutting off the raised bolts to fill the main hole and then fill the remaining gaps with the central panel line re-scribed for the correct appearance.
Along either side are the large storage racks which have an inner mounting plate and outer rack with the large holes and these are well done but there should be rows of tie down loops along the top, bottom and on the rear of these racks which are not there and again etched parts would be the best solution, another item for the inevitable etched update sets to come.
On the left rear is the pioneer tool rack with the tools nicely done and include the clips and brackets moulded with the tools but should look okay once fitted in place.
There are numerous other items fitted about the hull which shouldn’t cause any problems such as the square tube fitting on the upper rear hull that will need care cleaning the mould seams and the rear view mirrors on the front hull sides that again will need care in fitting, you can add these extended or stowed flush on the hull sides as you see fit.
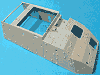
The fit of the two large hull top panels to the upper hull was very good not requiring any trimming as was the upper and lower hulls which fit together with the aid of locating lugs along the inner hull sides and this makes the final assembly very straightforward and trouble free.
Basic assembly is also a little tricky with the many small parts not lining up properly until they are all in place so using slower setting glue may be advisable as some adjustments were needed.
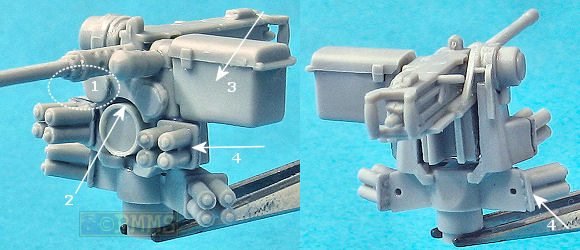
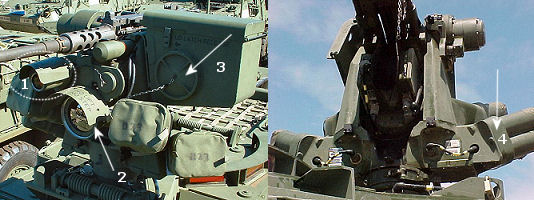
The .50cal MG is the only weapons option provided but this is quite basic with a pin hole on the left side of the receiver to fill and also includes the barrel changing handle which I have not seen fitted on any Stryker weapons stations but this is easy enough to trim off and you should also drill out the muzzle for a better look.
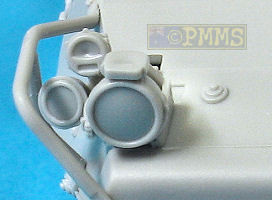
On the mounting itself the large optic device on the upper right side (1) is missing altogether as are the rain/sun shields over the lenses (2) which are quite prominent features. Missing from the ammo box is the circular cover for the main RWS sight which is velcroed to the front of the ammo box when not in use (3) and the shell ejection chutes are missing.
The smoke grenade launchers are very basic and lack the base plate (4) as well as the rear wiring and the mounting fairings are moulded square but should have rounded edges, easy enough to fix. The smoke grenades themselves are again very basic in appearance and most are actually fitted with dust covers or caps unless immediate use is eminent.
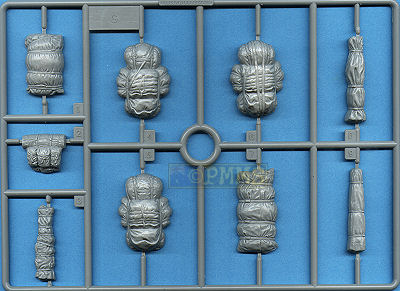
Also included is a selection of equipment packs and tarp rolls which have details that should come with careful painting but are a bit uniform in appearance and these can be added to the vehicle as required.
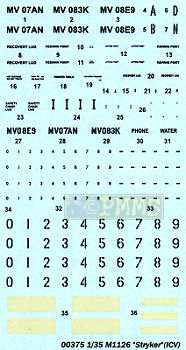
A large colour sheet is provided with five view illustrations of the Stryker to clearly show the location of the various markings but no actual unit information is given.
Being the first cab of the rank the kit has the advantage of being in the hand and will build into a good basic representation of a Stryker although not the current production type but there are a number of simplified details and additional details that should be added to bring it up the standard.
There is much scope for aftermarket etched sets not just with the base kit provided but for the extensive bar armour cages fitting to all current serving Strykers in Iraq and Afghanistan.
Highly recommended. 7.5/10
Click on thumbnails for larger view

Close new window to return to review
See the review of the AFV Club kit #AF 35126 M1126 Stryker ICV including comparisons with this kit.
Also see the Stryker Subjects page for additional reviews of Stryker related kits/update sets.
On
the Net:
Prime
Portal
| Stryker
in detail Part 1 Present Vehicle Line No.17 Wings & Wheels Publications. ISBN: 80-86416-61-5  |
Stryker
in detail Part 2 Present Vehicle Line No.19 Wings & Wheels Publications. ISBN: 978-80-86416-68-7  |
STRYKER Interim Armored Vehicle Concord Mini Color Series #7515 by Carl Schulze & Ralph Zwilling ISBN 962-361-141-2  |
| AMPS Boresight Stryker ICV/RV Special May/June 2007  |
Stryker Combat Vehicles Osprey New Vanguard 121 Gordon L Rottman ISBN: 9781841769301  |
Tankograd Militar Fahrzeug 2/2007 Pages 45-53 2nd Stryker Cavalry Regiments "Second Dragoons" Germany 2006  |
Thanks to my credit card and ![]() for
the review kit.
for
the review kit.