

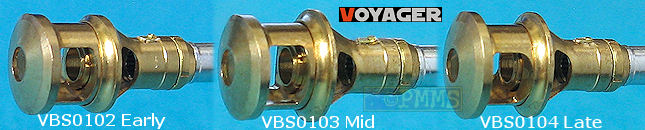
While the sets are labeled Early, Mid, Late there is no distinct delineation between the introduction of each muzzle brake type and the three types can been seen at overlapping time periods depending on the vehicle they were used on so the names are basically just to differentiate between the sets.
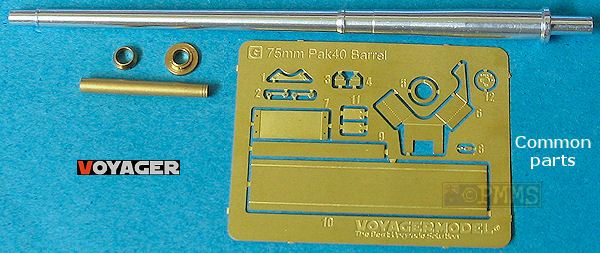
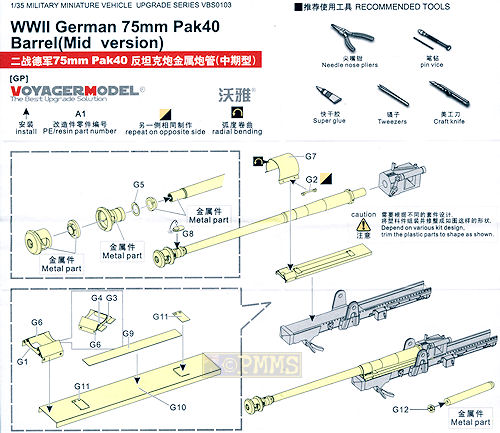
Each barrel is made up of the full length barrel in aluminium with rifling included in the drilled out muzzle plus 5 brass and 13 etched parts for the muzzle brakes and barrel mounting. There is also a single brass 75mm shell casing included in the set to be used as you see fit.
Dimensionally the barrel length matches available data and the 1:35 plans in the Nuts & Bolts book below it should be noted that the 1:35 plans in the AGP book have the barrel length considerably less than it should be which may cause some confusion. One interesting point is while the length matches the plans the position of the central cradle attachment strip bracket is about 1.5mm further forward on the barrel than on all available kits and other aftermarket barrels designed for those kits. This position of the bracket actually matches what is shown in the Nuts & Bolts plans but means the barrel won't fit the available kits as mentioned and to compensate for this, Voyager have included the full lower gun cradle to replace the kit parts on whatever gun this set is used on.
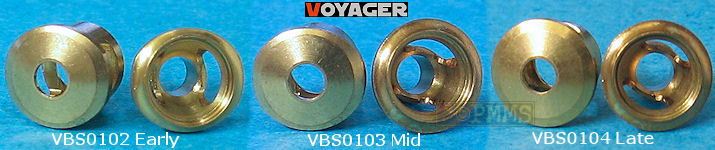
Muzzle brake halves for the 3 types
Note, early and mid are too rounded in profile
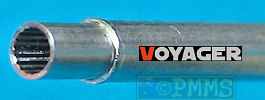
Barrel rifling
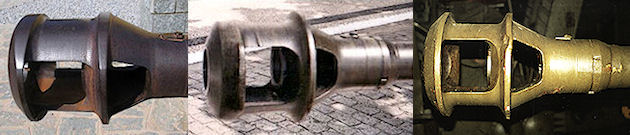
Images of the muzzle brakes fitted to the Pak40 and /1/2/3 guns fitted to the SP mountings show a number of variations in the shapes on the muzzle brakes with some having angled contours to the earlier types as well as more rounded flanges than usually seen on the most common types.
The muzzle brakes included in the "early" and "mid" sets here have a more rounded profile than the more commonly seen oval shape with flattened "top" and "bottom" sections but photos of these types do exist although it's not clear if these are variations on the later rounded type or of the earlier types? The thickness of the large muzzle brake flanges are a little too thick when referring to photos of the muzzle brakes (see below) but not too excessive.
When fitting the two muzzle brake halves together ensure the large openings are lined up correctly which may sound logical but if using cyanoacrylate and focusing on fitting the parts together these may be misaligned? After joining the two muzzle brake halves together there is a small join seam between the two that will need to be eliminated and soldering and lightly filing the join would be the easiest method to deal with this.
There is a small etched retaining bracket added to the top of the muzzle brake made up of a single small etched part that will need care removing from the frets and fitting. You should also note the small bolt head goes to the back of the etched bracket and not the front as shown in the instructions.
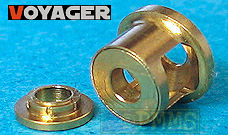
You then slip the brass collar and etched ring onto the barrel and add the assembled muzzle brake to complete the barrel assembly. The fit of these parts was excellent not requiring any filing of the barrel of the inner holes to fit making for quick and easy assembly.
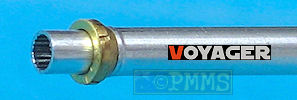
Inner bearing added to forward muzzle brake half
Assembled muzzle brakes
Images of actual muzzle brakes (early, mid, late types)
Additional images of the muzzle brake types included in these sets
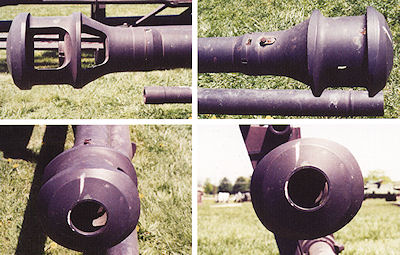
Images courtesy of Model Art
Fitting the barrel to any of the applicable kits will need the barrel collar cut from the kit breech as most have this moulded with the breech, the barrel hole in the kit breech may have to be enlarged depending on the kit used and test fitting will determine this.
The barrel cradle mounting is also provided as etched parts that will need careful bending to shape before fitting to the target kit gun cradle. It is best to anneal the barrel securing strip by running the etched part through a candle flame to make bending around the barrel easier in eliminating the springiness of the brass part. The smaller etched parts can then be added to the mounting to finish off the assembly.
The full length lower cradle slide has the side guides bent to shape but the assembled barrel cradle (etched part G6) is slightly too wide for the lower cradle slide and you need to take care when bending the lower edges of G6 to get these as tight as possible for a better fit to the slide. Soldering the cradle (G6) together is the better option for greater strength as there are other smaller details to be added along with fitting to the lower cradle slide as well as attaching the barrel securing strip to this assembly.
Fitting the cradle slide to your chosen kit should be straightforward but check the fit for any required trimming and the 75mm shell casing has an etched base plate with fine engraved stenciling included although having just the one round leaves it feeling very lonely as these are usually not solitary creatures but could be useful.
with just the muzzle brake parts being different
Assembly is straightforward and the additional etched gun cradle and slide are a nice bonus along with the single 75mm shell casing for another viable option for finishing your PaK40.
Highly Recommended.
See the PaK40 subjects page for additional reviews.
| Nuts & Bolts Vol.18 Marder III H & Pak40  |
Marder III AFV Super Detail Photo Vol.4 Published by Model Art Co.Ltd.  |
Thanks to Voyager Model for the review sets.