
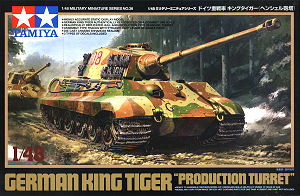
German King Tiger
"Production Turret"
1:48 Scale - Kit No.32536
Review by Terry Ashley
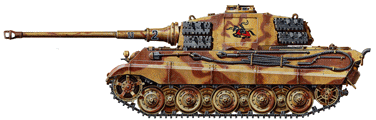
The vehicle itself represents the standard production Tiger II with Henschel turret and has many features from the late August 1944 production but also has some later features included to watch for if you want to be truly accurate.
The hull crew hatches are the early type with the central hull ventilator cover the later round type but both could be seen together while the engine deck layout is the early pre Aug ’44 style but has the central armoured air vent cover was only added from Sept ’44 while the drive sprockets represent the style used from early ’44.
The turret layout is the early Henschel style but with later 40mm Loader’s hatch and the rear turret door has the armoured hinge covers added after Aug ’44 and the cupola is also of the type used after Aug ’44 but could quite possibly be okay together as the timing is close.
These production detail issues are not that great but the biggest issue is the lack of detailing in a number of areas which we will deal with below.
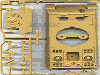
The kit has 110 parts in the usual light beige plastic plus the cast metal lower hull tub, a few poly caps and the decal and instruction sheets.
The standard of moulding is very good overall with a minimum of pin marks and no apparent flash while the detail is very nice in some areas and quite basic in others and you will also have to add your own zimmerit for one of the marking options.
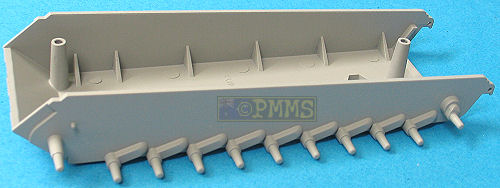
Lower Hull:
This is the usual cast metal tub but is very plain and lacking in any detail
at all especially compared to the cast tub in the recent KV-1 kit. The only
features on the tub are the basic axles with none of the large bump stops on
the first and last stations or bolt details and the hull plate joins on the
hull front have no weld texturing.
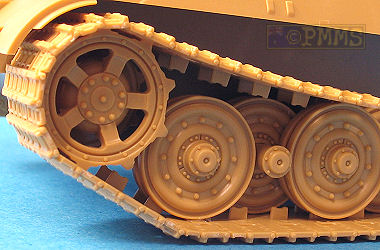
The drive sprockets, road wheels and idlers are dimensionally okay and have
nice details included although the hub bolts on the drive sprockets are a little
undersized and lack definition while the road wheel contours and bolt head
detail is nicely done.
The three part idler has detail on all exposed faces and again looks good with
all wheels designed to be glued to the axle stubs with cyanoacrylate.
When fitting the road wheels there is no clearance between the inner and outer road wheels and would grind together in real life but this won’t be a problem on the kit as the wheels are glued in place. The last road wheel and the idler intermesh and you should fit these together to avoid any problems.
At the front are the hull extension with inner bolt head detail and the correct production tow shackle contours but there are a couple of sizable pin marks to be removed as the track only partially hides these after assembly.
The rear hull panel is a good fit to the rear but there is a little movement as you glue this in place so ensure the bottom of the plastic panel is level with the bottom of the metal tub. Added to the rear hull is the two exhaust pipes with separate armoured covers but these lack any cast texture which you can add with Mr Surfacer or similar for a better appearance. The jack is made up of four parts with separate attachment racks which are a little think and could be thinned a little plus the wooden jack block and two C hooks added.
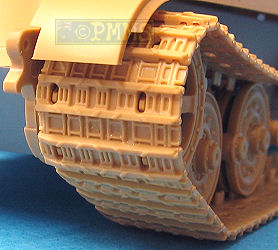
Tracks:
These are the usual link and length in normal plastic with quite nice detail
but there are some shallow pin marks on the insides, some of which will be
hidden by the wheels but you may want to remove these first. The section of
track above the first few road wheels has a subtle upward bend as it doesn’t
actually sit on the first two road wheels.
Fitting the track around the sprockets is fairly straightforward as the links are quite big and gluing one section at a time makes the job easy.
Upper Hull:
The main hull is in one large moulding with separate hull MG ball mount (for
the securing screw), crew hull hatches and rear engine door, again for the
securing screw.
As is Tamiya’s want they give you three tools moulded onto the hull (axe, wire cutters and crowbar) but provide others, sledge hammer, shovel and starter crank as separate parts and the reason some are separate and others not is still a mystery to me.
The weld seams around the hull top are very deep and would be canyons if scaled up and there is no surface texture with the flame cut texture on the hull joins being quite subtle. The large side fenders are separate full length for each side with separate tow cable bundles to add but if you want to add zimmerit this will have to be done before attaching the cables.
The glacis MG ball mount has a separate inner ball with separate MG barrel that could be drilled out for a better appearance and as mentioned you should screw the two hull parts together before gluing the MG mounting in place and you may also want to add cast texturing to the mounting for a better look if not adding zimmerit?
The Bosch head light is in three parts with an open blackout slit but you may want to add the wiring up to the hull top duct as this is quite a prominent feature.
The crew hatches have the early configuration but the grab handles are moulded on as solid lumps and replacing these with wire will improve the look while the two periscopes are just open covers with no inner periscope detail and adding these will again improve the look.
The rear engine deck has open grills for the various intakes but these are a little thick and the large mesh screens added over the forward intakes are just solid plastic and don’t look good at all but will of course be included in the inevitable etched sets for this kit.
Some of the moulded on detail is very basic with the four lifting hooks around the central deck panel lacking in any detail as is the grab handle on the separate engine bay door and replacing these will also add to the final appearance.
The two carburettor intake covers on the central door are identical separate parts but it should be noted these are not the same on the real vehicle with the rear cover having a curved profile (as with the kit part) while the front one should have a sharp edge profile around the top, a subtle difference in this scale but notable.
The armoured cover supplied for the rear air vent intake was a later feature and if you leave this off represent to the earlier intake you will have the slightly enlarge and add mesh screen to the opening.
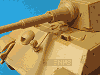
Turret:
The main shell is in one piece with the cupola moulded on with separate front
panel and rear hatch and Loader’s hatch which is the later 40mm hatch
with squared off edges. The rear hatch has inner details as well as the armoured
covers for the door hinges which are a later feature but you have to use them
to attach the door to the turret.
The gun mantlet is in two parts to capture the contours nicely but there is no cast texturing and the mantlet often had a casting seam along both sides which again you may want to add to improve the look and there should also be a small mounting bracket added to the top of the mantlet.
The two piece KwK43 L71 barrel is in the usual two halves with early muzzle brake included but the fit of my barrel halves was not that good and resulted in a distinct oval barrel profile after sanding the join seam smooth.
The inner gun mounting is a simple arrangement with poly caps trapped between two supports to allow barrel elevation and this fit neatly through the turret front plate with the barrel assemble then attached to the mounting.
The cupola has open periscope covers but no actual periscopes and again you may want to add these and the separate swivel hatch has the grab handle moulded on and again you may want to replace this with thin wire. The separate machine gun ring and MG mount are a little on the thick side but the later barrelled MG34 is quite petite.
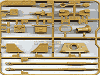
There are separate lifting eyes for the roof and a spare track sections for the turret sides but you will have to make the track racks if you want to leave some of these off.
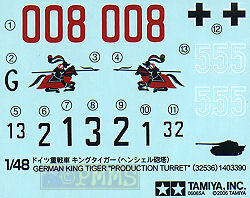
Decals:
These are again the usual Tamiya with good printing but thickish carrier film
with markings for three Tigers.
Conclusion:
Overall the kit will build into a nice replica of the Tiger II in this scale
with the differences in production features not that great but it could do
with detailing in some areas to improve things as the moulded on detail is
a little chunky in places.
The plain metal lower hull is noticeable but with full fenders fitted you can’t see that much of it so may not be a problem with plenty of scope for additional detailing but there is a bit of work to add the zimmerit for applicable tanks.
References:
Kit courtesy of my Credit Card and the excellent service from Rainbow Ten.
Page created August 22, 2006