
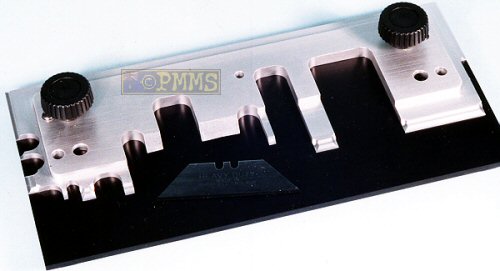
Hold & Fold
8 inch
Etched Metal Bending Tool
Review by Terry Ashley
This review is of the larger 8 inch model Hold & Fold which includes
some refinements and additional features from earlier H&F models.
Let me say up front this review is not meant to be a comparison review with
the Etch Mate I reviewed some time back,
I will leave it to the individual to read both reviews and decide
from
there which tool is for them.
The 8 inch Hold & Fold requires some minor assembly when you first receive
it but this only takes a few minutes and you are ready to get to work, an A4
sized instruction sheet is included to explain the assembly required and gives
some basic tips on using the tool.
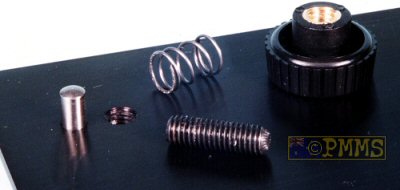
The set comes with a large thick base plate with two alignment pins pre-fitted
to ensure they are fitted correctly, you then have to screw in the two threaded
setscrew posts and these have Allen Key sockets in the end so they can be tightened
with the appropriate Allen Key (not supplied). You can also add a small drop
of cyanoacrylate or thread lock to make sure the setscrew posts don’t
move.
Slip the springs over the setscrews and place the tool head over the springs
and alignment pins and screw down the two knobs for a secure fit, all very
easy.
There are four self adhesive “feet” provided to attach to the underside corners of the base plate and I found these very sticky giving a secure footing on the workbench eliminating any movement while bending and thankfully the baseplate and tool head were perfectly straight which was a problem with my original Hold & Fold bought some years ago and has obviously been recified.
The large tool head is finely machined in aluminium with different sized fingers
with bevelled edges for different bending jobs and can also be moved on the
base
due to the
inclusion of two sets of locating holes in the tool head.
This allows you to position the tool head in the normal position or move it
back on the base plate giving more room in front of the tool head for larger
parts, the tool head can also be rotated to position the straight edge to the
front for bending larger etched parts such as the long fender sections in the
Eduard Karl set (35628) and this can also be positioned forward or back
on the base plate as you wish for more working room.
Click to see alternate positions
of the Tool Head
I found when taking the tool head off for repositioning it is best to hold it down with one hand while unscrewing the two knobs with the other, this keeps the tool head square with the base and you can then easily slip it off the setscrews and alignment pins as it tends to get stuck on the posts if one side rises higher than the other, this is not a criticism of the tool just plain physics.
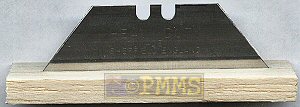
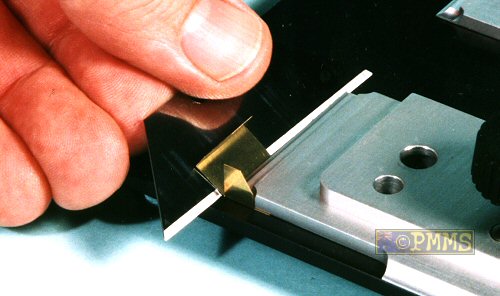
Finally there is the “Stanley” type blade provided to assist in
bending the parts and a word of caution on this as it IS a blade and a very
sharp one at that and it’s primary job is cutting. This tends to be forgotten
when you aren’t actually cutting anything and you can become careless
but due care should always be taken when handling and using the blade during
the bending process so you don’t end up with claret over your etched
parts.
When not using the blade I press it into a suitable sized block of balsa wood
or pencil eraser to keep the cutting edge out of harms way.
Using the tool:
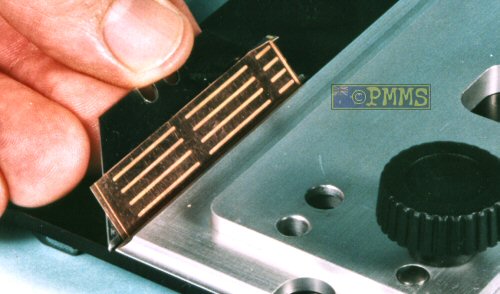
For the purposes of this exercise I have used some of the parts from the Voyager
Hetzer PE Set (35009) to illustrate the H&F in action.
Being the 8 inch version you may think it is only suitable for large jobs such as ship railings and large vehicle fenders but the tool head has at one end very small fingers and indentations to allow small etched parts to be worked while at the other end is one larger finger with different size fingers and spacings in between, this allows virtually any sized part to be worked.
Before bending any part with more than one bend it is best to visualise the bending sequence before starting as bending a join more than once usually results in it snapping off and that’s not what you want.
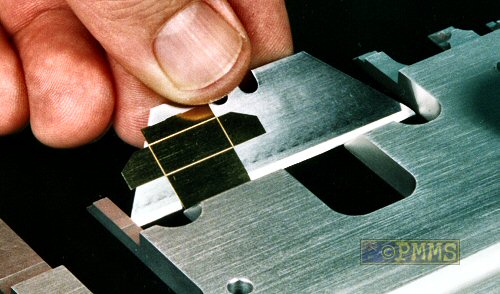
To bend the larger Hetzer fenders simply reverse the tool head and align the
fender bend line with the front of the tool head. It is best to align the rear
of
the engraved line on the etched part with the edge of the tool head; this allows
the part to be bent on the actual engraved line and not on the part itself
as it would if aligned at the front of the engraved line.
Tighten the knob to secure the part and slip the bending blade under the part
and bend to the required angle, reverse the part and bend the other side of
the fender ensuring and section already bent will miss the finger as its bent
upward.
For bending thicker average sized parts the centre fingers are the full thickness of the tool head with a single bevel for greater strength and can be used. The distance between the two extended fingers each side of these being just wide enough for the width of the bending blade showing the well thought out design.
When bending parts with two opposing angles the outer corner of the tool head can be used so the two angles can be bent at the same time, simply line up the part with the engraved bend lines even with the front and side of the tool head and bend as usual.
The extended finger with reduced height is just the thing for bending parts with multiple bends that come back onto itself. After making the first two bends the third will fold back over the thin finger without any problems, this can be used for even very small parts.
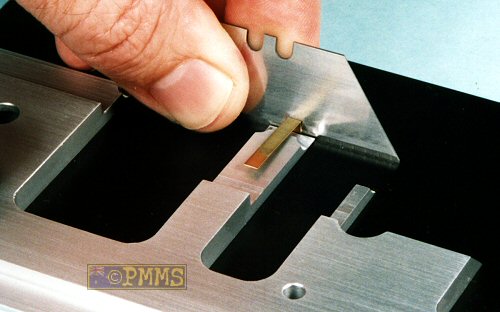
This extended finger is also useful for parts with multiple bends such as the Hetzer storage boxes where after bending the two sides and the first couple of bends the final bend can be made where the box folds back on itself with the sides missing the edges of the finger. The part can be wider than the finger as the parts already bent will ensure the final bend is even.

After using the tool for a while you will get to know which finger or tool head arrangement best suits the bending job required and the spring loaded tool head only requires a slight reduction in knob pressure to slip the parts in and out.
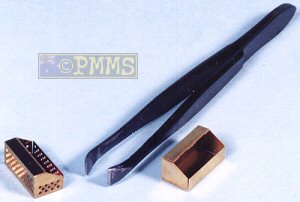
The finished boxes and fenders were achieved quickly and without any problems, the H&F makes the job extremely easy with its extended fingers and corner sections making bending two sides at once easy. There is another tool I use in conjunction with bending tools which is invaluable for simple bends and handling the etched parts, this is a pair of snub nosed tweezers which are also just the thing for holding the etched parts while filing off the resulting burr after cutting them from the frets.
Conclusion:
Overall an excellent tool that does its job very easily and well, some of the
features such as the extended fingers with reduced height and multiple position
tool head make different bending jobs easy to handle. The versatility of
the tool in handling items from large fenders and railings to the smallest
tool clips is also very impressive.
Highly recommended.
This and the other Hold & Fold models can be purchased directly from The
Small Shop EU
Thanks
to Alasdair of The
Small Shop EU for
the Hold & Fold sample.
Comment
on the other tools:
As I mentioned the choice between this and other tools such as the Etch
Mate is up to
the individual as both types work well and do the job intended, it is really
a matter of personal preference as it's difficult to compare directly
as this 8 inch model will obviously handle some jobs the smaller 6 1/2" Etch
Mate can't while conversely the Etch Mate will handle some jobs
the smaller 4" H&F won't,
so basically what works for you, works for you.
Page created 28 March 2004