

I have used here the most basic of hinges but the theory applies to even the most complicated etched hinge and we will also look at attaching multiple hinges to ensure they all line up and work correctly.
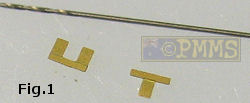
The basic etched hinge consists of a “U” section and a “T” section that fit together after bending the “fingers” around an appropriate hinge pin, usually thin wire for strength but you can use thin plastic rod or stretched sprue if you wish.
The first task is to cut the hinge segments from their metal fret and clean up any remaining bur which can be a little tricky with some of the finer hinge segments but using a pair of fine tweezers and needle file this shouldn’t take too long.
The next step is to bend the “fingers” of both hinge segments around the pin (Fig.1) and I use initially an appropriately drill bit shaft as this hard steel and will not deform as you bend the hinge segment around it.
To bend the “fingers”, firmly press the hinge segment to a hard surface using a stout pair of tweezers and using the tip of a #11 blade or similar carefully bend the finger around the drill shaft (Fig.2). This same technique can be used for longer hinges that have multiple “fingers” by bending a few “fingers” at a time until they are all bent.
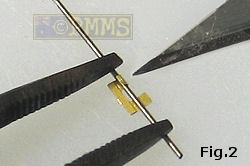
A note of caution here, make sure the point of the tweezers is well over the drill bit or you could launch this and the hinges into the void if they slip out from under the tweezers point.
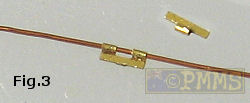
Once the initial bending has been done using the drill bit shaft, replace this with the wire you are going to use for the hinge pin and press the “finger” tightly around the wire pin (Fig.3). Repeat the same process for the other half of the hinge.
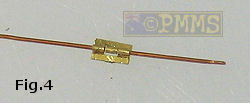
Next fit the two segments of the hinge together on the wire, to aid in slipping the wire pin through the hinge slightly file the end of the wire to a rounded (or pointed) profile as this will allow the pin to slip through the hinge segments more easily than a jagged raw cut end of the wire. (Fig.4).
When fitting the assembled hinge, be it a single hinge or a few that have to line up as in this example of hinges along one side of the Hauler 1:35 Anhanger 51 trailer always fully dry assemble the target storage box or hinged panel to fit the hinges.
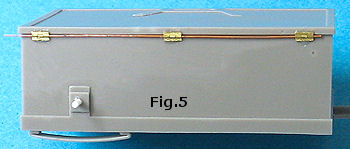
While holding the box or hatch parts together and with the hinges still on the wire attach each hinge segment using thick cyanoacrylate (super glue) or solder if on an etched box. Note you should not use thin cyanoacrylate as capillary action will run the glue through the entire hinge making it solid and also be sparing with the thicker cyanoacrylate (or solder) so it doesn’t overlap onto the other segment as you attach the hinge. (Fig.5).
This method of keeping the wire in place ensures the two hinge segments stay fully aligned as you attach the hinge and that multiple hinges are positioned correctly and are also aligned with each other.
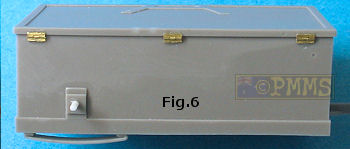
Once you have attached the hinges and tested the box top or hatch will open correctly remove the long wire, cut the short pin segments and slide these back into each individual hinge with a very small dab of cyanoacrylate on the end to hold the pin in place. (Fig.6) Note, filing the end of the small pin will also make inserting this easier as you did with the longer wire.
As mentioned this method can be used for any size or combination of hinges to ensure alignment of the hinge segments and individual hinges as well as for ease of assembly.