
Sd.Kfz.6/2 3.7cm FlaK36
auf Fahrgestell Zugkraftwagen 5t
1:35 kit comparison
Chapter 6: Cab
 The Bronco cab is made up of the main cabin floor that includes the side fenders sections along with additional parts attached to the engine firewall such as the instrument panel plus the side and rear panels, the seats and numerous smaller parts added with care needed cleaning up the fine mould seams on these to avoid damage.
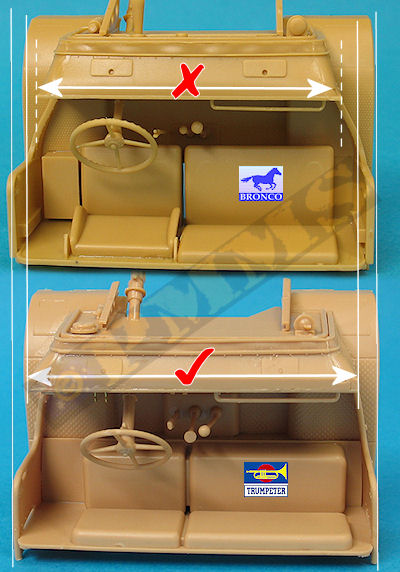
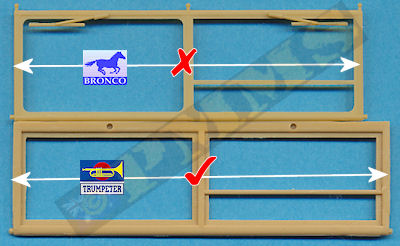
The major issue here a is the cab front/instrument panel is 2mm too narrow which translates to the windscreen also being too narrow so it can mate with the cab top section. The two side panels have a distinct inward kink as a result which is incorrect, the actual panels have a smooth curve with the lower edge of the crew entry opening almost straight without the kink of the kit part. To explain this a bit more the kit has the solid side panel parallel with the vehicle sides but in fact this panel has a slight inward curve which continues with the open crew entry part and to the side of the engine compartment rear of the hood line. This section should curve outward more than it does on the kit to meet with the front of the cab/windscreen if this was the correct width. See image.
This configuration is conformed in period photos on the 5ton half-track and in both the Panzer Tracts and Tank Power 1:35 plans but would take quite a bit of work to correct the kit parts unfortunately.
Note there is a little distortion in the image due to camera angles but still shows the issues as above.
The instrument panel while being too narrow has nice details included along with the separate instrument cluster with decals for the dial faces and small data blocks, the cluster has the correct top corner curves with the dial layout being one of two styles noted in reference documentation for the Sd.Kfz.6 BN 9. A two part oil tank is added under the panel but you will need to trim these off ¾ of the moulded on securing strips on the front to allow the instrument panel to sit correctly aligned with the firewall, this was the only issue fit wise with any of the parts. Also added to the panel are the separate grab handle and dial plus the full length steering column and steering wheel that include the rippled finger grips on the rear side of the wheel for good detail.
The floor section has fine tread plate but the central hump under the gear levers should be more pronounced, the gear levers themselves are nicely done with good definition of the hand brake handle. The brake, clutch and accelerator pedals are separate parts but are undersized and the accelerator “pedal” should actually be a small piston with the pedal attached and not the same as the other pedals. There is a separate battery box with a separate top that can be left off if you wish to show the terminal details.
The seats are in four sections, two for the cushions and two for the backrests, the driver’s backrest has the side extensions included but these should be blended into the main cushion to form a curve and not the distinct protrusion as on the part, also the backrest should be located a little lower on the rear panel and not level with the wider passenger back. It is easy to just trim the locating ribs on the rear panel and fit the cushion lower down as shown in the assembly images, there are also two small etched brackets fitted either side of the driver’s backrest.
The two side panels are nicely moulded with details on both sides and the only cleanup being some very fine flash inside the open hand grips plus a couple of pin marks that are hidden after the sidewalls are fully assembled with a separate turn indicator arm added to the outside. As mentioned there is a distinct kink in the crew entry opening that shouldn’t be there due to the narrow firewall but despite this the parts assembled without any problems.
There is also two small lights with separate clear lenses plus a larger spot light on the left side again with separate clear lens and two separate grab handles, it would be advisable to not attach the lights until after the cab is fully assembled to avoid any damage.
Probably the most important fittings are the two separate windscreen mounting posts (parts F45, F46) as these are quite small and need to be glued ensuring they are aligned parallel to the cab sides so the windscreen will fit properly later.
Despite the dimensional issues assembling all the components was straightforward with the firewall fitting precisely to the lower floor and the sidewalls and when fitting the top body panel (part B11) between the sidewalls and firewall you will need to squeeze the sides together as the glue dries to ensure a tight fit at the sidewall joins. But once the glue has dried there is just a very fine join line either side of the body panel that is easy to remove with light sanding or scraping with a #11 blade.
The windscreen itself is moulded quite thin with two clear ‘glass’ sections added from the inside along with the two wiper motors and outer blades. There is a choice of standard windscreen with clear plastic screen inserts plus the inner wiper motors and two extremely small 3 part etched brackets for the upper left side opening windscreen section or a canvas covered windscreen which will be attached in the lowered position. It is possible to fit the standard windscreen in the raised or lowered position as required.
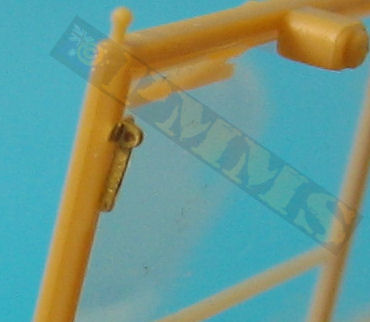
The small etched screen bracket made up of 3 very small parts
 The Trumpeter cab is also made up of the main cabin floor and the side fenders sections along with additional parts for the lower seat bulkhead and separate cushions plus the engine firewall and instrument panel, side and rear panels plus the seats with numerous smaller parts added. The cab has the correct continuous side panel curve and is the correct width as is the windscreen frame.
The instrument panel has the separate instrument cluster with decals for the dial faces and small data blocks, the instructions don’t tell you there are decals for the dials but they are on the small decal sheet. The cluster lacks the top corner curves and has the dial layout depicting one of two styles noted in reference documentation for the Sd.Kfz.6 BN 9, this is different from the Bronco cluster layout which depicts the other panel layout shown in the documentation. A two part oil tank is added under the panel along with the separate grab handle and dial on the left hand side which is rather poorly detailed plus two small etched levers and the full length steering column and steering wheel.
The floor section has fine tread plate with the central hump under the gear levers the right size but the gear levers themselves are a little oversized. The brake, clutch and accelerator pedals are separate parts with etched foot plates that include the K and B embossing on the respective brake and clutch pedals so watch you fit these on the appropriate pedal, the plates are slightly oversized but nothing to get excited over and the embossing gives a good visual appearance. The accelerator “pedal” correctly depicts the small piston with the pedal attached as it should be but there is no battery box included with just an open space in the cab where this should be.
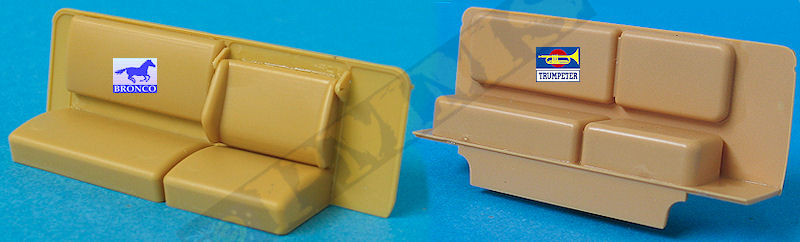
The seats lower cushions are a little on the thick side and should be reduced in height while the separate one piece backrests lacks the correct side extension curvature for the driver’s backrest it should have and also the driver’s backrest should be located a little lower on the rear panel and not level with the wider passenger back. A bit of work will be needed to separate the driver’s backrest and reposition as well as adding the rear curve as it should be.
The Trumpeter driver's seats lacks any of the required detail and is too high on the rear panel, the lower cushions are
also too thich and lack the subtle contours of the actual seats
The two side panels are nicely moulded with details on both sides but you are required to cut away a section from the rear of the panel to accommodate the rear tray sides, this is due to the side panels being those that will be included in the forthcoming Sd.Kfz.6 Pioneer version. The only cleanup is some very fine flash inside the open hand grips plus a couple of pin marks that are hidden after the sidewalls are fully assembled with a separate turn indicator arm added to the outside. The side panels have the smooth curve with the lower edge of the crew entry being straight without the kink as it should be.
There is also two small lights with separate clear lenses plus a larger spot light on the left side again with separate clear lens and two separate grab handles, it would be advisable to not attach the lights until after the cab is fully assembled to avoid any damage.
Probably the most important fittings are the two separate windscreen mounting posts (parts G15) as these are quite small and need to be glued ensuring they are aligned parallel to the cab sides so the windscreen will fit properly later.
The fit of the cab parts to the firewall, especially the top panel (part G7) is not that good with some gaps to be attended too, also the fit of the instrument panel to the top panel was poor and I had to reduce the length of the mounting brackets (parts F15/G31) to allow the instrument panel to fit properly. The windscreen frames are moulded on the thick side with two clear ‘glass’ sections added from the outside, this results in the glued edges being visible and over painting this will just increase the thickness of the frames even more. There are also the inner wiper motors and two outer wiper blades to be added.

Click for large views
|
