
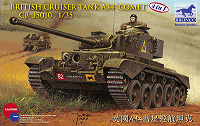
Comet Canvas Covered Mantlet And Gun Update
Set No.A106
Review by Peter Brown
with additional notes by Terry Ashley (in italics)
 One of the omissions on the Bronco Comet kit (#CB-35010)
is the cover for the mantlet and looking at photos of them in service almost
all tanks appear to have them. Bronco themselves have released
a resin add-on and now Accurate
Armour have produced their own which also includes the armament as
well.
One of the omissions on the Bronco Comet kit (#CB-35010)
is the cover for the mantlet and looking at photos of them in service almost
all tanks appear to have them. Bronco themselves have released
a resin add-on and now Accurate
Armour have produced their own which also includes the armament as
well.
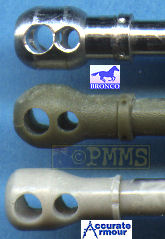
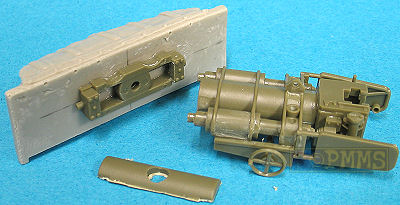
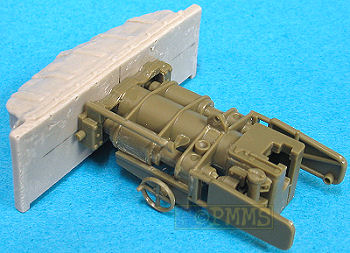
The set has just four resin parts and as would be expected, these come from AA’s existing full kit of the Comet released around 1990 as K018. The kit is produced with the mantlet as part of the complete turret casting and comparing the two the Update Set uses the same master. The guns are also the same as the full kit with the 77mm barrel in resin cast around a stiff metal core and includes a separate muzzle brake which requires the baffle holes and muzzle to be drilled out, a simple task using a drill though I would recommend using a pin vice as that is more controllable.
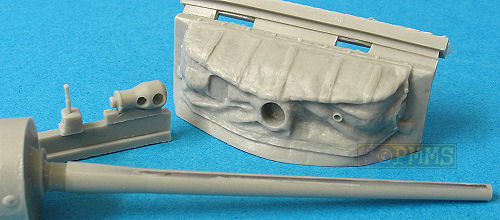
It is easiest to drill out the two side holes and the muzzle while the muzzle brake is still attached to its casting block as this gives a more solid hold and you can carefully trim the muzzle brake after this.
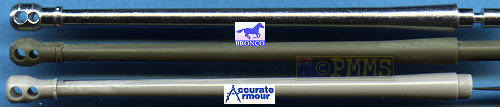
Barrel dimensions:
The actual 77mm barrel measures from where it exits the mantlet to the start
of the muzzle brake at 104.5inches which equals 75.83mm in 1:35 scale with
the
AA barrel measuring 76.5mm and the Bronco plastic
and metal barrels at 75.2mm and as all three differ by less than 1mm it's
really of little concern.
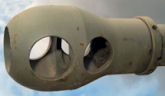
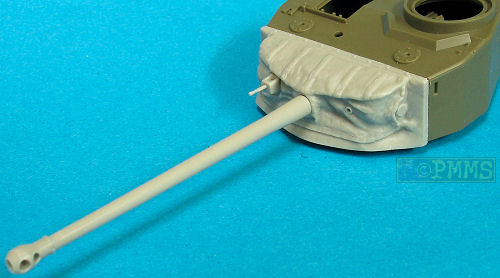
The other more important issue is the shape of the muzzle brake which has rounded contours and spaced baffle holes in most photos I have seen. The AA barrel has the correct rear contours and hole spacings but the front is too square and should be more rounded, a bit of sanding will fix this. The muzzle brake shape of the AA part can be seen occasionally but appears far less common than the rounded type of the Bronco plastic muzzle brake.
The Bronco plastic barrel matches very closely to images and drawings in both profile and the hole spacing but the Bronco metal barrel has the contours far too square and the baffle holes too close together.
 |
 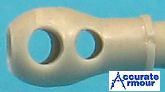 |
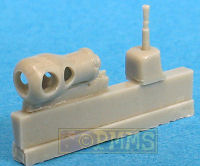
A BESA barrel end and its supporting armoured tray are also provided and you may want to drill out the barrel further for a better appearance with this unit just gluing straight to the mantlet cover.
The mantlet cover has very good canvas contours that match photos closely as well as the weld beads around the rear section that mates with the turret and is designed to replace the Bronco parts (E2, E18, F13 and F14) in Section 6 of the kit instruction sheet. There is a moulding block to be removed from the back which snapped off with a little pressure and was soon cleaned up. AA tell us to fit their part to the turret front with the lower part resting on the "lip" provided by Bronco part E27, when I tried this I had to do some cutting away and thinning to get a level fit.
I would suggest fitting some sort of locating part to the back of the resin item to ensure a tight fit, the mould plug can be used for that, or perhaps cutting away the front of E27 flush with the turret sides.
As suggested I found it easier to cut the lower turret ring (part E27) flush with the front of the turret and simply attach the resin mantlet to the front of the turret with cyanoacrylate. This will leave the indentation on the bottom of the AA mantlet cover but this can’t be seen once the kit is assembled.

As the resin item has no provision for fitting the plastic gun internal parts, these can be left off but if you want to view them though open hatches or add an interior you will need to do extra work.
To add the assembled gun breech to the resin mantlet cover firstly mark the location with a soft pencil on the back of the resin part using the trunnion mountings on kit part E2 as guide. Next using a razor saw cut the front curved section from the Bronco kit gun mounting (part E6) and glue the mounting to the back of the resin mantlet cover. Then simply glue the assembled breech to the gun mounting which is inserted through the front turret opening as you fit the mantlet cover in place.
Note - there are two different styles of mantlet covers seen on Comets. Wartime vehicles have the style AA provide with the lower edge tucked under the mantlet and the two round trunnion bosses exposed. Many tanks in post-war photos have a larger cover which extends to the "chin" on the turret front and also covers the sides of the mounting. Bronco depicts the square locating points for that on their part F13.
Conclusion:
Overall a simple upgrade which improves the appearance and saves the trouble
of making the cover yourself and also offers subtle detail improvements over
the Bronco resin mantlet cover. You can either sand to contours of the AA muzzle brake or use the Bronco plastic kit gun whichever you prefer.
Highly recommended
See the A34 Comet Subject page for additional detail/update set reviews available.
References:

 for
the review set.
for
the review set.
Page Created December 15, 2006