

M1A1 Abrams Engine Set
CMK 1:35th Set #3059
Review by Terry Ashley
The box top says “M1A1 Abrams for Tamiya kit” while the enclosed instruction sheet says “M1A2 Abrams for Dragon kit”? The illustrations in the instructions show the parts being fitted to the Tamiya M1A2 kit so if your confused, so am I.
But in reality the set is designed for any of the Tamiya Abrams kits;
![]()
35156 M1A1 Abrams
35158 M1A1 Abrams w/mine plow
35269 M1A2 OIF
But they can also be used with any of the other available Abrams kits as the resin engine compartment fits inside the kit hulls which are the same width on all kits but some trimming is needed such as removing the inner motorized mountings in the Tamiya and Trumpeter kits and the engine deck T panel is slightly different sizes on some kits; (more on this later)
![]()
3516 M1A1 Abrams w/mine plow Desert Storm
3517 M1A1HA Abrams
3533 M1A1HA Abrams 1st Marine Tank Battalion
3524 M1A2 Abrams
![]()
6438 M1A1 Abrams w/resin parts
6449 M1A1 Abrams
![]()
00334 M1A1HA Abrams
00335 M1A1HA Abrams USMC w/TWMP
00336 M1A1HA Abrams w/mine plow
00337 M1A2 Abrams
00346 M1 Panther II
The CMK Set:
The set consist of 21 parts cast in a dark grey resin and the 4 page A5 instruction
sheet. The standard of resin casting is superb with crisp clean detail without
the slightest hint of warpage and no air holes or other blemishes anywhere.
The parts have the usual casting blocks to be removed which are easy enough
except for the engine bay tub which has a huge resin block on the bottom that
has to be removed for the tub to fit into the kit hull and this will require
a bit of effort to remove. I went to the tool shed and actually used a metal
hack saw for the job as using a modelling razor saw would have taken the better
part of a year. A small hobby power saw would also be very useful but take
care when using any power tool and you also have to be careful holding the
tub while cutting as the thin rear walls can easily be snapped off, and don’t
forget the face mask for the resin dust.
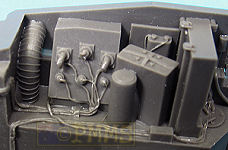
The detail on the resin parts is again excellent with very well defined wiring and engine accessories as well as the many contours of the tub floor and sides that include the lower torsion bars and cabling for a very impressive casting. The turbine engine also has excellent wiring and other details included again without the slightest blemish.
The details match those in the references listed much better than some other resin Abrams engines especially the intricate wiring at the front of the turbine but the mesh intake covers on the oil coolers are solid with just mesh texturing.
The two rear upper walls of the tub are separate parts allowing for the outward contours here and these are easily glued in place using thicker cyanoacrylate for a better bond.
The other impressive thing with this set is the excellent and precise fit of all the resin parts which require no trimming to fit and also included locating lugs and pins to make sure of the proper fit, again very impressive.
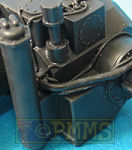
Due to this the assembly of the turbine and fitting this into the bay tub made for one of the most trouble free resin sets I have ever assembled. The connecting pipes to the large oil coolers have locating pins and corresponding holes to make for a secure fit but I also added plastic rod pins where the pipes joined the turbine to allow these to be added and removed freely, but this is a personal thing.
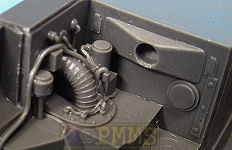
There is one step not shown in the instructions for some reason which makes
fitting the turbine into the bay even easier. There are two holes included
in the rear side walls of the tub and these correspond to the centres of the
two separate final drive housings (parts PUR9). The final drives fit neatly
into their locating holes in the rear of the turbine but by drilling a hole
in parts PUR9 (after removing the casting plugs) you can slip a plastic pin
through the sidewall hole into the final drive hole to precisely hold the powerpack
at the right height inside the tub (see images).
I used 2mm plastic rod for the pins and drilled the corresponding 2mm holes
in the final drives and widened the wall holes also to 2mm for a uniform fit.
At the front of the turbine is a large locating lug and using this and the pins means you can add and remove the turbine into the tub to test fit and also allow them to be painted separately and add later as no glue is actually needed to hold the two together using the pins to securely hold everything together.
The large upper exhaust duct (part PUR13) also has a large square locating lug for precise location and the smaller ducting pipe (parts PUR14, 15) also have a locating hole for the pipe in the bulkhead to make fitting this easy. There are large "NO STEP" and other warning stencilling on the top of the ducting that you will have to find elsewhere to finish this off.
One puzzling thing is the choice of dark grey resin when most of the engine bay and turbine are painted in an off white colour, this will make for some interesting painting as you will possibly need a few undercoats to cover the dark resin colour before applying the final while colour.
You are given a resin plug (part PUR4) that fits inside the rear louvred kit panel to blank this off and this also fits very precisely but there are a number of issues in actually fitting the tub to the kits.
The instructions are exploded view drawings with all the parts clearly indicated and make assembly straightforward apart from not mentioning the final drive pins as mentioned above.
Fitting the engine tub to the Abrams Kits:
The set gives you a nicely cast T shaped engine deck panel but this doesn’t
have any non-skid texturing, probably in keeping with the Tamiya parts which
also don’t have this texturing and the four small mesh doors as do all
other Abrams engine sets and some kits with separate engine decks.
The resin panel replaces the kit panel which you will have to cut out from the Tamiya hull thereby destroying the panel in the process, but this raises other issues with the Abrams engine deck layout.
The actual T panel on the Abrams can’t be removed until five surrounding doors are opened as these rest on the T panel and also the rear louvered hull doors have to be opened first which means to accurately depict an Abrams with the T deck removed all these doors and panels must also be open exposing the batteries, cooling fans and other detail under these panels and also the inner louver detail on the rear doors will have to be added. There is an illustration in the Museum Ordnance Abrams book showing the powerpack being lifted out showing the other open panels surrounding the T engine deck and some of the inner detail of these open panels. (Thanks to Pawel "Vodnik" for the technical stuff here.)
In fact the resin T panel includes the wire lift handles from the surrounding doors with the casting (as do most other resin and kit panels) when these handles are actually not part of the T panel.
Most other resin Abrams engine sets have this same issue although a few such as the resin parts in the Italeri M1A1 kit #6438 and the Verlinden set do include the batteries to add when you open these panels.
To fit the resin engine tub into the Tamiya kits you need to trim off the internal locating lugs for the motorized parts and also trim the insides of the outer kit final drive housing that protrude into the bay and the tub then fits very snugly without any further trimming needed.
To fit to any of the other Abrams kits some additional trimming may be needed but the Dragon and Italeri kits have no motorization lugs but the upper T panel is a slightly different size on the Dragon kits (2mm depth difference) and other minor differences with some kits and test fitting is the order of the day. But the nice thing is all the Dragon, Italeri and Trumpeter Abrams kits come with the T panel as a separate part so you don’t have to worry about cutting this away from the rear hull as you do with the Tamiya kits. The Italeri kits have the engine bay walls included with the upper hull and so these will have to be cut away, no big problem. This set may also fit to the soon to be released Dragon M1A1 AIM Abrams as reports are this will better depict the engine deck layout than previous kits, we will know more when the kit hits the shops.
Conclusion:
This CMK set is without doubt the best Abrams engine bay/turbine set yet released
with superb quality casting detail, no blemished at all and the most precise
fit of resin parts I’ve seen for a while with the numerous locating
lugs and pins making the job that much easier. The detail on the engine bay
itself will look excellent with the turbine completely removed making for
some good diorama potential.
The issues with the actual engine deck layout will have to be taken into account to accurately depict an Abrams with the engine exposed or removed and considerably work will be needed to remove the additional panels and add the inner detail.
But the engine bay and turbine on their own get top marks and I guess it’s up to you how far you go with the other work required to accurately depict the setup.
Highly recommended with reservations regarding the extra work needed to correctly depict the Abrams with engine exposed.
Engine bay and powerpack details

The Resin Parts
Click for larger view
Assembly images
close new window to return to review
| Abrams Main Battle Tank M1A1 and M1A2 Museum Ordnance Special #9 Darlington Productions Inc.  |
M1A1/A2Abrams Mini Color Series #7502 Concord Publications ISBN 962-361-638-4  |
ABRAMS A History of the American Main Battle Tank Vol.2 R.P.Hunnicutt  |
| M1 Abrams Main Battle Tank Osprey New Vanguard 2 ISBN: 185532 283 8  |
Abrams Company Europa Militaria No.28 The Crosswood Press Ltd. ISBN 1 86126 285 X  |
Review set courtesy of my overworked Credit Card.
CMK Update sets are
available from Hobby
Gryffon
Page created June 24, 2006