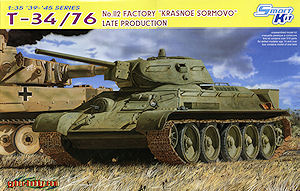
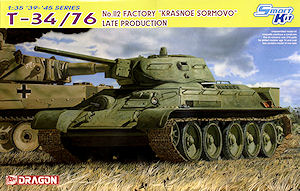
This latest T-34 kit from Cyberhobby/Dragon follows the recent kit of the T-34-76 No.112 Factory "Krasnoe Sormovo" Early Production (kit #6452) with this kit of the T-34/76 No.112 Factory "Krasnoe Sormovo" Late Production which like the Early Production had a number of features peculiar to this version as do numerous other versions from different factories.
The kit is labelled as Late Production but is in fact more of a Middle Production produced around mid 1942 with those produced in late 1942/early 1943 had additional features such as the armoured hull machine gun shield and the head light moved from the glacis to the left hull side. It should also be noted that many of the Factory 112 vehicles built around this period were also fitted with additional armour glacis panels but these are not provided with this kit. There are numerous 1:35 plans of these additional armour panels the T-34 Mythical Weapon book if you wish to add these yourself to depict the vehicles as they appear in many period photos.
Cyberhobby/Dragon have again captured most of these features that include a revised rear plate design, notched welds on the glacis as well as all rubber road wheels but with the all steel idler wheels and optional features of hull and turret grab handles with the additional bullet guards added around the turret ring and squared cornered top meshed engine bay cover.
The kit also features the single head light on the left glacis and hull machine gun without the armoured shield plus the right hull mounted aerial pot which was fitted to these later production vehicles.
As you would expect the kit uses parts from the T-34-76 No.112 Factory "Krasnoe Sormovo" Early Production (kit #6452) with many of these parts originating from previous kits such as the T-34-76 STZ Mod.1941 (kit #6355) and T-34-76 Mod.1941 Cast Turret (kit #6418) with the track coming from the SU-100 Tank Destroyer (kit #6359). These is a new sprue U that includes a new cast turret shell, new style drive sprockets and the large square fuel tanks and some of the older sprues have had the sprue snipper as work with gaps resulting in the sprue layout.
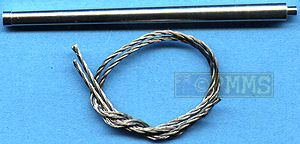
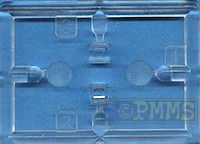
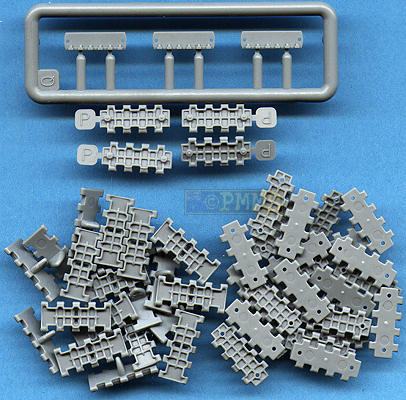
The kit consist of 393 parts in light grey plastic with a further 44 track links plus a large etched fret and the metal 76.2mm barrel, a length of braided steel wire, 4 clear plastic parts as well as the decal sheet and the instruction sheet.
Standard of moulding is excellent throughout with clean crisp details and virtually no pin marks that can be seen after assembly due to the many small plastic nodes but you will need care removing these from some parts. Some of the sprue attachments overlap the parts meaning when you remove these there is no scar left on the part itself which makes things a little easier on the cleanup while others have the usual sprue attachment on the part proper.
Some of the older parts have a little bit of fine flash appearing but nothing excessive and the level of surface details is well done with nice weld seams, bolt detail and other detail nicely represented and the fit of the parts is very good overall with just a few minor niggles but nothing that the average modeller can’t handle.
Dimensionally the kit measures up well against available 1:35 plans and data with any discrepancies well within acceptable tolerances given printing processes etc.
One thing to watch is due to the sprues coming from various kits there are some sprues with the same letter such as 2 x sprue H, 2 x sprue Q and 2 x sprue R as well as duplicate parts that include 2 x drive sprockets, 2 x idlers, 2 x glacis plates, 2 x lower and upper rear hull plates, 3 x engine intakes 3 x exhaust pipes, 3 x engine cover hatches, 2 x fuel tank styles, 3 x driver's hatch top covers, 2 x turret roofs, 4 x turret hatch types and 2 x gun tube styles which means you have take note of the instructions to make sure you use the correct parts in the kit. It goes without saying there are plenty of parts left over for the spares box.
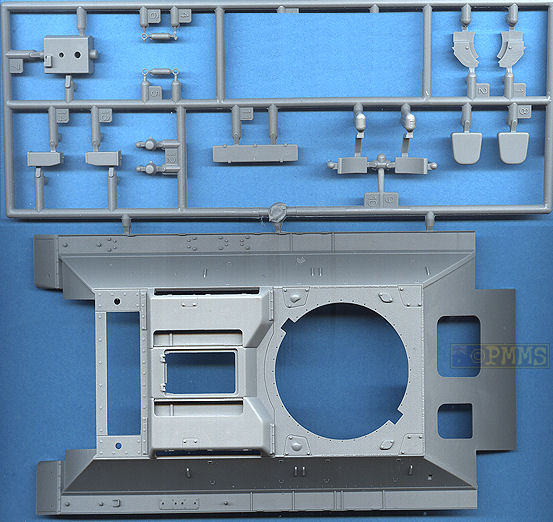
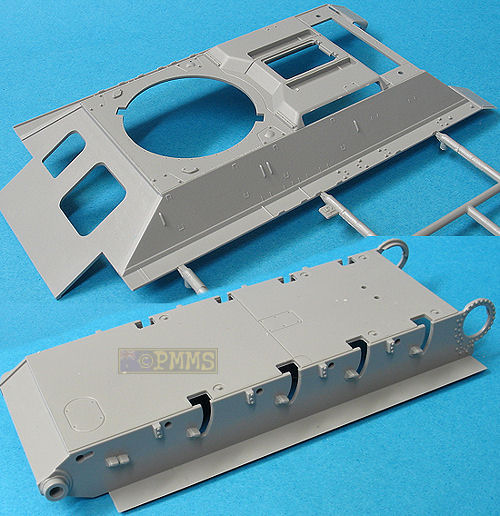
This is the same tub from the previous T-34 kits with separate front panel and new lower rear panel added and includes the side sponson fillers as well as a couple of separate access plates on the hull bottom.
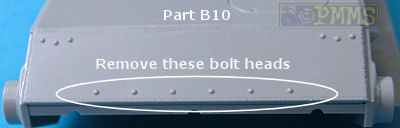
The separate lower front plate has nice weld seam details but you will need to remove the 6 upper bolt heads as these are not on these Factory 112 versions. The lower rear hull panel includes the slightly different features of the Factory 112 plate on the final drive bulges as well as towing hooks added to both panels with the fit to the hull being very good.
Inside the hull are the separate suspension channels with inner spring detail with the separate axles from the original T-34 kits and have a little less detail than those in more recent kits.
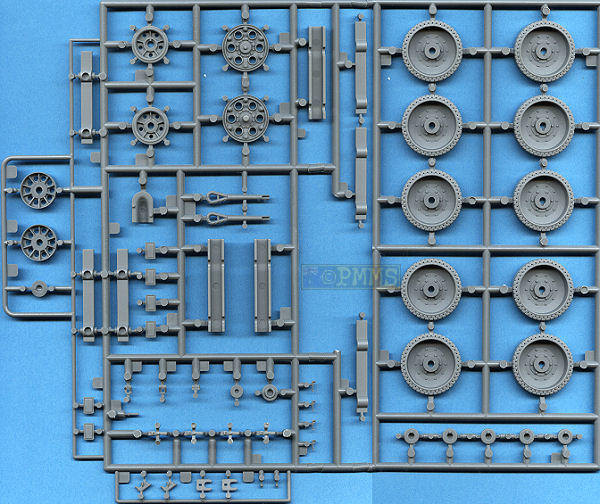
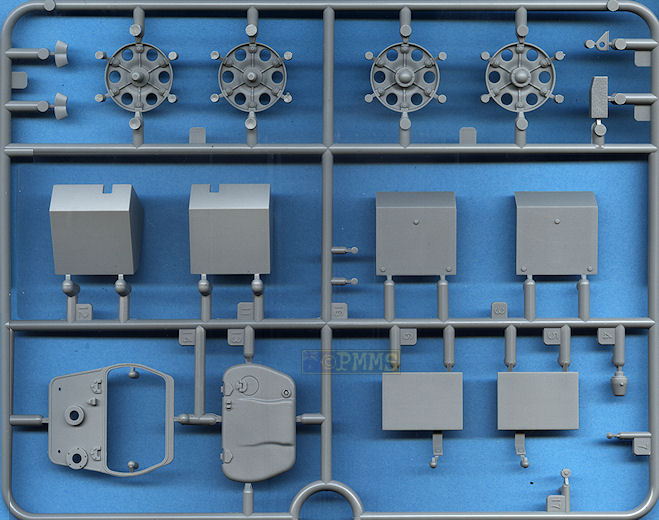
There is just one set of road wheels provided, the original 1940 pattern rubber tyred pressed disc road wheel which correctly have the ten hub bolts and inner stiffening ring but take care when removing the moulding seam around the middle of the tyre section so as not to damage the detail. Each wheel station has the two separate wheels and a separate hub cap that also has the correct detail for this type of wheel and is designed to be glued to the axle stub.
For the drive sprockets you get the original 1940 pattern sprockets as well as later style cast drive sprockets which are more applicable for this kit with both having excellent details on both the inner and outer sprocket discs and include the drive rollers as they should as well as separate hub cap and fit together without any problems.
Included for the kit are the later all steel idler wheels applicable to this version but the original idler wheels with rubber sections are still included but not used so you can consign these to the spares box.
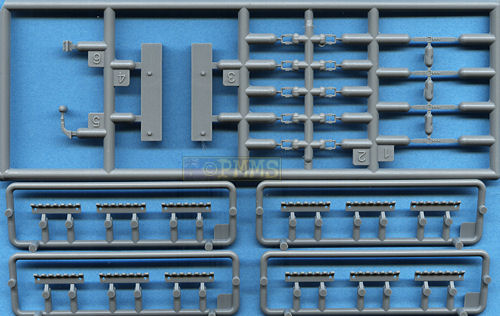
These are individual link “magic track” with the links having little or no cleanup required and are designed to be glued together and are not workable but the links have nicely defined link details and as there is no discernable sag on T-34 track assembly should be fairly straightforward.
The upper hull is the same as from the previous T-34-76 kits such as #6452, #6205, #6355 and #6418 with the separate front glacis plate with the notched side plate welds as well as enlarged early style driver’s hatch and new tow hooks made up of three parts each. These are quite nicely done but there is a small notch missing from the top of the hook and the separate securing latch is quite undersized, you will also need to fill the join seam at the top half of the side glacis/hull join as this was actually part of the side hull plate and not the glacis as depicted in the kit.
The front fenders sections are separate plastic parts with the edges bevelled for a better appearance but could do with being thinned a little more and overall the surface details are again well done. At the back the fender extensions are included with the main hull but alternate etched fenders are provided if you want to cut off the plastic parts and replace these.
Also at the back there is only the large inspection hatch rear plate from the Factory 112 early kit and this is a very good fit to the rear hull with separate engine inspection hatch that is also a good fit to the rear plate.
There are actually 3 alternate engine bay hatch covers provided that gives you a choice of solid hatch with plastic mesh moulded in place if you want a quick build or a hatch with cut-out and separate etched mesh and frames.
There are also two locating pins on the inside of the hatch cover that also need to be removed due to the etched panel/louvers added to the inner engine deck but again the instructions don’t indicate this, but it’s quite obvious that it won’t fit without cutting off the pins.
Thankfully Dragon have again removed the moulded on frame so you don’t have to remove this first as you did in previous kits and you can get straight into fitting the mesh screen in place which is easily done using thin cyanoacrylate and small tweezers to hold the mesh in place as you apply the glue. The frame is then added over the top in the same manner ensuring you line up the etched parts perfectly to avoid any problems.
The inner hull etched louver panel has been modified like it was with the Mod.1942 STZ kit to allow the upper hatch cover to fit properly but you will have to slightly trim the forward bolted strips on the deck for the etched panel to fit neatly. But you still need to cut away the moulded on bolts from the inner engine deck and you would think by now these would have been removed to save a bit of work as the instructions again don't tell you these need to be removed to fit the etched panel, but it is fairly obvious this has to be done.
The separate etched louvers can then be added but if you want to show these at an angle you will have to bend the end connectors to get the correct sit preferably before attaching to the etched panel.
The four side and top intake grills have two styles provided, the original from the previous T-34-76 kits and those from the recent kits and it’s best to use the original intakes (parts G20/G21) for this kit as photos indicate these are the correct pattern for this kit.
The intakes fit neatly into the hull cut-outs with the detail on the plastic intakes being perfectly adequate but the top engine deck inspection hatch is a tight fit and I shaved a very small amount off the sides and front to get a perfect fit but this is only very minor.
On the real hull panel there is a choice of the original two piece exhaust pipes or the newer one piece pipes (parts M6) and it is best to use these for the kit. Note there is a raised seam along the top of the exhaust pipes to represent the welded seam and you should take care to leave this in place. As the sprue attachment is right on this raised seam some careful knife work is needed during cleanup to ensure the seam remains intact.
I also drilled out the pipes for a better appearance as while they are indented at the end this is not very deep and drilling out does improve the look and another small issue is these exhausts while having the better detail extend too far out from the armoured covers and trimming these a little will give a more accurate appearance.
Other details added to the hull are the fender storage boxes with separate etched latches plus etched grouser tie downs and straps for the separate snow grousers supplied. You should cut away all the other moulded on details from the hull sides as these were quite bare on these Factory 112 vehicles with the instruction illustrations showing the details gone but they don't actually mention to remove the details.
The steel wire provided is used for the tow cables that fit into plastic cable eyes and have etched securing brackets on the fenders.
The right side mounted aerial pot is added and when assembling the driver’s hatch with separate clear periscopes you will have to open up the holes to fit the periscopes in place. The separate periscope covers unfortunately can only be fitted in the open position with the periscopes in place so if you want to show the covers closed you should leave out the clear periscopes altogether.
The separate hull machine gun coaming has excellent weld bead detail and fits perfectly to the hull and drilling out the MG barrel will provide a better look. The head light has a separate clear lens and alternate plastic or etched mounting post but if the etched post is used you will have to fill in the hull locating hole for the plastic post afterwards.
There are additional details provided in the form of the finely moulded grab handles that were added along the hull sides and on the engine deck as well as the turret splash guards fitted to the later 1942 early 1943 Factory 112 produced vehicles but here is no actual locating points for the grab handles and you will have to be careful when adding these.
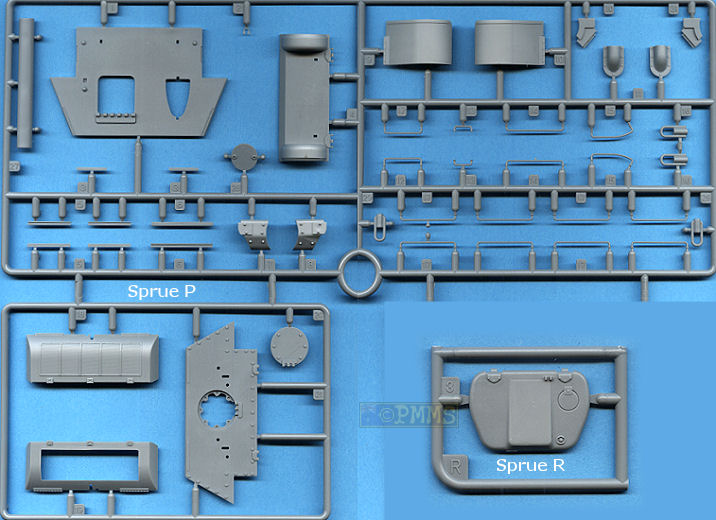
The large rear hull mounted box fuel tanks are provided in three parts each and these are added to the rear hull plate without any problems to add a different look to these vehicles.
The fit of the upper and lower hull parts front and rear as well as the underside sponson joins is very good and there shouldn’t be any problems here if the usual care is taken during assembly.
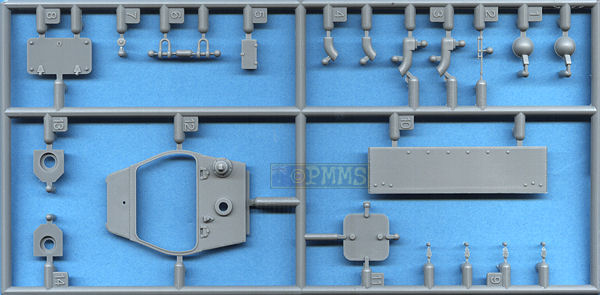
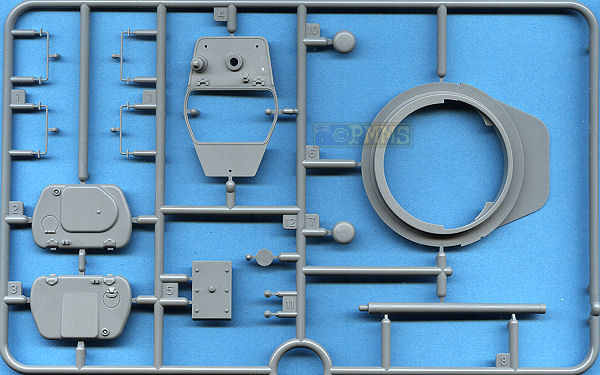
There is a new style cast turret provided that differs slightly from that in theT-34-76 No.112 Factory "Krasnoe Sormovo" Early Production (kit #6452) and includes the raised weld seam and texturing along the sides and front joins as well as including very subtle cast surface texturing and welds around the side vision ports. The main difference being the rear escape hatch is eliminated with a fully cast turret but there are two large mould seams where the hatch has been filled in on the moulds and you will have to clean these up but this may result in the surface texturing being compromised and may have to retextured after cleanup.
The new cast turret is moulded in one piece with virtually no cleanup required but unfortunately the turret is attached to the sprue by a single attachment point at the back and this resulted in some minor damage on the rear lower lip that needed filling but this may vary between kits.
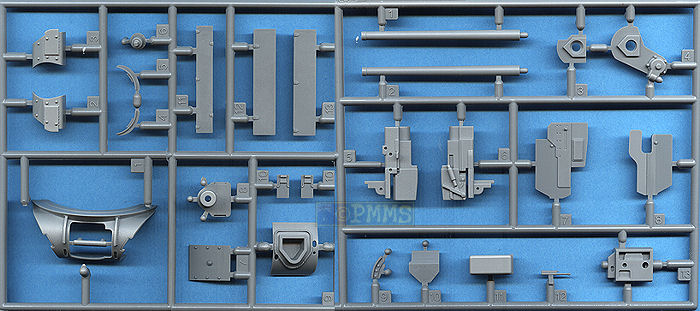
The gun shield and housing is made up of four parts which fit together well and have excellent weld and bolt head details and you should note there is a weld bead along the top join seam and adding this will cover up the join would be a better option.
Again there is a choice of two F32 76.2mm main guns, the original plastic gun in two halves plus the aluminium barrel and obviously the metal barrel would be the preferred choice here. This has a drilled out muzzle but there is no rifling included but is still the barrel of choice as it’s perfectly round and just slips into the gun housing.
The roof is also new for this kit with the original roof still included so make sure you use the correct one (part U14) with a choice of two turret hatches, both moulded commendably thin with excellent contours without any hint of pin marks and includes additional etched parts for the interior details but to use these you have to trim off the moulded on plastic detail and care will be needed with this. There is a small error in the location of the inner bracket (etched part MA10) and it should be fitted under the hatch rim and butted to the lip as the instructions indicate.
If fitting the desired hatch in the open position you will have to trim the small bracket on the front for holding the hatch open slightly as this will stop the hatch sitting properly into the hinge recess on the right side and test fitting will show what is needed.
As with the previous kits there is the full gun breech and mountings which gives you all the basic structures for a nicely detailed gun as well as two crew seats and there are additional etched parts for the inner visor mountings and the large top hatch will allow most of the detail to be easily seen.
You have to take care when bending the inner visor parts to get these done but as there are hard to see afterwards is not really an issue.
As with the hull you also get the fine plastic grab handles to add around the turret if you are building the kit with these fitted but again the lack of locating points will need care in getting these in the correct positions and if Dragon had added the small paint spots we have seen on other kits it would make the job a lot easier.
Another thing to watch is the part numbers of the grab handles are transposed and parts P12 should be the shorter front handles and P14 the longer rear handles and not the other way around as shown in the instructions.
There are also two small plugs added to the underside of the turret bustle and you may also want to add weld beads around the underside part join seams to add further detail here.
The fit of the turret shell and the turret ring is quite good but the side join will need a little work as it is not perfectly even but this should be easy to remedy with the trusty #11 blade.
These are the usual exploded view drawings and as there are no real complicated sequences to contend with there shouldn't be any problems but the usual careful study before gluing should avoid any problems arising.
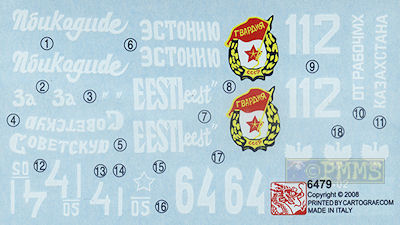
The decal sheet just a good selection of turret numbers and slogans as well as the large coloured crest and flag emblem although the instructions don't actually show you where this is used.
There are 5 vehicles shown in the instructions but as we have seen with previous kits 3 are just marked "Unidentified Unit" and there is no indication of the colours to be used other than the exhaust pipes but I guess you "should know" they are painted in Russian Green overall but you would think from all research we are told goes into these kits a little more info could be given here.
The 5 makings listed are:
|
Overall this is another excellent T-34 kit of the Factory 112 produced T-34 but as mentioned is has more middle production features than the late production as labelled.
The kit captures the mid production Factory 112 features well and it wouldn’t take much to produce a later production vehicle by moving the head light to the side plate and adding the MG armoured shield if you wish to do this. You may also wish to add the additional armour plate panels to the glacis as seen on many of these Factory 112 vehicles.
There are some minor issues along the away as there are with any kit but overall this will build easily into another excellent T-34 kit in this series from Dragon.
Hopefully they will move on the hexagonal turret versions before too long to complete the T-34-76 series.
Highly recommended 8/10
See the T-34 series subject page for additional reviews of T-34 items.
Click on thumbnails for larger view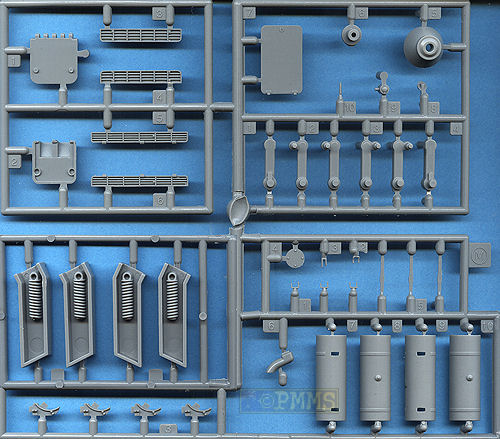

Detail Images
Close new window to return to review