
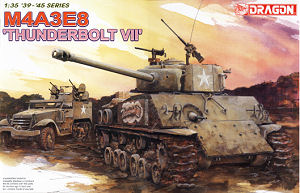
M4A3E8 Sherman
"Thunderbolt VII"
Dragon Kit No. 6183
1:35th Scale
Review by Terry Ashley
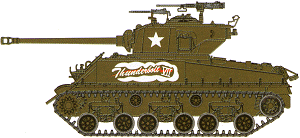


The kit consists of 375 parts in light grey plastic which are cleanly moulded overall with the usual small nodes keeping pin marks to a minimum plus 18 clear plastic parts, a fret of etched parts, the metal barrel and metal parts and springs for the suspension and a bag of T66 Magic tracks as well as the decal and instruction sheets.
Due to the sprues from the previous kits there are quite a few left over parts for the spares box and you should take care to use the correct parts for this kit where alternate parts are included such as the rear hull plate and engine decks plus other smaller parts.
As with any review, I simply present the information and facts for your perusal and it's up to the individual to take or leave this as they see fit.
Lower Hull:
This is large conventional tub with underside detail plus the return roller
and idler mountings included on the side panels as well as the upper sponson
inserts included with separate rear plate and front transmission cover. There
are actually three different rear plates from the various kits included so
you should make sure you use the correct one (part A1) for this kit with
this having the idler mountings and exhaust outlets added, there is also
a four part upper exhaust deflector which is quite detailed when assembled
and fitted to the top of the rear plate under the hull overhang.
The single piece cast transmission cover has subtle cast texture included with
separate tow shackle brackets and hooks added with the fit to the hull tub
being very good for both the transmission cover and real plate.
HVSS Suspension:
This new suspension is a marked improvement over that in the older kits with
each bogie unit made up of 28 parts that includes 2 fine springs and a small
brass tube for quite a detailed assembly. I will also make a brief comparison
here with the recent AFV Club HVSS bogies units available separately in set
#35030 and included in the new M40
GMC (kit #35031) to see how they shape
up together.
The Dragon bogies are designed to be workable after assembly but this is a bit gimmicky as they don’t really work realistically with the spring units distorting if you compress the wheels and it would be best to assembly them as fixed units. It is possible to easily fix them in an articulated state to use in a diorama over rough ground if need be due to the working nature so this is helpful.
The AFV Club bogies are also designed to be workable but these just swing from side to side and don’t actually compress as do the real units and like the Dragon units are best assembled as fixed units.
Due to the many parts in the Dragon units care is needed when assembling the bogies, especially the volute spring units which trap the two fine springs between the end sections, just don’t let go of the springs while compressing during assembly as they may very well join the Space Station crew in orbit.
The two main bogie swing arm brackets on the Dragon kit have fine casting numbers included on the one side which means when assembled one faces the outside and the other the inside, this is actually correct and most photos show the casting numbers on the outside at the same end as the oil reservoir on the upper shock absorber piston.

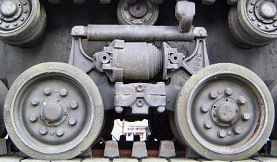
The Dragon road wheels have separate rubber sections with fine embossing on
the side walls and have good definition at the join when assembled but the
detail on road wheel hub lacks the grease nipple (the small housing is included
but not the nipple) and there is a pin mark indentation on the central hub,
plus the wheel bolts are a little undersized.
The AFV Club wheels are better detailed in this area as the image shows.
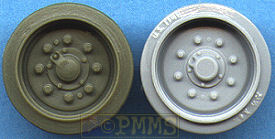
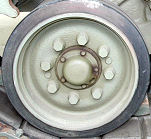
Both units included the oil reservoir on the upper shock absorber with the weld seam included but the Dragon items looks slightly oversized when comparing the photos but this won’t be very noticeable on the assembled bogies with the lower bolts on the bogie attachment plate being better defined on the Dragon units.
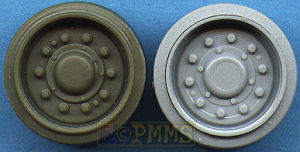
The Dragon idler wheels again have separate rubber sections for good definition but the rim bolts lack detail and there is again a pin mark indention on the central hub with the AFV Club idlers again being better detailed.
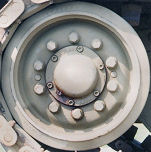
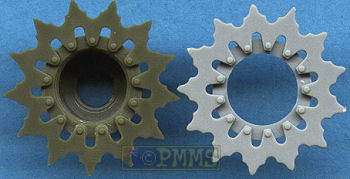
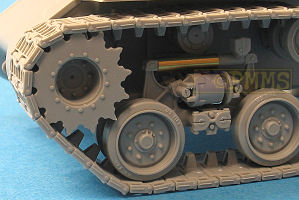
With the drive sprockets Dragon provide a choice of two types the fancy smooth and solid plate disks with inner bolt detail and these attach to the separate inner sprocket hub with very small locating pins to ensure the sprocket teeth line up. The inner hub bolts are a little undersized due to the moulding constraints as the inner disk is inside the central hub.
The AFV Club sprockets only have the fancy smooth sprocket with a separate inner sprocket hub also having very small locating pins to ensure the sprocket teeth line up but the inner bolted hub is a separate part allowing the hub bolts to be better depicted. Both kits provide the final drive covers as separate parts with the correct ribbing on the drive axle which can be seen between the sprocket and final drive after assembly.
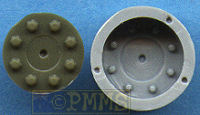
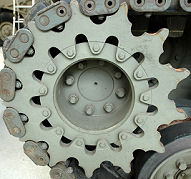
The return rollers are a bit of a mish mash as both have minor distortions on the central hub of the large rollers but the Dragon rollers lack the grease nipple which is on the AFV Club roller. The smaller return rollers are similar on both and are fairly good matches for the actual unit.
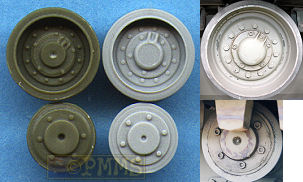
The Dragon bogie hull mounting brackets are better contoured and detailed than the AFV Club brackets but this detail is mostly hidden under the model after assemble but it’s nice to know the detail is there.
So overall the AFV Club suspension units have better defined bolt heads and hub detail in the road wheels, idlers and drive sprockets while the Dragon units have better hull mounting brackets and detail on the central bogie attachment plate and so both have pluses and minuses and will build into nice representations of the HVSS suspension way ahead of previous efforts.
And so back to the review.
Tracks:
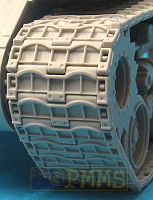
The T66 Cast Steel tracks are provided as separate link “magic tracks” which
require no cleanup other than four small pin marks on the inside that are not
that noticeable on the assembled tracks if you don’t bother removing
them.
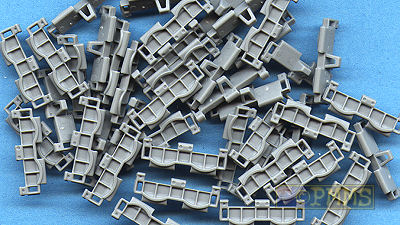
The links are not workable but designed to be simply glued together and as there is no track sag on the Sherman “live” track assembly is very easy by laying the track on a flat surface while gluing together. When gluing the links around the sprocket and idler, glue the links together and let the glue “go off” and then form around the wheels as this will help keep them together as you attach to the model.
The detail on the links is very good with well defined cast detail and end connector included on each link that fits over the next with the assembled tracks runs looking good on the model.
Upper Hull:
This is the single large moulding from the M4A2 kit with altered rear hull
plate angle plus the separate crew hatches and engine deck as well as all
the smaller details such as fuel filler caps, ventilators, lifting eyes and
tail lights with the details cleanly moulded and the hull angles front and
back being correct for the M4A3.
The M4A2 grouser covers at the back are still included and you should remove these (the instructions tell you to do this, so Dragon know about this) and these is also a fairly large mould seam across the rear hull where the new rear plate section was added from the M4A2 hull and you will also have to carefully remove this making sure to leave the surrounding detail intact.
For the first time in a plastic kit we have raised weld seams around the hull and while it’s good that a manufacturer has finally realised that the weld seams on a Sherman are not canyons the weld seams are unfortunately wrongly depicted. The weld seams on Sherman hulls have a flowing texture not the pitted style on the kit welds but you may be able to smooth these out a little to better represent the actual weld seams.


There is the A2 and A3 style engine deck in the kit so again make sure you use the right one (part G7) and this has separate access doors with grillwork on both sides if you were thinking of showing these open.
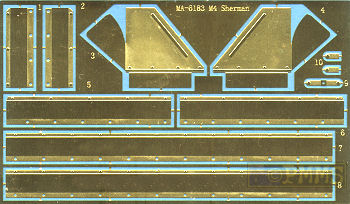
There are also numerous locating holes to be opened up for the tools which are moulded with the tool brackets included while the front fenders and the side extension fenders are provided in etched metal. You have to be careful with these parts as there are no engraved bending lines and using an etched bending tool would be advisable especially for the long side fenders.
At the front is a finely moulded barrel travel lock but the bush guards for the light and siren could do with thinning for a better look.
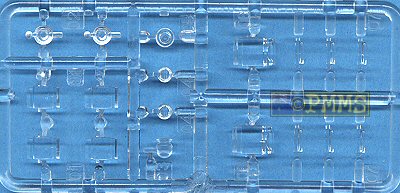
The crew hatches are cleanly moulded free of any pin marks and have separate clear periscopes that fit into separate periscope mountings with quite finely moulded periscope guards but you may want to replace the solid grab handle with thin wire for a better look.
Also included are the additional armour plates added to the hull front on some 37th Tank Battalion vehicles (notable Thunderbolt VII) which includes the flame cut texture around the edges for a good appearance. You will have to cut off the light and travel lock mountings from the main hull and add these to the additional glacis armour panel (replacement small mounting parts provided on Sprue A so just cut the others off).
There are also the two large spaced panels on the hull sides which you just glue in place as required.
Turret:
The kit gives you a choice of two T23 turrets, the early with large split Loader’s
hatch and the later style with oval Loader’s hatch and both these have
been refined from the turrets in the previous kits (#6188, #6255) with slightly
different contours and cast texture around the pistol ports.
There is only one lower turret ring so you don’t get two complete turrets but it’s nice to have the choice of turrets to add variety to the kit (or an excuse to buy two), and the mantlet also includes subtle cast texture with the co-ax MG barrel detail and fine casting numbers included.
Also included is a metal or two part plastic barrel with separate one piece muzzle brake with the metal barrel being the obvious choice to eliminate the joins seam cleanup and the other reason is the plastic barrel is actually 4mm too short while the metal barrel is the correct length. This is partly due to the muzzle brake designed to fit on the end of the plastic barrel but also means if you want to fit the muzzle brake to the metal barrel this would have to be shortened to compensate for the barrel tip that screws inside the muzzle brake. The muzzle brake is hollowed out and is the correct length but the depth of the brake flanges is a little undersized but may not stand out that much on the final build.
The Commander’s cupola has separate clear plastic periscopes which allows for nice definition but these aren’t clear and you will need to paint them anyway and the separate cupola hatch also has a separate clear plastic periscope and again you will need to paint this to cover the clear appearance and a separate small grab handle is provided.
The large split hatch ring has nice contours including very fine casting numbers which are also on the two hatch halves with these clear of any pin marks on the inside. The periscope mounting and clear periscopes are separate parts but the moulded on grab handle could be replaced with thin wire for a better appearance.
The oval Loader’s hatch is also free of any pin marks with a separate small grab handle and inner latch detail while the main sight in front of the Commander’s cupola and the left side top periscope are also separate parts for good definition with clear periscopes included.
Other separate parts include the aerial mounts, lifting hooks, search light and the rear mounted .50cal MG mount and brackets with the turrets building into nice representations of the T23 with the only minor issues being the mould seam lines at the back corners that mar the cast effect here but should be easy to remedy with a bit of Mr Surfacer and the turret ring join line will also need smoothing out.
The .50cal machine gun is quite nice but a little chunky around the cooling jacket and the .30cal is also nicely done for plastic items.
The additional armour panels included on Thunderbolt VII are included for the turret sides if you are modelling that tank and also include flame cut texture around the edges with these fitting directly to the turret sides like the real panels.
You should check your references before adding the additional hull and turret armour panels to make sure they are applicable to model you are building but their inclusion adds more choice to the kit.

Decals:
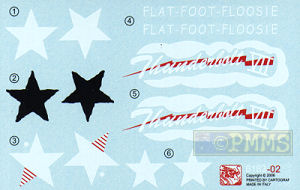
The small sheet has is nicely printed with markings for four M5A3E8s from NW
Europe in 1945.
Conclusion:
Overall this is a very good representation of the M4A3E8 HVSS Sherman with
improvements over previous Sherman kits but still with some niggling little
issues to frustrate those wanting total accuracy such as the hull weld beads
and the wheel details.
But as mentioned it’s good that the hull welds seams have been recognised as raised and the model will look very good when built from the box and given a few more tweaks we almost have the “perfect” Sherman in kit form.
Highly recommended
The Sprues:
Click on thumbnails for larger view
Sprues


Detail Images


Close new window to return to review
| SHERMAN A History
of the American Medium Tank R.P.Hunnicutt. Presidio Books ISBN 0-89141-080-5 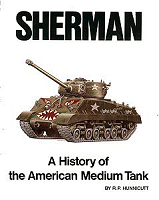 |
Modeler's Guide
to the Sherman MMIR Special. Ampersand Publishing Company, Inc 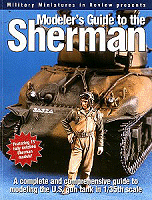 |
 for
the review kit.
Page created September 24, 2006