
T-34-85 w/Bedspring Armour
Dragon Kit #6266
1:35th Scale
Review by Terry Ashley
It also includes some of the updates from the other recent Premium Edition T-34-85 Mod.1944 (kit #6319) such as the one piece plastic or metal 85mm barrel, the full hull machine gun, mesh screens for the engine intake covers and the one piece exhaust pipes as well as the individual “magic tracks”. But it also inherits some of the issues is that the four small etched engine intake grills are still way too big to fit the plastic parts and the metal barrel doesn’t fit into the mantlet very well.
Despite what’s written in the plethora of product advertisements that precede each new Dragon release the only really new parts in this kit is the heap of etched parts for the bedspring armour, the etched inner engine bay louvers and some other smaller etched details.
The kit best represents a late 1944 Factory 183 produced T-34-85 with the distinctive cast ribbing around the bottom of the turret and twin ventilator covers at the back of the roof along with ‘half spider web’ wheels but it should be noted that there are various turret features from the various factories as well as smaller details like the wheels where there are numerous variations in the drive sprockets, idlers and road wheels.
There are also a number of variations of the ‘spider web’ wheels with some having ribs only half distance and a lesser number of smaller holes around the hub as well as variations of the type with full length ribs with some having a coupe of the inner holes blanked off while others have them all open and the wheels in this kit represent just one of those variations.
The kit has 226 parts in light grey plastic with one clear part, a couple of bags of individual link “magic” tracks plus two large frets of etched parts, the metal barrel and a length of braided wire as well as the decal and instruction sheets. There is also another metal part indicated on the instruction sheet, part MC 45mm metal rod but this was not in my kit so I’m not sure if it should be?
The standard of moulding is typical Dragon with good crisp details and a minimum of flash, pin marks or other blemishes with only the usual minor moulding seams to be cleaned off the parts as with any kit. There are many small ‘nodes’ on the parts to be removed but these are a small price to pay for the cleaner parts overall. One thing noticed when comparing the parts to the original kit #6203 is the moulds have been reworked to improve the crispness/definition of the detail, so the actual parts are the same but the detail is crisper as it was also for kit #6319.
Lower Hull:
This is a conventional tub with bottom, sides and sponson covers with separate
front and rear panels as well as the four internal suspension towers with inner
spring detail added to the insides. There are two small discs added to the
underside and added to the sides are the separate axles, idler mountings and
final drive housings as well as the rear side track pin retainer bracket.
The axles are fixed in the neutral position but it would be easy to reposition for a diorama setting if required and the idler mounting can be fixed at different angles and it my be an idea not to glue this until fitting the tracks to get the correct tension.
At the front is a separate lower plate with nice weld seam details and the lower rear hull panel includes the final drive bulges as well as towing hooks added to both panels with the fit to the hull being very good.
The road wheels as mentioned are the same ‘half spider web’ type as in the previous kit #6203 with nice rib and rubber sidewall details and the central hub cap is a separate part.
Both the drive sprockets and idler wheels are the same as the previous kit
with nicely represented rim details with the idler having a separate hub cap
while the drive sprocket has the cap moulded with the wheel meaning there is
no undercut around the hub cap as with the idlers and road wheels but this
is only a minor issue.
There are actually a second drive sprocket outer wheel included in the kit
with a different hub pattern but only the outer wheel is included making it
not that useful.
Upper Hull:
This is again the same as in the previous kit and is complete with the side
sponsons and cut-outs for the turret ring, glacis driver’s hatch and
machine gun plus having a separate rear plate. All the rear engine deck panels
are also separate including the top engine inspection hatch and the four intake
grills plus a separate rear intake screen hatch with the deck below this hollowed
out with bolt head detail included.
Added to this kit are etched inner louvers missing from the previous kits as well as the screen mesh with separate bolted frames from kit #6319 which requires you to cut out the moulded screen mesh before adding the etched mesh which is a fairly easy operation for anyone with basic modelling skills but obviously care is needed when doing any cutting.
Engine deck louvers:
When adding the inner etched louvers you will have to cut off the moulded on
bolt heads but unfortunately this
results in other fit problems with the large rear engine
cover.
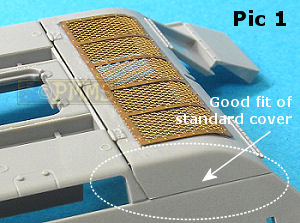
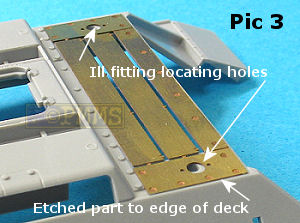
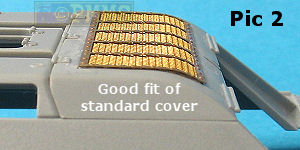
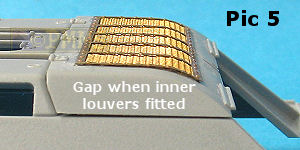
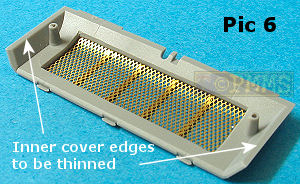
As originally designed the rear cover fits snugly to the rear deck using the two inner locating pins to keep everything in place but the inside edges of the cover are quite thick, something that is irrelevant when just fitting the plastic parts together. Pic 1 & 2
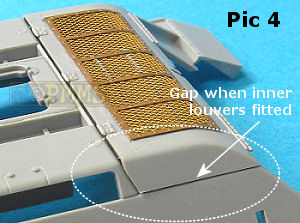
But when adding the etched louver panel this extends out to within a millilitre or closer to the edge of the rear deck meaning when you add the cover over the etched louvers it is lifted up by the thickness of the etched louvers leaving a noticable gap under the top cover, the cover pin hole also does not line up correctly and you may have to trim the locating pins to fit. Pic 3, 4 & 5
There is a couple of ways around this, firstly reducing the inner edge of the top cover to fit over the etched louvers but this means the edge will be paper thin and I wouldn’t advise this. Pic 6
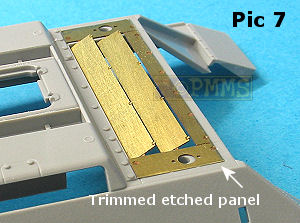
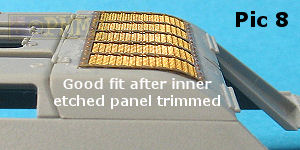
The second is to cut a 1mm strip from the sides of the etched louver panel allowing the cover to clear this and sit properly in place but cutting the etched parts without damaging the louvers will need care. The top cover then fits perfectly in place as before. Pic 7, 8
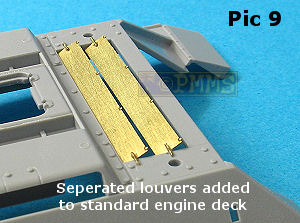
The third and probably the easiest as this negates the locating hole fit also is to simply cut the louvers from the surrounding etched frame, add a couple of wire ‘hinges’ and glue these in place in the deck cut-out. Pic 9
Whichever solution you choose will require a bit of work that shouldn’t be necessary if a bit more thought had gone into the design of the kit.
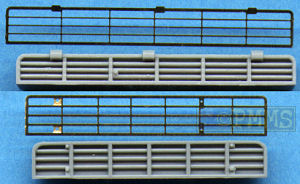
The four smaller intakes added to the side and top of the engine deck are separate parts with nice clean grill work included and these fit snugly into the hull cut-outs without any trimming needed and you are also provided with etched grill covers to add if you wish? Unfortunately these etched grills are simply too big both in height and width to fit the kit grills and they are basically a waste of time but as mentioned the plastic grills are quite nice and the etched grills are not really needed anyway.
At the back the separate rear panel fits snugly to the hull after minor cleanup of the mating surfaces and there is a separate round inspection hatch and separate exhaust pipe covers plus the separate exhaust pipe stubs. The original stubs are in two sections to give the open pipes and there are also the one piece pipes moulded with slide moulds to give the open appearance but are actually not a good as the originals as they extend too far out of the exhaust covers when compared to most photos and as there is a small weld join on the stubs and this will nicely cover the join line of the original stubs.
A case of adding new “slide mould” detail that sounds good but doesn’t do anything for the actual detail but of course you could use the excellent Moskit metal T-34 exhaust pipes (set#35-06) if you really wanted to improve this area.
The kit includes the four hull side mounted fuel tanks that have simulated damage which is a little uniform in appearance but not really a problem and include the retaining brackets moulded on. The large etched fret includes an elaborate array of fuel tank mounting brackets and securing strips with separate clips that require you to cut off the moulded strips but the added level of details will look impressive.
Also included are the mountings brackets are clips for the two smaller tanks carried on the rear hull plate of some T-34s but the tanks themselves are not included leaving you with empty brackets as seen in some photos.
Moving to the front the five part driver’s hatch has separate periscope covers and the hatch itself has an inner and out panel to allow good detail on both with the inner latches provided as etched parts if you want to cut off the moulded on latches but if you do remember to add small discs to lift the two latches off the door so they don’t sit flush or the effect will be lost.
The separate machine gun coaming is the revised part from kit #6319 with nice cast effect and weld beads included around the lower edges and the front opening to accept the complete 7.62mm DTM machine gun with magazine with a movable ball mounting that allows the gun to move after assembly and this is really a nice improvement over the simple MG barrel included with the original kit. Also included as mentioned are the optional parts for the OT-34 Flamethrower version should you want to use these
Also added to the glacis are the tow hooks along with etched fittings and the fender mounted storage boxes have etched latches included plus all the right side track grouser mountings and securing straps are in fine etched parts to add more detail definition here.
The moulded on square front fenders should be cut off and replaced with the rounded versions included in the kit for this version and there shouldn’t be any real problems here but take care when removing the fenders.
The large bow saw included as etched parts in kit #6319 are not included on the revised etched frets for some reason do you have to use the plastic one provided and the left side mounted head light has a separate clear lens and the new braided wire tow cable has separate plastic end shackles.
After fitting the upper and lower hulls together which sees a very good fit there is a separate front nose cap that includes nice weld bead texture to nicely cover the front join line.
The major feature of this kit is the large etched bedspring armour for the hull sides and over the engine deck but you have to be careful as both frets are labelled MA but the instructions label them as MA and MB which can be a little confusing when identifying the parts.
The mesh is finely etched and some have a thin edges that need to be bent and using a good etched bending tool will be desirable for this job with the panels also having separate mounting brackets. The instructions aren’t that clear where these are mounted but it doesn’t really matter as these were field fitted so can basically go anywhere that fits.
Tracks:
These are in the form of individual “magic” track links that don’t
have any sprue attachments to clear up but there are two shallow pin marks
on the inside of each link which will be easy to remove but makes things a
little tedious.
The links are not workable and are designed to be simply glued together and as
there is only minor track sag on the T-34 you can assemble the top and bottom
runs beforehand and add after the glue is nearly dry.
Turret:
As mentioned this is also the same as in the original kit and is a nice representation
of the 1944 Factory 183 turret which from most photos do not have as rough
cast texture as some other turrets and also don’t have the large casting
numbers on the back which are seen on other factory turrets.
The turret measures out quite well with only minor shape discrepancies here and there but nothing to get excited about with the width at the front being slightly too narrow when compared the available data. This is not really that noticeable on the assembled turret and to fix this would mean destroying the cast texture and weld ribbing along the sides as well as the side fillet section joins so is probably not worth the effort.
The cast ribbing along the side joins is quite nicely done but you should take care not to damage this detail when fitting the upper and lower turret halves together and there are two small panels at the lower front corners to give the contours of the actual turret. It should be noted that the kit join lines of the upper and lower turret halves and also the front fillets all correspond to weld seams on the actual turret which means you don’t have the eliminate these as they should remain. You may want to enhance the welds a little with lengths of stretched sprue textured to simulate welds or by you favourite method of adding weld seams for a better look.
On the top are the twin rear mounting ventilator covers of the later turrets and these have the top slightly flattened which does represent one of the variations seen on these covers with others have a more rounded profile and there are the two forward periscopes made up of two separate parts each with alternate plastic or etched top covers.
The turret doesn't have the weld seam around the cupola base as with the previous kit because this is included on the separate cupola ring and the cupola itself has a thin mould seam around the outside to be removed and the vision slits are moulded separately but take care as these are quite small to remove from the sprue and to fit. There is the top hatch ring with this cupola using the two split hatches and just the “shadow” of the original inner pin marks to be smoothed out which is very easy and also has the separate periscope covers.
Added around the turret walls are the six small attachment hooks on the rear wall, the three grab rails in plastic plus the side vision slits and pistol port plugs and four lifting hooks on each corner.
The large front mantlet again has nice cast and flame cut texture and includes the machine gun and sight openings and this is trapped between the upper and lower turret halves to allow elevation with the barrel fitting into the mantlet neck.
There is a choice of single piece plastic barrel with hollowed out muzzle that just needs the small moulding seam sanded smooth or the turned aluminium barrel which also has the muzzle hollowed out but not as deeply as the plastic barrel with the length of both being spot on.
The barrels simply fit into the mantlet neck but the base of the metal barrel is fractionally smaller than the plastic barrel and the fit of the metal barrel is a little sloppy with a noticeable gap between it and the neck making lining the barrel up correctly a little tricky and the gap will require attention while the fit of the plastic barrel is a lot better.
Again you have the large etched bedspring panels to add to the sides and top of the turret and again you should watch the part numbering to avoid confusion with the screens having nice mesh with the edges that need careful bending.
Decals:
A large sheet is included with well printed markings with very thin carrier
film cropped close the printed image with the markings for four T-34s.
These are:

Conclusion:
Although this kit doesn’t actual have any new plastic parts and there
are a few niggling fit issues left over from the previous kit as well as some
new ones what you get will still build into the best replica of the 1944 factory
183 T-34-85 available today with the updates from the previous Premuim Edition
kit adding to the detail as do the additional etched parts and options included
allowing different configurations if required.
The extensive etched Bedspring Armour looks most impressive and gives a different look to the vehicle and offers huge diorama potential given the locations most photos of these vehicles are taken.
Highly recommended.
The Sprues: Click on thumbnails for larger view

Detail images
Close new window to return to review
| T-34 Mythical
Weapon by Robert Michulec Published by AirConnection  |
T-34 Bloody Peace-Maker Model Fan Encyclopaedia #7 ISBN: 83-914521-6-6  |
T-34 Medium Tank 1941-45 Osprey New Vanguard 9 ISBN 1855323826  |
|
T-34-85 |
Russian T-34 Battle Tank Schiffer Military History ISBN 0-88740-405-7  |
T-34 in action #2020 Squadron Signal Publications ISBN 0-89747-112-1  |
| Medium Tank T-34-85 Modelist Konstruktor publications 4'99  |
Ground Power Magazine #127 - 12/2004 GALILEO Publishing Co.,Ltd  |
Page created January 2, 2007
