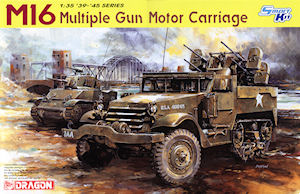
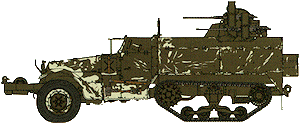
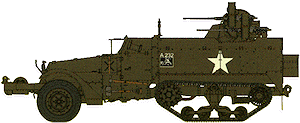
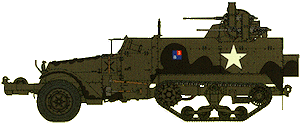
The purpose built M16 Multiple Gun Motor Carriage with Maxson M45 quad cal.50 M2HB mounting was based on the M3 half track chassis, there were also other Multiple Gun Motor Carriage types built on the standard M3 Personnel Carriers easily identified by the lack of the folding armoured hull panels found on purpose-built M16s.
Others were built on the M5 chassis, designated M17 which were sent to Russia under the Lend Lease programme and some on the M2s chassis unofficially designated M16B which also lacked the folding armoured hull panels.
This new kit from Dragon is of the purpose built M16 MGMC with the Maxson M45D quad cal.50 M2HB mounting with fold down hull sides but as it uses a number of parts from the previous M2A1/M4 half track kits (#6329, #6361) there are a few detail compromises as a consequence. The most notable being the suspension bogies which lack the large oval cut-out in the bogie housing seen on all photos of purpose built M16 MGMCs I have seen, this doesn’t apply to those converted from other chassis as mentioned above.
Also a number of the issues identified with the previous kits have not been updated so we are left making the same comments as before such as the flat tyres, the hull rivets without screw slot, the basic driver’s controls and the detail lacking from the suspension bogies. It’s a pity Dragon haven’t addressed any of these issues despite the time between this and the release of the M4 Mortar Carrier (kit #6361) back in May 2007, but I guess they have other priorities.
This kit uses 6 sprues from the M2A1/M4 kits, sprues A,B,C,D,E & J as well as 5 new sprues L, N, P, Q & R with the new M16 and figure parts. It’s also interesting to note that Sprue C has been updated with some new parts that are applicable to the M3 half track and not used with this kit as well as rear chassis inserts without the recess for the idler spring which I assume will now be in the other half track kits as well so you don’t have to fill this for early M2s.
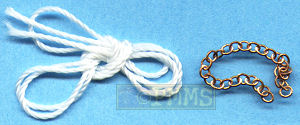
The kit has 389 parts in the usual light grey plastic, 8 in clear plastic, 18 etched parts and a small length of twine and chain plus the decal and instruction sheets with the standard of moulding again very good with clean crisp parts that did not have any flash apparent and just the usual array of small plastic knock out nodes on many of the parts which takes a bit to remove but is a small price for the cleaner parts.
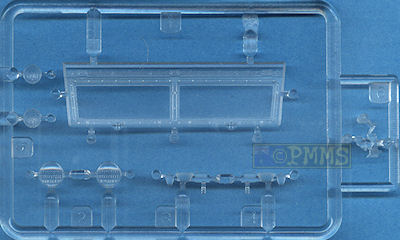

There are a few very shallow pin ejector marks on some parts where unavoidable but these are mostly fairly easy to deal with along with the usual fine mould seams on the parts.
As with other kits there are some parts left over most notably are the two cal.30 and single cal.50 MGs from the previous H/T kits and these could come in very handy for other projects.
The full chassis frame and cross members is in one piece which ensures everything is nice and square to start with but there is a fairly large mould seam to be removed from the sides of the chassis which is easy to deal with.
Detail on chassis is good with separate rear side sections for the idler mounting allowing the mounting brackets to be crisply moulded with the chassis also including the bottom sump engine section with all other components added to the chassis.
Added to the sides of the chassis are the steering gear, drive train mountings and at the back the rear cross member with towing pintle added.
The White 160AX petrol engine that powered all M2 and M3 half-track types is provided in just 7 parts that gives you the basics of engine block with separate head, air cleaner and exhaust manifold and oil filter plus the front engine mounting and fan, but take care as the instructions show to fit the fan in the wrong place. It should go on the top of part A36 and not on the bottom as indicated and why this has not been corrected is anyone’s guess; it’s only a matter of repositioning an arrow in the illustrations. There is plenty of scope for additional detailing such as the wiring if you want to show the engine exposed on your model.
Added to this is a two part radiator assembly with nice mesh texture on the radiator but you have to ensure the engine mounting on the front of the engine (part A36) is correctly aligned or the fan will not sit evenly in the round coaming opening at the back of the radiator assembly.
The front axle has nine parts that fit together well and have nice details but watch as the instructions transpose the numbers for wheel hubs (parts A3 and A4) but the illustrations are correct with the axle mounted on two leaf springs but watch not to damage the detail while removing the mould seam.
Added to the axle brake drums are the two part front wheels which have very nice hub and tread pattern with the six small cut-outs around the rim being open for a nice look and about the only thing you may want to add is the air valve.
You still get the same flat tyres as with the previous Dragon half track kits and while everyone is entitled to their opinion on this the simple fact remains that all U.S and other military cross ply tyres of WWII do not bulge if inflated correctly which is usually the case as evidenced by hundreds of period photos. But there are a large number of aftermarket wheel sets available with the Hussar set #35054 being a standout for those who do care about depicting their kit with correctly inflated tyres.
Added to the front is the extended curved bumper that goes with the winch assembly is in two parts, upper and lower sections allowing good details to be included and again the fit of these parts is very good leaving just a very small join seam to be removed but I did have a little trouble fitting the winch mounting (part C4) as the locating points were not that precise and some test fitting would be advised.
Detail on the winch motor is very good with the embossed “Tulsa Winch Co” logo that you can actually read and the supplied thread and chain is added to the drum with this assembly also fitted to the chassis extensions that fit neatly into the front bumper, but watch that you fit parts C20 and C22 on the correct sides.
The drive sprockets on these half-tracks are very intricate with many cut-outs and ribs and Dragon have made extensive use of slide moulds to create possibly the best replicas of the sprockets that you could possibly do in injected plastic.
The two sprockets are fitted to the separate drive tooth disc and then to the two part brake drum assembly and include the small bolts between the sprocket ribs and correct cut-out sections. The only minor issue are four very small pin marks on the inner disc that are difficult to remove but as mentioned are very shallow and difficult to see from some angles and if you wanted to get real picky the ribs and outer disc are slightly too thick but really not worth the effort of thinning and as mentioned they are excellent efforts.
Like the drive sprockets the idlers also have many cut-outs and inner ribs and these too are superbly done with again the only issue being some very small pin marks around the inner disc but the ribs and outer rim on the real idlers are thicker than on the drive sprockets and are pretty much okay on the plastic idlers.
Note that the cut-outs on the two idler discs don’t line up evenly as they do on the drive sprockets but are offset and Dragon have nailed this feature also.
These are the same assemblies from the previous M2A1/M4 half tracks and are unfortunately not the appropriate bogie type as fitted to all purpose built M16 MGMC vehicles. These should have the large oval cut-out in the bogies housing and you will have to add these along with other obvious missing detail as mentioned in the previous kit reviews to represent M16 bogies correctly.
The bogie units themselves are nicely engineered and fit together very well with the volute spring and return roller assembly separate that fit into the inner bogie unit with the outer unit and cover slipped neatly over this for a snug assembly.
The central bogie units include the inner suspension arm with the outer wheel having separate arms that trap the nicely detailed wheels between them and these are in turn trapped between the inner arms and if you leave these loose the outer bogie wheels will actually articulate.
There is one thing to watch with the outer suspension arms (parts D22) as they are not the same top and bottom with a slight raised profile that should be positioned at the top, the instructions simply don’t show this and it is very easy to fit these the wrong way around.
The large idler springs are somewhat simplified with the mounting base lacking details and a large mould seam in the springs themselves and some additional detailing or replacing the springs with wire would improve these.
The obvious details to be added include on the inner bogie mounting there should be a hole with raised lip added at the bottom and four hex bolts should be added to the return roller mounting, four small rivets should be added to the front of the inner suspension arms.
One the right bogie there should be an exhaust pipe mounting bracket that can be added from thin card and wire plus of course the oval cut-outs in the bogie housings as mentioned above.
Also on the bogie housing covers some have casting numbers in different positions and you may want to add these after referring to photos of the M16 bogies.
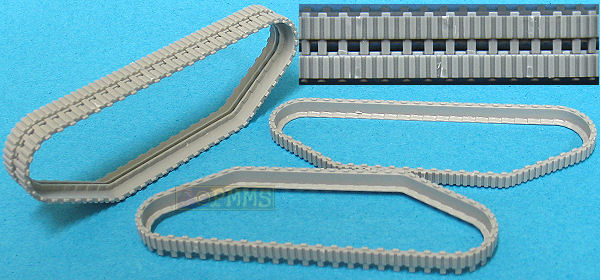
The rubber tracks of the half-tracks don’t have any sag and Dragon have moulded these in two halves pre-formed to the correct profile to fit around the drive and idlers wheels and the details on the track is nicely represented.
You should note that the two track halves have to be fitted over the fully assembled suspension units and can’t be fitted if glued together earlier so take care here as the instructions are not that clear on this.
Overall this is very good solution to these type tracks as there is no pressure on the delicate suspension components allowing the intricate detail to be included without fear of damage.
The lower cab floor and fenders are moulded in one piece with nice tread plate on the floor with the driver’s foot pedals just depicted as raised detail on the firewall and replacing these will add to the appearance as will adding the numerous bolt heads on the driver's firewall floor.
The fenders still have the small locating lines for the early head lights and these should be removed which is quite easily done with light sanding.
All the gear levers are separate parts but the larger gear shift lever (part B13) and the smaller lever (part B25) don’t have the correct contours and can be replaced with wire bent to the correct shape plus the hand brake lacks the release cable which is easy to add from thin wire. See images.
The instrument panel has engraved details nicely done and the steering wheel has commendable thin ribs while the two part seats have nice cushion details, these are too short and should extend out past the seat frames by about 2mm.
Added to the floor section are the side panels with details on both sides as well as a few inner pin marks but these are mostly hidden and shouldn’t be a problem while the engine top panel and the side panels have engraved lines on the inside if you want to cut out the engine bay doors to show open exposing the engine, but care is needed if doing this to not damage any of the panel details.
The jerry can mountings are moulded to the cab sides and are really just lumps of plastic lacking any rear detail but most aftermarket etched sets include these mountings that require you to cut off the lumps to add back the etched mountings.
This also results in the pick axe head being cut short as it should in reality fit under the jerry can mounting if not moulded solid as it is.
The two doors are in lower and upper halves and you can show the top section raised or lowered and there is an additional etched armoured flap to close the vision port if required. The detail on both sides of the door panels is nicely done without any pin marks to contend with but the door handles are moulded with the doors and lack definition. Carefully cutting away the handles and repositioning with a gap between the handle and door will add better detail here.
At the front are two alternate radiator louver panels, one with closed louvers and the other with just the panel frame and etched louvers allowing these to be positioned in the open position if you wish?
The windscreen is provided as a clear part with plastic outer armoured cover as well as etched windscreen wipers to add with the armoured flap in the open position.
Added to the fenders are the later removable headlights which are completely moulded in clear plastic and included quite thin plastic guards.
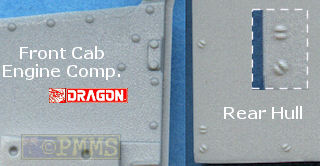
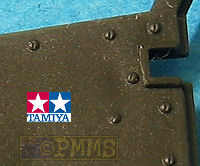
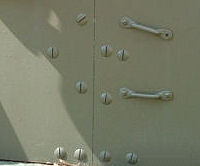
The issue still remains with the body panels in that they are actually held together with large dome screws and not the round rivets depicted in the kit which as mentioned Tamiya were able to feature on their 30 year old kit. The new rear hull panels have slotted screws (more on that below) so we now have the front body without screw slots and rear body with screws lots.
This is as expected is all new for the M16 with the floor section including the fuel tanks along with separate side, rear and alternate front panels all of which are free of any pins mars on either side, there is also a separate underside panel with the chassis mountings that fits neatly in place and is all but hidden after assembly.
The top folding panels are also separate and allow you to fit these raised or lowered as you wish and again there are no pin marks at all on these parts.
One thing to watch when cleaning up the parts is the sprue attachments for the side panels are along the top and there is also a small raised lip around the top so you are going to have to be careful when trimming the sprue burr to ensure this lip remains intact.
The rear body panels now include small dome screws with the screws slots included but the dome heads are a little smaller than those on the hull front and the slots not that cleanly done but the dome screw heads are so small you probably won’t notice this.
This now means the kit has a mixture of screws heads with and without screw slots as well as having different sized heads on the front and rear hull sections which is what happens when you try and patch up something that should have been done right in the first place.
The alternate front panels provide different radio and ammo canister storage but as usual there is no explanation as to which is the most appropriate to use or even what radios are included. There is the larger SCR-528 which faces forward into the cab and is the more common seen plus a smaller radio that is rather devoid of any detail at all but presumably is for the SCR-609 and it would be the better option detail wise at least to use the SCR-528.
The fit of the rear body panels is mostly good but there was a small gap at one side when fitting the rear panel and shaving a very small amount off the sides of the floor panel will allow a more precise fit, but this is minor so test fit before removing too much from the floor.
Other details added inside the compartment are four spare cal.50 barrels, the crew seat backs fitted to the fuel tanks, the seat cushions are included with the floor moulding as well as a few small storage boxes on the side panels.
On the outside are the two large rear plate storage boxes, the distinctive bucket storage, rear tow pintle and etched rear mud flaps and the full rear compartment can be assembled as a separate sub-assembly and fitted to the chassis at any time. Just watch as there is also a central seat added to the front plate that is actually inside the driver’s compartment after assembly and this needs care as you add the front cab and rear compartment sub-assemblies together.
Firstly there is the original cal.50 and two cal.30 MGs still included from the previous half track kits and these can be consigned to the spares box as they are not used with this kit as there are four brand new cal.50 HBMGs included for the quad mounting.
The details on the new cal.50s sees the received done very well with excellent crisp details with separate ammo feed chute covers that have additional detail on the insides and you should take care as the guns are reversed for the left and right side of the mountings with the cocking handles facing outward on both sides.
In short MG parts Q11/Q3 go in the left side of the mounting and parts Q12/Q4 go on the right side, the instructions do show the correct numbers but the use of the numbering system of just Q11(Q12) for left and right can be a little confusing if not used to it?
While the receiver detail is well done the same can’t be said for the cooling jackets which are rather plain and lacking in any definition on the cooling holes but the muzzle is slightly hollowed out.
I choose to replace the poor cooling jackets with the excellent Adlers Nest metal cal.50 barrel (set #ANM-35024) as these really do add considerable more detail than the kit guns. To add these you just need to carefully cut away the kit cooling jackets ensuring the lower mounting bracket remains and then drill the hole for the barrel pin into the receiver ensuring this is located centrally to slip the Adlers Nest barrel into place.
The Maxson mounting pedestal has two small inspection hatches but these are again very basic with just the outlines and you may wish to add a little more detail to these hatches. There is also an etched bolt strip provided to add to the recess between the lower pedestal and mounting turntable floor but this is way too wide and simply does not fit into the recess as intended.
The etched strip is 2.5mm wide but the recess it is to fit into is only 1.5mm wide and you will need to trim 1mm off the etched strip to fit, this should actually be about .75mm off the bottom and .25mm off the top to ensure the embossed bolt heads are located centrally round the strip. Looking at the CAD images provided for this kit this etched strip has actually been designed to sit on the outer lip of the mounting (see images) instead of inside the recess and is totally incorrect and if fitted as designed the mounting would not traverse.
This is quite a bit of work and it seems no one tried test fitting this before releasing the kit but we will probably see this strip provided correctly in the inevitable aftermarket update to come for this kit to save a bit of work.
Added to the floor turntable is a 6 part auxiliary motor but only 5 parts are shown in the instructions with part P13 not getting a mention but just appearing in the diagrams so watch this when assembling the motor. The 2 part battery is added next to the motor and you may want to add the additional wiring for the motor and battery to finish of these assemblies.
The two part gunner’s seat, two part gunner’s control stick and forward footrest all fit easily into place without any problems and there is also a gunner figure provided which will have to be added at this stage if you are going to use this as it can’t be added later.
Added next are the two large side mountings which are cleanly moulded without any pin marks and detail on both sides but there are quite substantial mould seams around the edges and inside the many recesses that will need to be removed which is a little tedious. There are two cross members between the two side mountings (parts P25, P32) and it’s best to glue these to one side beforehand to make fitting easier but other than that the fit of the side mountings is very precise.
Added to the back of the mounting is the loader’s platform which identifies the mounting as the M45D variant and this too fits into place without any problems.
The two outer gun mountings have excellent details including the lower elevation teeth but you should note these are not designed to elevate after assembly and you have to decide on the degree of gun elevation before attaching the gun mountings to the inner mountings.
Added to the side gun mountings panels are the four gun mounting posts which are again different on each side so take care with this and you should also ensure the posts are aligned correctly by temporarily fitting the guns in place as you glue the posts in place will ensure the alignment is correct.
The gun mounting posts have small tabs on the ends to fit into the large ammo canisters and this makes fitting these easy with the ammo canisters themselves are made up of two parts each with the join line along the edge of the canister face eliminating the need to fill and join line. The detail on canisters is also well done but watch as the canisters for the gun mounting are different from those provided as storage so watch this during assembly, the instruction do show the different part numbers but take not to mix these up.
Fitting the guns and ammo canisters with the short sections of ammo belt between the gun and canister is fairly straightforward but watch as mentioned that everything aligns correctly before the glue has dried.
Fitted between the two side gun mountings is the gun site rod (part P24) with separate clear gun sight (part E6) but you should take note that the sight is not located centrally on the rod but offset to the right. Unfortunately the instructions are not clear on this and if not careful you can easily fit the mounting rod the wrong away around and end up with the sight offset incorrectly to left so watch this.
Attached to the front of the mounting is the large circular gun shield but the lower angled fillet is too short and lacks the weld seam around the fillet join which is quite evident on pictures of the shield. There is not much you can do about the undersized fillet but you could add the weld seam for a better look.
Overall this is nicely done Maxson mounting but as always there is room for the smaller details such as wiring to be added
The assembled quad mounting fits easily to the outline on the compartment floor plate but as the mounting is designed to just glue to the lower pedestal you will have to decide on the rotation of the mounting or you could just leave it unglued to allow repositioning the mounting if you wish.
The pioneer tools are provided with the brackets moulded in place plus additional tools without the brackets but no etched brackets are provided so you have to source these elsewhere, but it’s good the naked tools are provided for this option.
There are two seated figures made up of 7 parts each for the driver’s and gunner with the details on the figures being quite nicely done but both will have to be fully painted and fitted in place during assembly as they can’t be added later. This also means the kit itself will need finishing in these areas also and unless you specifically want to add figures for a diorama setting leaving these out will be the easier option both for assembly and painting, but it up to use, it’s you model.
These are the normal exploded view drawings which in the main are easy to follow but there are some annoying anomolies and you have to be on your guard. It is best to test fit the assemblies before gluing to make sure things are in the right place and I have learnt with Dragon instructions if it looks like a part may need to be altered to fit it is usually a warning something is amiss with the instructions so check carefully before altering any part.
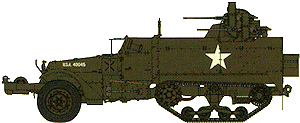
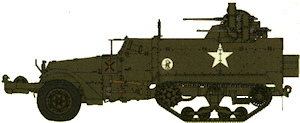
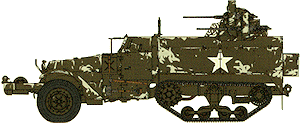
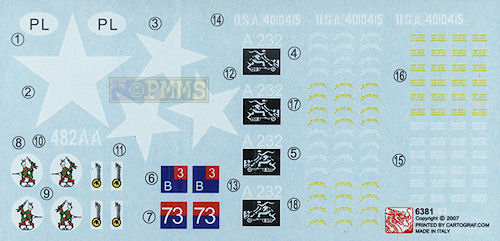
There decal sheet included is well printed with the carrier film cropped close to the printed image and has a selection of white registration numbers, white Allied stars, unit insignis and a good selection of stencil data for the ammo canisters..
The markings provided are:
|
|
Overall this is an excellent rendition of the M16 MGMC half-track with some very well done details such as the drive sprockets and idler components and the general details throughout but unfortunately just using the same bogies from previous results in the incorrect type for the M16 and some work is needed here as well as added the missing bogie detail well documented previously.
Like any kit there are areas where improvements can be made to lift the detail level further and while this kit is clearly the best M16 half track available today it still falls short from being the ultimate kit in a number of areas as outlined above. The fact none of the well documented detail omissions from the first kits have not been addressed and we have a mixture of hull rivet/screw head detail is really disappointing but if none of that is of concern then the kit will build quite easily into a nice looking model.
The final verdict is it’s a nice kit that will build easily but could have been a lot better if some known issues were addressed.
Highly recommended 7.5/10.


