
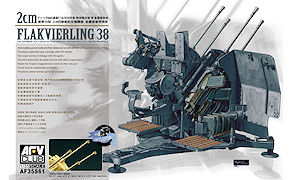
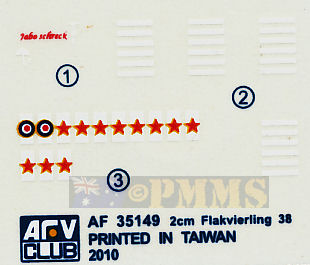
2cm Flakvierling 38
Special Edition with metal barrels
AFV Club 1:35 Kit No. AF 35S61
Kit review by Terry Ashley
Technical Advice by Jon Bailey
The Gunner fired the weapon by way of two foot pedals; each pedal fired the two diametrically opposite guns allowing the other two guns to be reloaded for sustained firing. It had a maximum combined rate of fire of 1,400 rounds per minute although the practical combat rate was 800 rounds per minute.
It could also be fired in automatic or semi-automatic mode and all four guns could be fired at the same time by depressing both firing pedals in emergencies but not recommended due to ammunition use.
The mount was normally transported on an Sd.Ah.52 trailer towed by vehicles such as 3/5t trucks and Sd.Kfz.11 half tracks as well as mobile AA vehicles such as the Sd.Kfz.7/1 half-track and Panzer IV based Wirbelwind plus some local one off installations.
As well as Wehrmacht use, the Flakvierling 38 was also used by the Kriegsmarine fitted to U-boats and ships as well as on trains, fixed installations such as around harbours and on flak towers and was very well respected by Allied pilots due to the high rate of fire.
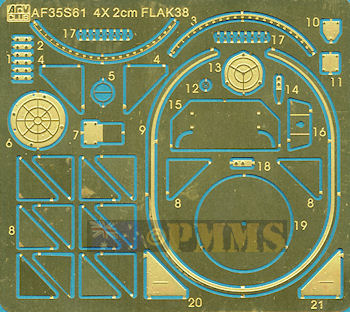
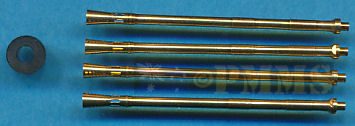
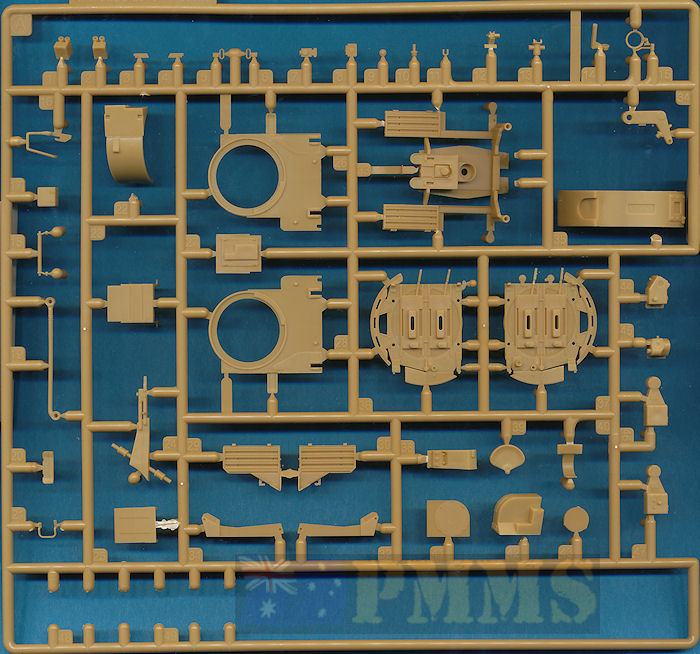
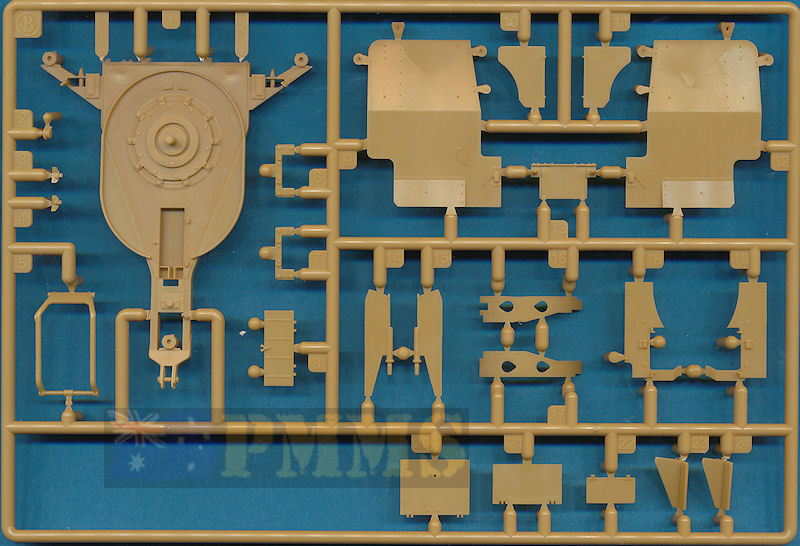
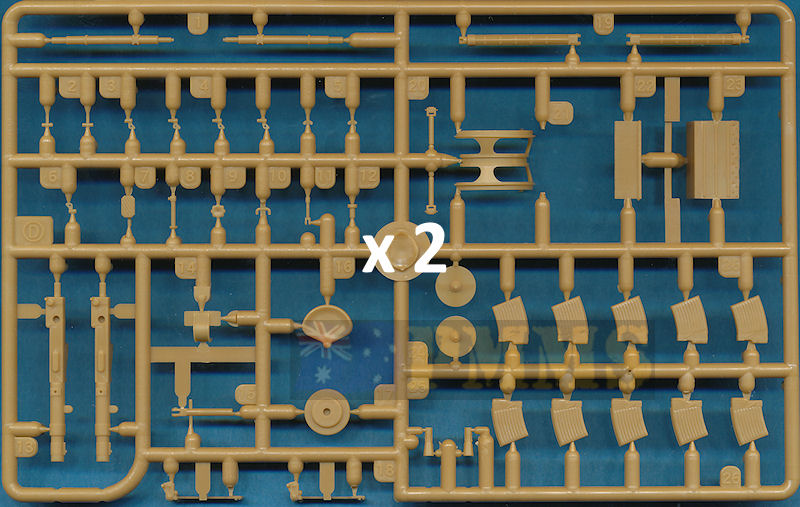
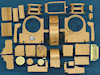
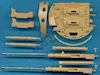
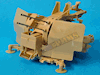
The kit as the name suggests just gives you the full Flakvierling 38 mounting on the triangular base without the Sd.Ah.52 trailer plus a few 20 round magazines with the ability to build the kit in firing or travel configuration. The kit consists of 162 parts in light beige plastic, 53 etched parts along with 4 metal barrels, a rubber bushing and a 12 page instruction booklet.
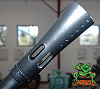
Metal barrels and vinyl plug
Standard of moulding is very good with few if any pin marks visible after assembly and only the odd bit of fine flash with the normal mould seam lines and the many plastic nodes being the only cleanup needed on the parts. There are some quite small and fine parts that need the usual care in cleanup and assembly but the level of detail definition as result of these parts is very good overall.
Dimensionally the kit matches well with the available 1:35 plans in the books listed below; these are mostly showing the Flakvierling 38 on mobile mounts such as the Wirbelwind and Sd.Kfz.7/1 so not all the features are measurable, such as the triangular base. Those features than can be checked were mostly within acceptable tolerances given there were also some minor differences between the plans themselves which doesn’t make things easy.
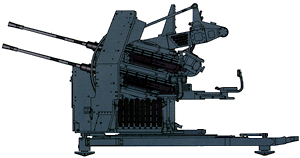
The Carriage itself has the two side panels with the rear seat rests added and a central part that has the lower support for the inner bearing ring allowing it to rotate freely. The bearing rings on the side panels also have raised sections that act as cradle stops and when the outer gun cradles are attached these stops only allow elevation and depression of the guns the same degree as the real guns that adds further to the authenticity of the whole assembly.
The top cover plate with the rear mounts for the sight arm and battery box is then added to finish off the main carriage structure along with the small gunner’s shield made up of four parts with separate sight door added to the top of the carriage and the side stop handle (part A16).
The two side protection boxes (parts A31, A32) are separate parts with two very small butterfly nuts added, these require extreme care when removing form the sprues as the attachment points are almost as big as the nuts themselves.
At the front is a four part recuperator housing with the later flat round access overs on either side with bevelled joins edges resulting in a clean join not requiring any filler. You are also given additional covers as etched parts with the circular ribbing and after trimming off the moulded on bolts from the flat covers add the etched covers for the earlier appearance.
At the front is the spent shell collector box as a single part with the front flap as another etched part for a nice thin appearance. This has the two front ribs that require you to pressure emboss with a pointed tool and it’s best to do this after bending the sides to shape to reduce the part distortion while embossing the ribs. The flap is designed to open and close which it does nicely allowing you to alter the position at any time depending on the final configuration of the model. Two small grab handles are provided for the sides of the flap but reference images show this handle was only fitted to the left side of the flap so you could just leave off the other handle.
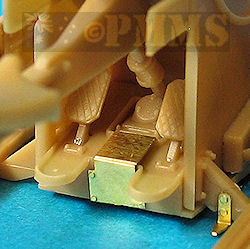
At the back of the carriage is the Gunner’s position with the seat rest and traverse gear drive shaft are in one piece with the gunner’s seat and backrest as separate parts, the drive shaft ends fit into the foot plate and underside of the traverse gear housing without any problems.
The traverse gear housing is in two parts with the two small thumb knobs included which have excellent detail along with separate traverse hand wheels. There are alternate parts supplied for the housing with either two small equipment boxes or etched plates to cover the location of the boxes if not used. The assembled traverse gear housing is attached to the upper carriage while aligning with the top of the traverse gear drive shaft.
The main sight arm is in two halves with the inner arm in one piece with nicely engraved detail and alternate outer arm sections. One has a small control panel on the outer side while the other has the panel blanked over with additional grab handles and top guard added to whichever arm section you choose. The smaller L shaped sight bracket arm is attached to the main arm by way of the small locating pin (part A9) that allows the sight arm to elevate with the guns; just ensure you don’t get glue on this pin in the process.
Added to the bracket arm is the sight mounting bracket (part A13) with the correct end clips and this allows you to model the gun without the sight in place, the sight was only fitted during action and stowed away while in transit.
The gun sight provided is a very good representation of the later revised Schwebekreisvisier 30/38 sight made up of three plastic and two etched parts, the sight includes the Gunner’s eye piece with a small etched sight ring added inside. The main sight ring at the front has the outer ring and pendulum balance arm as one piece with the main sight ring also in fine etched brass.
A quick note on the main sight ring (part G5) and the pendulum balance arm moulded with the outer ring should always remain perpendicular as they are free swinging on the actual sight with the balance arm controlled by gravity so these can be positioned according to the elevation of the guns.
The outer sight mounting bracket (part A12) has small pins that fit into the arm mounting bracket in the same manner as the real sight for more excellent detail. One point is the ground sight scope is not included therefore the gun can only be built in the AA role.
Smaller detail parts include the front foot rest posts, the small brackets to hold the folded outer walk board sections and two etched detail parts added between the firing pedal plates.
At the front is the large locking lever that has the stop bracket on the bottom that ensures it sits correctly in the forward position and just doesn’t flop forward as on most Flakvierling 38 kits. The lever is trapped between the two forward sections of the Platform so you have to fit the lever in place at this stage.
The magazine racks have the small square wood pads on the bottom and rear plates with the triangular segments as etched parts for excellent definition. I found the small slots for the etched segments on the rear magazine wall (part D23) needed to be enlarged ever so slightly for a better fit of the etched segments but other than that all went together well.
Added to the racks are the rectangular box and bent rod tubes and you can add any number of 20 round magazines provided to the racks as required.
The two Loader’s seats have separate back rests and the mounting posts have the lower U bracket for fitting to the outer walk board section allowing the seats to be positioned in the raised firing or folded travel modes as required.
The separate outer walk boards can be positioned in the down or raised position for the travel mode resting them on the brackets provided. There are also two small rings added to the front of the boards which need care handling and the underside L bracket that extends out from the boards is included for additional detail.
Fitting of the Upper Carriage to the Platform is very precise and will hold in place without glue such is the good fit, you would of course glue the assemblies together to avoid and embarrassing incident, but it does allow you to temporarily fit the two together to test fit other components along the way.
The barrel changing hand grips have been represented as raised sections with very little texturing but these in fact should be flush with the rest of the barrel tube with just the texturing apparent. Being metal this is very difficult to correct which sort of negates the advantage of the metal barrels in the first place apart from the flash suppressors and you really need to replace these with other after market barrels that have the hand grips correctly depicted for truly accurate barrels.

Overall 2cm FlaK gun
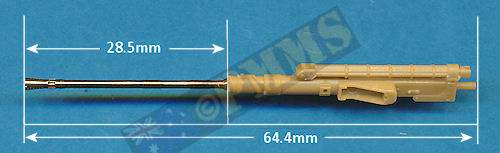
The barrels are just the outer tube section and flash suppressor with the rear barrel housing and receiver in one piece and the barrel fits very snugly into the recess on the receiver allowing the barrels to stay in place without gluing if you wish.
The receivers have the magazine bracket moulded on allowing you to add one of the magazines supplied or not along with separate top receiver covers and gun sleighs.
The sleigh gun attachment bracket is included with the main sleigh but still has good definition between the gun and bracket and these are attached to the circular gun cradle along with the recoil cylinders and the curved front gun shield.
Detail on the cradle is very well done and includes the two fine firing levers, the two small deflecting pullies on the rear edge of the left side cradle and separate etched elevation quadrants around the curved lower cable drum bracket with fine engraved gradients. There are actually two etched elevation quadrants supplied with the instructions showing to fit these on both sides, but in fact should only be on the left side cradle, so just leave off the right side part.
The three rectangular holes above the gradients are fully opened out for a very good appearance.
When fitting the gun cradles to the Upper Carriage you should take care not to accidentally glue the inner bearing to the gun carriage.
After attaching the Gun Cradles to the Upper Carriage the left side Cradle is attached to the sight arm by way of the connecting rod (part A19), this is held in place by two small pins (parts D12) which allows the sight arm to remain aligned with the barrel when elevated.
The plastic shield/mounting plates are moulded a uniform thickness (or should that be thinness?) with fine rivet detail on both sides as well as being completely free of any pin marks for nice looking plastic shields.
The inner shields are in two pieces allowing you to easily reposition the top folding section should you want the shields in the travel position, also note the inner shield panels are fitted at an angle of about 70 degrees to the main shields with the instructions having plan view drawing showing the correct angle which should eliminate any problems.
Added to the shields are extremely small wing nuts as well as separate latches requiring care especially when removing from the sprue due to the small hole in the wing section making them fairly fragile.
The way they are attached to the sprue means most had snapped off in the middle before having a chance to remove them. It’s a good idea to apply a small dab of liquid glue to the join of the wing section to the shank before trying to cut away from the sprue. Then carefully cut the wing section free with a sharp blade, I also cut away a small part of the sprue so there is no chance of this catching on the wing as you carefully cut away the shank to free them from the sprue.
Use fine tweezers to glue these in place where indicated in the instructions and there shouldn’t be any further problems.
The pin on the bottom of the inner section fits into the tube couplings on the platform for easy fitting. The square armoured box over the front deflector box is in four parts with the lower front plate able to be glued in the open or closed position depending on your choice.
There are also two very small butterfly latches that hold the flap open or closed after noting the comments above on handling the small nuts.
You have to take care aligning the etched lip as it can move about a bit while gluing in place.
There is a fairly prominent mould seam around the sides of the Base which is easily removed and added to the Base are the three round ‘feet’ (levelling devises) with side bolt panels added to the rear legs for good detail.
The storage compartment cover is separate and has detail on the inside of the cover as well as compartments inside the box if you wish to show the box open in a diorama setting. Three levelling handles are the correct length and include the notch brackets they sit in when not in use.
There are also numerous small etched parts added for the bolt heads on the Base ‘legs’. The central round plate on the Base has a large pin that fits into the rubber bushing inside the Platform allowing the gun mounting to rotate freely.
All of this does require a little extra assembly along the way but the end result is outstanding representation of the Flakvierling 38 but as mentioned there is no transport trailer included.
Rating: 9/10
A more detailed look at this kit compared to the others available will follow shortly as a full 5 way kit comparison of the AFV Club, Bronco, DML, Tamiya and Trumpeter Flakvierling 38 kits.
Footnote: While this kit doesn’t include the Sd.Ah.52 trailer, the good news for modellers is it will fit perfectly with only the smallest of modification to the Bronco Models Sd.Ah.52 trailer. Thankfully this trailer will be released shortly by Bronco as a separate kit #CB-35079 so you don’t have to buy their full Flakvierling 38 kit just to get the trailer.
The only modifications required on the AFV Club kit is to trim the small latch pin off the base parts B3 and B4, then the AFV Club triangular base will fit the Bronco trailer hitches perfectly wihtout any modifications to the trailer.
Click on thumbnails for larger view
Detail images
 2cm
FlaK38
2cm
FlaK38Muzzle Reference images
| TM-E9-228 2cm Flakvierling 38 Four barrelled mount Easy 1 Productions  |
2 cm Flakvierling 38 Nuts & Bolts Vol.27  |
Flakpanzer IV Wirbelwind (Sd.Kdz. 161/4), Ostwind & Kugelblitz Nuts & Bolts Vol.25  |
| Flakpanzerkampfwagen IV and other Flakpanzer projects from 1942 to 1945 Panzer Tracks No.12-1  |
German
20mm FlaK in WWII 1395-1945 Schiffer Military History ISBN: 0-88740-758-7  |
Sd.Kfz.7 in detail Special Museum Line No.36 Wings & Wheels Publications ISBN 80-86416-60-7  |
| Halbketten Zugkraftwagen 8t Sd.Kfz.7/1/2 AFV Super Detail Photo Vol.9 Published by Model Art Co.Ltd.  |
Flak
at War Trojca Publications Waldemar Trojca, Karlheinz Münch ISBN: 83-60041-15-6  |
German Anti-Aircraft Combat Vehicles Revised Edition Ground Power Special Feb '08  |
 and
and 