M24 Chaffee Detail Set
1:35 Set #F058
Review by Terry Ashley
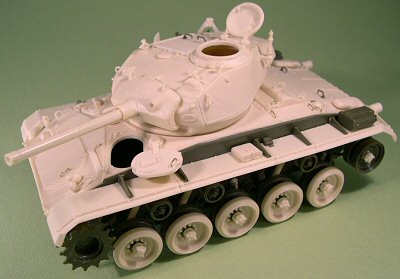
While labelled as a detail set it basically replaces everything in the Italeri kit except the lower hull, inner road wheels and gun mountings inside the turret with the complete upper hull, fenders, turret and outer road wheels being provided in resin along with numerous smaller detail parts for a very extensive set.
There are 147 parts cast in the usual light cream resin plus some MV lenses, a length of twine for the tow rope, a short length of thin plastic rod plus the instruction sheet with the quality of resin casting being very good overall as is usual for Formations resin.
The parts have the usual casting blocks to be removed and care will be needed with some of the smaller parts and some minor cleanup will be needed along the edges of the upper hull as well as thin resin film inside the hatch cut-outs.
There was one area with minor blemishes at the bottom of the gun mantlet where due to the way the part is cast the bottom is quite thin and has some minor distortion. This can be reinforced with plastic card but when assembled this area is mostly out of sight between the lower turret ring and mantlet so won’t be that noticeable if left as is.
The Hull:
 The large upper hull casting is excellent and doesn’t have any warping
which is good for such a large flat piece although the front is slightly bowed
but this will straighten itself when attached to the Italeri lower hull and
so is not a problem. Some fine resin film has to be cleaned out from the crew
hatches and turret ring openings but you need not open out the opening for
the separate engine deck door unless you intend adding the twin engines.
The large upper hull casting is excellent and doesn’t have any warping
which is good for such a large flat piece although the front is slightly bowed
but this will straighten itself when attached to the Italeri lower hull and
so is not a problem. Some fine resin film has to be cleaned out from the crew
hatches and turret ring openings but you need not open out the opening for
the separate engine deck door unless you intend adding the twin engines.
Detail on the upper hull is superb with subtle weld seams, bolt heads including the recessed bolt heads around the front transmission inspection plate and cleanly cast engine deck grills which are cast without the mesh covering so the detail is not compromised and there are numerous smaller separate parts for added detail definition. These include the two rear side fuel compartment vent covers which have the small space between the hull achieved by the resin parts resting on raised locating stubs and there are also small casting numbers on top of the covers. The two exhaust outlets are separate parts which are fitted from inside the hull for good definition but care is needed when removing these from their casting blocks to ensure the square base is left intact as this positions the part in the hull openings.
The engine deck door is a separate part that fits perfectly into the desk recess and as mentioned if you don’t plan on adding the engines there is no need to open out the space under the door.
At the front are the two crew hatches with separate pericopes as well as the four hull T latches which are extremely small and will need special care removing from the resin backing and in gluing to the hull. Other parts include the front ventilator cover, head lights (with MV lenses), horn, hull MG and mounting for the driver’s external weather visor. Other detail can be added from thin wire for the fuel filler cap pins and various grab handles.
The lower hull from the Italeri kit is used along with new resin rear hull plates with a choice of early flat plate or later style with the square mountings for the floatation devise plus the shock absorbers and the two small T brackets on either side of the hull as well as new full length fenders. The tail light housings and tail lights are separate parts as is the towing pintle, lower shackles and upper lifting rings on the rear hull plate.
The only modifications needed on the Italeri hull to fit the new parts is the removal of the upper lip along the hull front as this is included with the resin upper hull casting. Fitting of the resin upper hull will require some minor trimming and test fitting will determine any that is required, but on my hull I only needed to lightly file smooth a minor bulge along one side and ensure the sides were perfectly straight and the fit between the plastic lower hull sides was then very good. The fit of the rear hull plate likewise may require some minor trimming and I had to reduce the width of the inner locating recesses to better fit inside the plastic lower hull, but this was only very minor. There was one area that caused a little concern in that the upper hull was a little less than 1mm short leaving a small gap at the rear between the upper hull and rear hull plate but this could be filled with a thin strip of plastic card and wouldn’t be really noticeable.
The fenders are attached to the hull sides and again some minor trimming may be needed but test fitting before hand will result in a good fit.
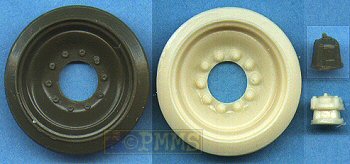
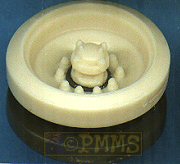
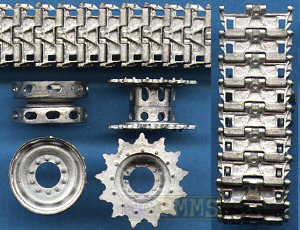
The outer road wheels are provided in resin and have much improved wheel disc contours and hub bolt details and these are designed to fit to the Italeri inner wheel halves. After removing the casting block and resin film from the hub holes the resin wheels were a perfect fit to the Italeri wheels with the new resin hubs replacing the plastic items for a more detailed look and the Italeri kit axles are used to attach the wheels. The kit drive sprockets and idler wheels (with new resin hub) are still used but these have their own problems in not having any of the rim lightening holes of the real wheels. Replacing these with those available from Friulmodel would greatly improve their appearance and while we are here, using the T72E1 steel tracks from Friulmodel set ATL-39 will improve the tracks as well as providing the drive sprockets and idlers included in that set.
The Turret:
 The new resin turret completely replaces the Italeri item and is again perfectly
cast with the Commander’s cupola included and subtle weld seams plus
a separate cupola top hatch and open loader’s hatch.
The new resin turret completely replaces the Italeri item and is again perfectly
cast with the Commander’s cupola included and subtle weld seams plus
a separate cupola top hatch and open loader’s hatch.
Breakdown of the turret parts is similar to the Italeri turret in having the
main shell with separate lower ring and front section with the fit of the resin
parts being spot on, any minor gaps with the front panel can be filled with thick
cyanoacrylate or epoxy as you assemble the parts.
The Commander’s cupola hatch is in two parts with the outer rim and inner revolving hatch and care should be taken when removing the resin film inside the rim as there is a small notch on the inside of the rim that must remain. The fit of the rim and inner hatch is perfect and the rear hinge can be made workable with careful fitting. Added to the hatch are the separate periscope and cover plus a grab handle from thin wire for a very nicely detailed assembly. The loader’s hatch is a simple plate as per the real thing with the hinge being added using the thin plastic rod provided and wire latch handles. The delicate MG pedestal mount on the rear of the turret is made up of five separate parts with precise locating brackets included on the turret roof so positioning this shouldn’t be a problem.
Other separate parts include the lifting rings, shell ejection port door, sighting vane, ventilator cover plus the aerial mounts as well as a separate rear stowage box. The sight vane is a particularly delicate casting and you are given two in case of breakage which is nice of Rob.
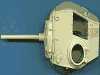
At the front is the separate gun mantlet with nice cast effect and casting numbers included but with the minor casting flaw on the bottom as mentioned above as well as separate lifting rings and co-ax MG. The Italeri kit gun block and mountings are used inside the turret to attach the resin parts and this requires the plastic gun tube to be cut off level with the resin barrel which is then glued to the kit gun, I inserted a small plastic rod pin in the end of the resin barrel to allow for a better fit inside the plastic barrel stub.
The fit of the mantlet to the kit gun isn’t that good and I added a small ring of aluminium tube around the barrel base to fit better into the back of the mantlet, but the mantlet neck is slightly too wide resulting in the gap between the barrel and neck being more than it should but we are only talking small discrepancies here and you should be able to add a small ring inside the neck to reduce the space a little.
The lightweight 75mm gun mount was designed for the M24 from the gun used in the B25H bomber and the kit barrel has the two small attachment bands part way down the tube which is a leftover from the aircraft mounting with later barrels produced specifically for the M24 not having these bands, this is the reason there are images of Chaffees with and without the barrel bands.
The set of pioneer tools from Set F056 but strangely the wire to make the handles for the Engine Crank Handle and Track Bar wasn’t included but you should be able to find a suitable length of wire for these.
The instructions are two pages of diagrams showing the location of the parts which are called out by number with the resin parts numbered on their blocks (sprues) to make identification easy. While the illustrations are useful some additional reference would be helpful to fit the parts and any of the books listed below would be useful.
Conclusion:
This is a superb detail set that transforms the Italeri kit with the excellent
standard of casting and details on the parts all adding to the final effect.
Considering the amount and scope of the new resin parts the trimming needed
is really quite minor and any problem areas nothing out of the ordinary for
a comprehensive resin set.
Highly Recommended
Additional detailing:
Despite all the detail in this set additional detail can be added by using Eduard’s etched detail set #35608 for things
such as the tool brackets and tie downs, fender supports, headlight bush
guards, periscope housings and tie down cleats. As this set is designed for
the Italeri M24
kit some parts don’t fit the Formations parts like
the engine intake screens which are different sizes and some trimming will
be needed on the etched screens to fit the Formations engine
grills.
As mentioned above using the Friulmodel set ATL-39 for the T72E1 steel tracks with the drive sprockets and idler wheels that have to correct lightening holes included will greatly improve that part of the kit as well.
There are also a few metal barrels available for the M24 from Jordi
Rubio and Finemolds. The Jordi
Rubio barrel is exactly the same size (length
and diameter) as the Formations resin barrel while the Finemolds barrel
is slightly thinner than the Jordi Rubio and Formations barrel
and as these two match available plans using the Finemolds barrel
would be a step backward.
The Formations resin barrel is perfectly adequate dimensionally
and is also easier to fit being resin as opposed to the metal barrels.

References:
|
STUART A History of the American Light Tank |
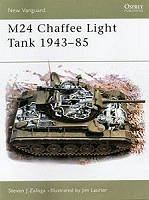
M24 Chaffee Light Tank 1943-1985 |
|
Stuart U.S.Light Tanks in action |
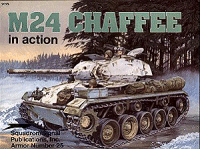
M24 Chaffee in Action |
|
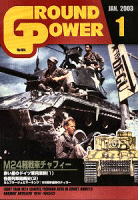
Ground Power Magazine |
M24 Chaffee Light Tank |
Check the Formations website for details of other update sets available and thanks to Rob for the review sample.
Page created October 12, 2005