
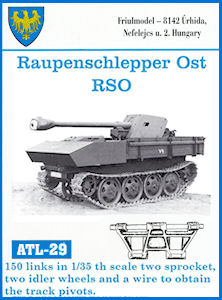
Raupenschlepper Ost RSO
Friulmodel 1:35 Scale Track Set No. ATL-29 Revised
Review by Terry Ashley

This new set of workable RSO track fromFriulmodel addresses all three issues as well as including superbly done replacement drive and Idler sprockets to give us a set that will be all but indispensible for anyone building the DML or Italeri RSO kits.
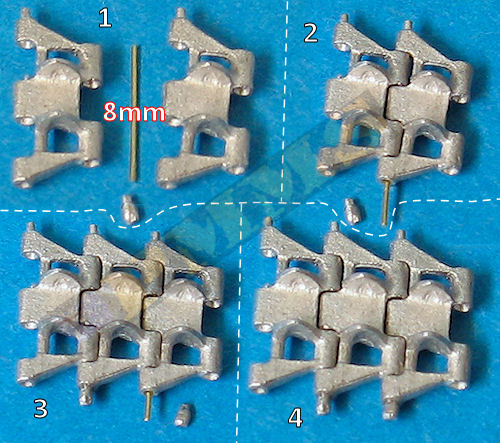
It consists of 150 individual metal links in separate bags for the left and right track along with separate track pin bolts cast 20 to a large casting block. Replacement drive and idler sprockets in two halves each are provided plus the usual length of wire for the track pins. There are two small instruction sheets to give some tips on the track assembly but this fairly straightforward in any case.
Dimensionally the new links match the data and 1:35 plans in the Nuts & Bolts and Panzer Tracts books listed below perfectly with the diamond cleats matching the period photos well. There is minimal cleanup required with just small casting burs on one side of the link and occasional bit of ‘flash’ on some links. The small end bolts are cast on a large casting block but the bolt casting seams are proportionally quite large and it’s best to clean these while the bolts are still attached to the casting block for easier handling. The only quibble here is the end bolts are a little oversized but this is not that noticeable on the fitted track runs as they are on the inside of the track runs.
The other important detail is the new tracks are ‘handed’, this means the separate pin bolts face the inside towards the hull on both track runs when the tracks are fitted to the running gear, if not handed the separate pin bolts would be on the inside of one track run and on the outside of the other, which is incorrect.
Note there are two styles of cleats on RSO track seen in period photos, the diamond type as on these Friulmodel tracks and rectangular cleats as on the DML and Modelkasten RSO tracks.
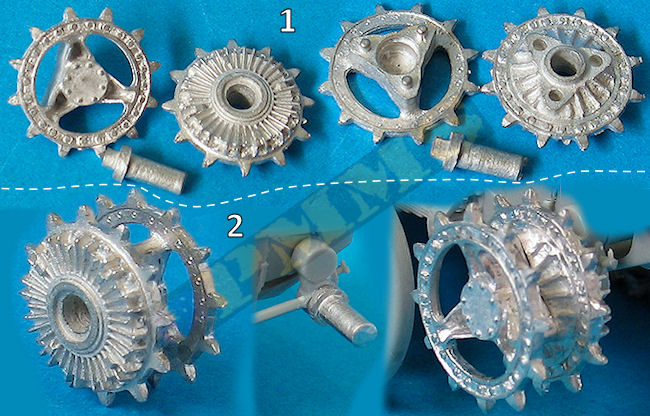
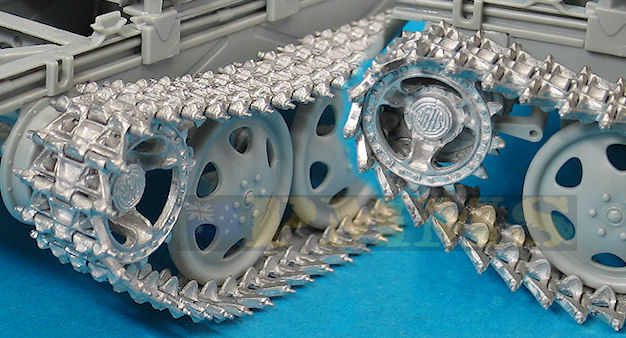
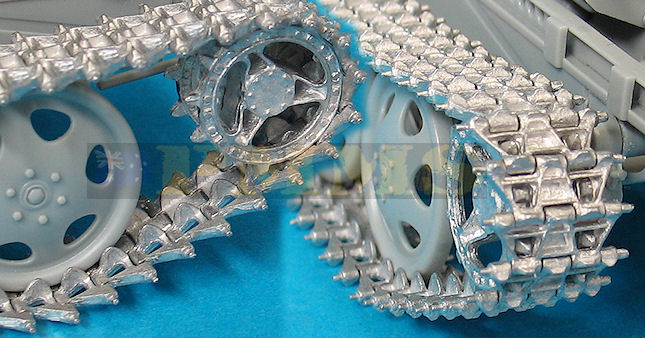
The new drive and idler sprockets also match the data very well with excellent detail definition including the bolt head detail on the inner faces of each disc segment. There is again minimal cleanup with just some small burs to be removed before assembly, the idler sprockets also have a small cast seam around the inside of the spokes that will need to be removed and the axle stubs have some excess metal on the ends to be removed and quite large cast seams which are easily removed.
Care is needed when fitting the sprocket halves together as they are not numbered and the inner triangular hub is larger on the drive sprocket but you can fit the idler half to the drive half if not careful, so check carefully before gluing.
2. The assembled sprocket, axle fitted to kit and sprocket fitted to axle.
No alterations required as metal parts simply replace the plastic kit parts.
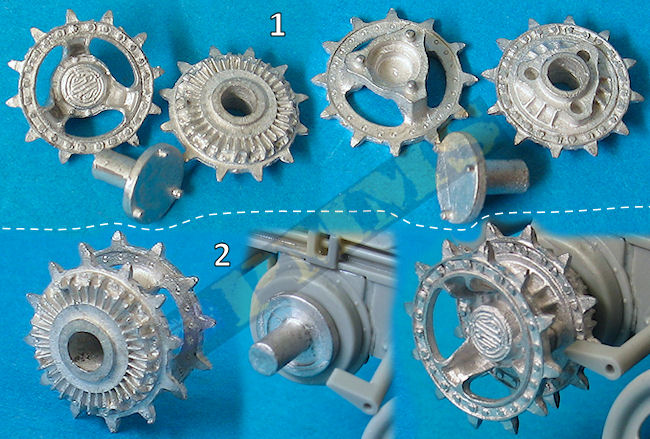
Replacement sprocket mounting axles are provided for the new sprockets and these simply replace the DML kit parts not requiring any kit alterations, but it’s best not the glue the idler mounting in place as you will need to make some minor axle adjustments to get the correct track tension just like the real RSO as the track is fitted. Note; the sprockets are designed to be glued in place on their respective axle stubs and again it’s best to leave one or both unglued until the track is fitted to ensure the teeth align correctly with the track.
2. The assembled sprocket, axle fitted to kit and sprocket fitted to axle.
No alterations required as metal parts simply replace the plastic kit parts.
Assembly is quite straightforward really by fitting one link into the next and inserting the wire pin, ensure the wire is as far as it can be into the link hole to leave room for the end bolt pin to fit. Occasionally the links may not align exactly and you can simply re-drill with the two links together the properly align the pin holes. The drill bit in this instance tends to align the link hole rather than drill new holes so the fit will still be good, you may also need to fully open up the wire holes on some links with the drill but this was not required on all links.
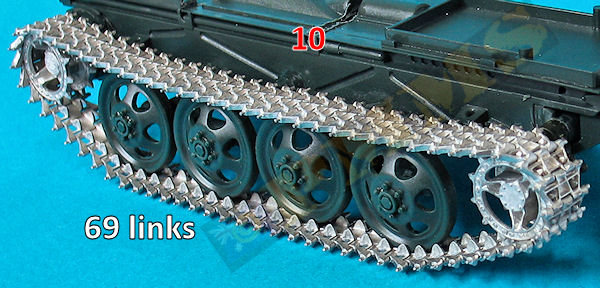
After fitting each track pin add a dab of thick cyanoacrylate into the pin hole and fit the end bolt into place ensuring it is aligned correctly, you then simply repeat the sequence for each link until the track run of 67 links (for DML) or 69 links (for Italeri) is complete for each side. The assembled track runs are extremely robust and articulate freely, this being the hallmark of the metal Friulmodel tracks.
3. Secure end pin with dab of cyanoacrylate and repeat step 2 for the next link.
4. Repeat the steps to assembly the full 88 links per side.
As mentioned above the drive and idler sprockets and their axle subs are a straight swap for the DML kit parts so fitting these is the same as assembling the actual kit parts. You will need to adjust the front idler axle slightly to get the correct track sag over the top of the road wheels and this is why you didn’t glue the idler axle in place earlier, didn’t you? The fit of the metal tracks to the metal sprockets is spot on as you would imagine so no issues here.
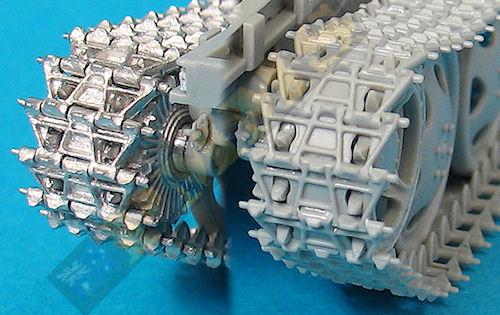
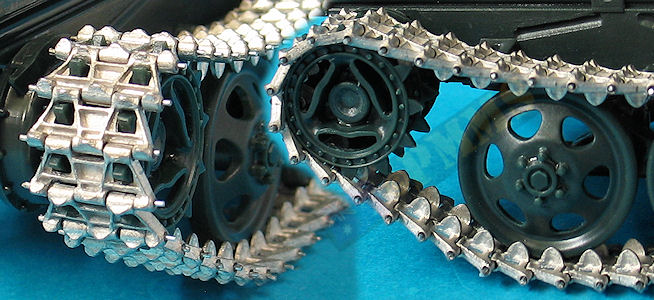
Comparison of the DML RSO kit tracks showing the greater definition of the Fruilmodel tracks
Italeri RSO:
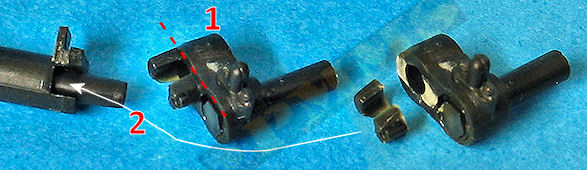
There is a little more work involved fitting the sprockets to the Italeri RSO kits, but nothing too difficult. With the metal drive sprocket axle simply cut the three small locating pins from the axle mounting ring and glue this directly to the kit final drive housings (parts 17, 18) ensuring you align this centrally on the drum, the metal drive sprocket then fits to the axle as intended.
For the idler mountings these need to be modified so you can adjust the track tension for the correct track sag and to do this you firstly glue the kit axle (parts 34) into the axle mounting (parts 9, 10) and once dry cut the axle off level with the small raised ring on the front of the mounting. Then cut the two locating lugs from the inside of the kit axle mounting and glue these into the recesses in the main axle (parts 7, 8), once dry cut off the main axle pin level with the end of the main axle.
You then drill a 2mm hole into the main axle and glue a 2mm plastic rod pin into the axle mounting hole (parts 9, 10) and let dry completely. You then drill a shallow 2mm hole into the outer axle mount and cyanoacrylate the Friulmodel metal axle stub to the plastic mounting, when this modified assembly is all dry you can insert the 2mm plastic rod pin into the main axle and adjust the angle of the mounting for the correct track tension, see the images below to help make sense of all that.
2. glue these lugs into the recesses in the main axle (parts 7, 8),
3. once dry cut off the main axle pin level with the end of the main axle.
4. glue a 2mm plastic rod pin into the axle mounting hole (parts 9, 10) and let dry completely.
5. drill a 2mm hole into the main axle.
6. drill a shallow 2mm hole into the outer axle mount and cyanoacrylate the Friulmodel metal axle stub to the plastic mounting
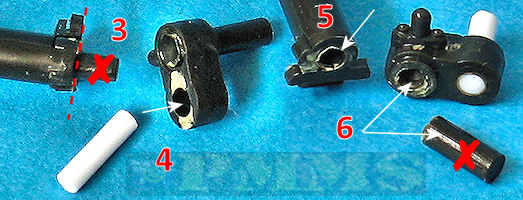
7. insert the 2mm plastic rod pin into the main axle and adjust the angle of the mounting for the correct track tension.
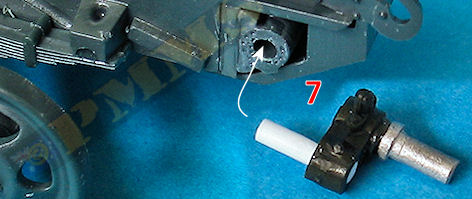
8. Images of Friulmodel metal axle stubs fitted to the kit as above, note; leave the axle mounting unglued to allow track tension adjustment..

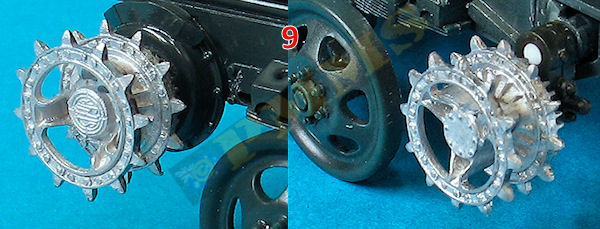
9. Replacment drive and idler sprockets added, leave theseidler mounting unglued until the track is fitted.
10. Overall view of the Friulmodel track and sprockets added to kit.
Views of the original set #ATL-29 with the larger cleats and non handed track
resulting on the wire pin being on the outside of the left hand track runs.
The new revised set # ATL-29 for comparison
The only real concern with these new “revised” tracks is when buying especially online. By this I mean the only packaged difference from the original set is small added text mentioning the drive and idler sprockets now included. You would need to make sure to stipulate exactly you want the “revised” set and not the original as mistakes could easily be made due to the product number still the same at ATL-29
Other than that this is simply a superb set of RSO tracks and Drive/Idler sprockets that may well become an essential inclusion for anyone building any of the DML or Italeri RSO kits.
Rating 9.5/10
| 7.5cm Pak 40/4 auf gep. Selbstfahrlafftte Raupenachleper OST (RSO) Nuts & Bolts Vol. 09 Revised  |
Panzerjaeger Panzer Tracts No.7.3 Thomas L Jentz, Hilary Louise Doyle  |
| Allied & Axis No.20 Raupenachleper OST Ampersand Publishing  |
Ground Power Magazine #119- 4/2004 Published by GALILEO Publishing Co.,Ltd  |
Thanks to Friulmodel for the review Set.
