

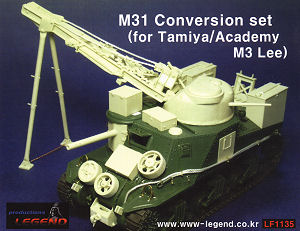
The M31 TRV or originally designated the T2 TRV and initially built on the
later M3 chassis with most photos showing the hull side doors welded shut or
eliminated on the production line plus the three dome ventilators fitted to
the hull and turret.
As well as the M3 based M31 additional vehicles were built of the welded M3A3
(designated M31B1) and later M3A5 (designated M31B2) but as these were diesel
powered additional modifications would be required to the rear engine deck
and rear hull panels.
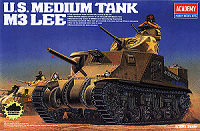
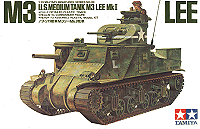
Both target kits have their own issues such as the suspensions (Academy bogies too tall, Tamiya bogies too wide and lack detail plus the road wheels have six cut-outs instead of five) and the hull angles of the Academy kit if you are concerned with this but little if any kit modifications are required to add the M31 conversion parts to whichever kit you choose as the base model.
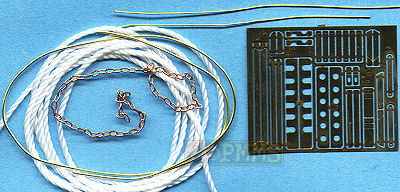
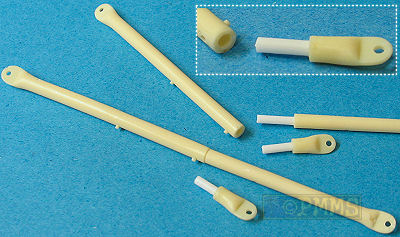
The Legends set consists of 178 parts in the usual light cream resin plus a length of twine, a few lengths of brass wire, as small etched fret and short length of chain and of course the all colour instruction sheet.
Standard of resin casting is excellent overall with very few blemishes evident but a few small air holes are exposed when removing the casting blocks such as on the spare road wheels and crane boom support legs but these are easily filled. There is also a bit of warping on some parts which can be pulled into line during assembly or a quick dip in warm water will straighten them out before hand but nothing that is too excessive.
There are some quite substantial casting blocks on the parts which will need care when removing as it is difficult to determine where the casting block ends and parts start on some parts and careful referral to the instruction drawings is needed so as not to cut away the actual part during cleanup. The large casting block actually makes it easier to remove them from some parts as they give you something to get a good grip of while wielding the razor saw and there is also some thin resin film to be removed which is easily dealt with.
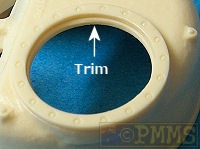
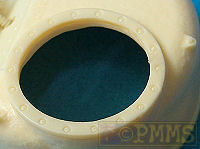
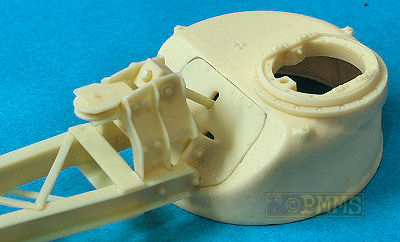
Included in the set is a compete new turret with the front crane mounting plate and newly designed cupola hatch as separate parts with the two split hatches also separate if you wanted to add a Commander figure.
The turret is from set #LF1133 with nicely done cast surface texture, small casting numbers on the top and the subtle contour on the sidewall under the cupola plus the separate cupola bolted ring which is warped but will pull nice and flat when glued in place and so is not a problem.
There are three large casting blocks to be removed from inside the turret shell but if you are leaving the hatches closed these could be left alone and you can just glue the turret in place on the turret race or fit the Academy kit turret ring (part E24) if attaching to the Academy kit which requires some of the raised detail be removed to fit into the resin turret. When using the Tamiya kit the lower turret ring (part A29) is a little loose but will fit into the resin turret to allow easy fitting to the kit.
If you use this turret and the Academy turret ring with the Legends M3 Lee Detail Set (#LF1133) you need to cut off the two securing lugs from the ring to fit into the resin hull turret race.
Detail on the cupola is very good with inner ring detail to which is added brass wire handles and separate split hatches that fit snugly in place if you wish to show them closed. After gluing the cupola bolted ring (part #5) in place you will have to trim the turret roof to match the inside of the ring to allow the new cupola to fit into place, this includes trimming the inside of the turret wall to be flush with the inside of the bolted ring.
The dome ventilator is a separate part and can be added for the later M3 and the dummy 37mm gun is added to the back although the instructions don’t give a clear indication of the exact location or angle and referring to reference photos may help with this.
The crane mounting plate replaces the gun mounting at the front with the fit to the turret opening leaving a few gaps at the corners easily filled with thicker cyanoacrylate and the large multi-part crane which is basically the centre piece of the conversion is attached to the support lugs on the mounting plate, best done after gluing the plate firmly to the turret.
The crane jib has the two sides as separate parts but these were warped a little and while they will pull back in line during assembly straightening these before hand may help things.
Assembling the crane will require care as there are no locating lugs or clear indication where things go and careful reference to the assembly photos is essential and you also must check that everything is aligned correctly before the cyanoacrylate sets.
It’s best to start at the back of the crane with the large brackets fitted over the turret support lugs and held together by gluing parts 11 and 13 between them with these parts lining up between the outer bolts on the brackets, it is essential that you check the alignment from all angles when gluing these together as this will form the basis for the rest of the crane boom alignment. Part 11 requires the central hole drilled out for the threaded rod (part 26) that extends into the cut-out in the mounting plate.
Once this is firmly glued the crane jib is movable allowing you to position this at any elevation and you can then glue the front sections together and again check the alignment from all angles to make sure everything lines up correctly, the front and rear brackets (parts 1 and 2) can be glued in place to make a solid assembly.
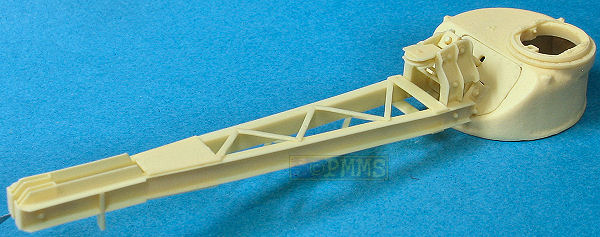
The top and bottom W brackets are then glued in place to form the basic crane assembly and these can be used to align any warping of the crane arms that still remains.
The location of the remaining smaller brackets and fittings is not that clear in the instructions and no locating marks are on the parts, for example to fit part 40 (lower brackets) you must use the assembled crane support legs as a guide to the proper location for part 40 and careful study of the instruction photos is essential and thankfully most give you at least two sometimes three different angles to help get things in place correctly.
You have a choice of assembling the support legs in the stowed position or extended to support the crane in use with alternate lower legs (parts 58 and 59) provided and as these are designed to just butt join together adding locating pins will give a sturdier assembly and also allow you to swap them around to alter the position of the crane boom.
On the hull you are provided replacement side doors to represent the welded doors and this requires you to cut the door hinges from the kit but the lower edge of the resin doors were not fully formed and you will have to rebuild with thin card, easiest to do once the doors are glued to the hull. The doors fit perfectly to the Academy hull but are too small for the hull opening on the Tamiya kit and filling the opening with plastic card and then fitting the doors flush to the card would be the best option here.
The main gun is replaced by a hinged door with dummy 75mm gun and this is cast in one piece but does not fully cover the gun opening on both the Academy and Tamiya kits leave about 1mm of the opening exposed and you may want to fill the opening before fitting the dummy gun with the fit being perfect on the hull from the Legends M3 Lee Detail Set (#LF1133).
At the back are quite complicated winch brackets made up of multiple parts and again careful study of the assembly photos will be needed to get things in the right place but again there are shots from different angles which help considerably and you will also need to remove or relocate some of the hull rivets to fit the parts with the instructions showing those rivets involved.
For the rear hull plate there is new nicely detailed air square air cleaners and exhaust outlets plus the central large towing pintle with a similar unit also added to the front transmission cover.
The remainder of the parts including the large storage boxes on the rear sponsons are straightforward to fit after removing the rivets as are the smaller fittings around the hull and none of these should pose any problems fitting in place.
The tools are nicely cast with the mounting brackets included with the instructions showing the add the securing straps from thin paper but of course if you have a spare etched set about these could be used.
Additional etched parts are provided for the head light bush guards and rear
spare track mounting brackets to add some finer details to the conversion.
| Conclusion: |
Previous experience in working with resin would be of great assistance with this set and as mentioned careful study of the instruction photos is needed both when cleaning up the parts and during construction as there are some complicated and tricky assemblies.
The set offers all the required parts for the M31 except for the underside winch cable outlet and while there are no major kit alterations required you may want to consider updating the Academy bogies with the available sets which can also be used to improve the Tamiya kit in the regard.
The set has a choice of final configuration with the alternate support legs
making for some good diorama potential and will transform your M3 into a completely
different look.
Highly recommended.
| Resin Parts: |
Resin parts
Click for large view

Close new window to return to review
| References: |
| SHERMAN A History of the American Medium Tank R.P.Hunnicutt. Presidio Books ISBN 0-89141-080-5  |
M3 Lee/Grant Medium Tank 1941-45 Osprey New Vanguard ISBN 1 84176 889 8  |
Medium Tank M3 to M3A5 General Lee/Grant Tanks in Detail 4 by Terry J Gander.  |
| US Armored Funnies Steven Zaloga Concord Publications  |
AFVisual M3 Lee Letterman Publications LP019 By David Doyle  |
M3 Lee/Grant in action Squadron Signal Publicatrions Armour series #2033  |