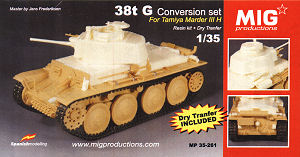
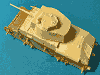
PzKpfw 38(t) Ausf.G Conversion
Mig Productions set #MP 35-261
Review by Terry Ashley
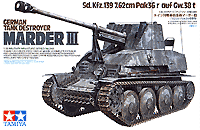 This conversion set from Mig Productions is designed for the Tamiya Marder
III 7.62cm Pak36(r) (kit #35248) to produce a PzKpfw 38(t) Ausf.G which was
the last version of turreted 38(t) tanks produced in WWII.
This conversion set from Mig Productions is designed for the Tamiya Marder
III 7.62cm Pak36(r) (kit #35248) to produce a PzKpfw 38(t) Ausf.G which was
the last version of turreted 38(t) tanks produced in WWII.
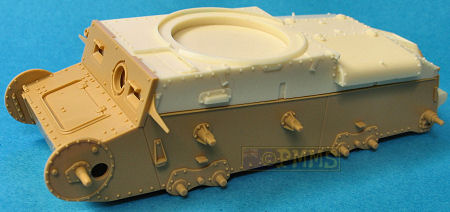
The set consists of 25 parts in light cream resin, a small sheet of rub on dry transfer decals and the usual small colour instruction sheet as seen in previous Mig Productions sets.
The standard of resin casting is first class with clean crisp details and no blemishes such as air holes or deformities evident on any of the parts, a couple of the smaller parts were broken on the pouring runners but are easily repaired.
There are just the small casting blocks to be removed and this is helped by the large casting blocks on the bottom of the turret and upper hull parts that need only trimming but not removed altogether which helps reduce the cleanup required.

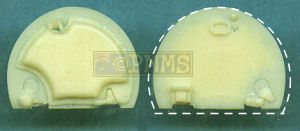
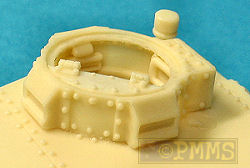
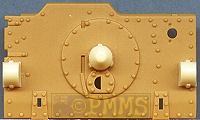
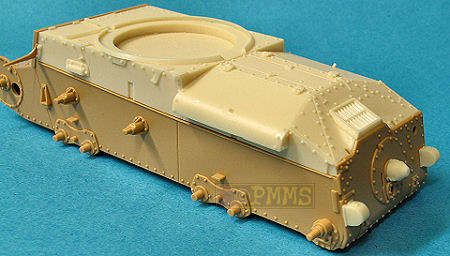
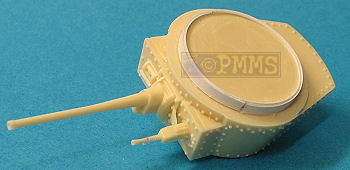
The largest parts are the Ausf.G upper hull section with excellent bolt head details with crisply rendered rear hull intake grills with the turret also having the many bolt heads including under the rear turret bustle with a separate main gun and Commander’s cupola and a large “pit” under the cupola for a commander figure if you want to add this. The turret size matches available 1:35 plans very well as does the hull which has to be to mate to the Tamiya hull.
The cupola is a superb casting with separate inside visors and a separate top hatch with excellent details inside and out with the small fixed cupola top section also separate allowing the hatch to be shown open or closed. One minor issue is the hatch is too big to fit into the cupola hatch ring and some trimming will be required if you want to fix this closed.
This entails trimming about 1mm from the rear straight edge and you will have to carefully remove the right hinge and re-attach after trimming with the diameter of the hatch reduced by about 0.5mm each side to fit the cupola opening with test fitting to determine the right amount of trimming. Of course if you show the hatch open none of this is required as the slight oversized hatch won’t be noticed.
Some minor surgery is required on the Tamiya kit parts to take the new resin parts but nothing too difficult and should quite easy to deal with.
On the rear hull plate (part B18) you just trim off the idler mountings and central panel fitting to be replaced with the replacement resin items that fit perfectly without any further trimming needed.
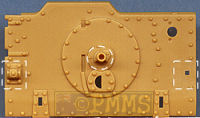
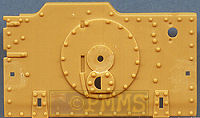
The upper sections of the two hull side panels (parts B2, B8) need trimming along the mid level panel line which is quite easy as you just cut along the panel line and the lower hull is then assembled as per the Tamiya kit instructions.
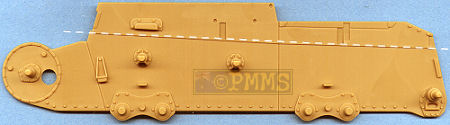
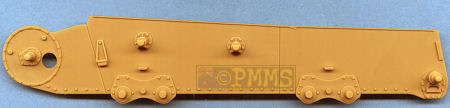
After allowing the hull assembly to dry completely the resin upper hull is inserted into the Tamiya kit opening and the fit here was excellent with no further trimming required which is good to see as mating large resin parts to plastic kit parts can sometimes cause problems but not in this case.
The Tamiya front hull panel (part B4) requires the inside location ribs removed and this is then attached to the resin upper hull and there was only some minor trimming required on one side for a perfect match up while the fit of the rear hull panel to the upper resin hull was perfect not requiring any trimming at all.
The fit of the main gun housing and 3.7cm Skoda gun to the turret front is very good and allows the gun to elevate if required but there is no indication how far you should insert the gun into the housing and a set of 1:35 plans will come in handy to determine this. One thing you will notice about the gun is there is an extra "lip" cast onto the muzzle which has a large air hole, this lip has to be removed for the correct barrel length being was put there to cater for the inevitable air bubble resulting from the casting method.
The co-axial ZB vz.35 machine gun (called the Besa when manufactured in Britain) machine gun is another excellent casting with very well defined cooling ribs and hollowed out muzzle with this simply glued to the front of the turret with minor trimming to get the desired gun angle. PS. No it is not an MG34 as some making a quick guess might think because it's German.
Fitting the cupola is again very easy due to the spot on fit into the turret top opening and the separate main sight is fitted into the locating hole provided but the fit of the turret into the hull turret ring cut-out is rather loose and strips of plastic strip were added around the lower turret ring to achieve a snug fit.
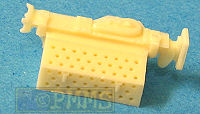
There are other smaller resin details to be added such as rear tail lights and the front NOTEK light and antenna mounting as well as a very crisp casting of the distinctive 38(t) perforated fender storage box with the jack included in the casting with the holes in the box very well defined.
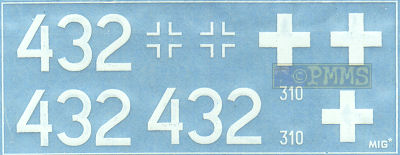
Included in the set is a small rub on dry transfer decal sheet with generic markings for two overall Panzer grey vehicles with two styles of balkenkreuz and turret numbers 432 and 310 included.
The usual small colour instruction sheets shows the Tamiya kit alterations required and assembly of the resin parts but the photos are quite small and the lack of text instructions means you do have to study the photos closely but having additional references will help with construction.
Conclusion:
This is a well cast set with excellent details on the blemish free parts and
the Tamiya kit alterations are well within the capabilities of anyone who would
buy this set in the first place with construction relatively easy for such
a major conversion due to the good fit of parts.
Dragon have announced a kit of the 38(t) Ausf.G for later in the year but if you can’t wait or want to exercise some basic modelling skills this set will provide you with a good quality kit by combining excellent resin parts with the already top notch Tamiya kit.
Highly recommended.
References:|
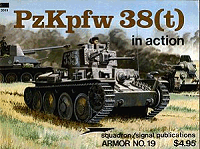
PzKpfw 38(t) in action |
Ground Power Magazine |
|
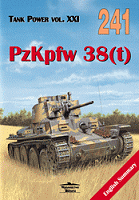
PzKpfw 38 (t) |
TANKS & ARMOUR: PANZER 38(t) Ian Allen Publishing 96 pages, Soft Cover ISBN: 071103091X 
|
Thanks to Mig from MIG Productions for the review set.
Page created May 14, 2006