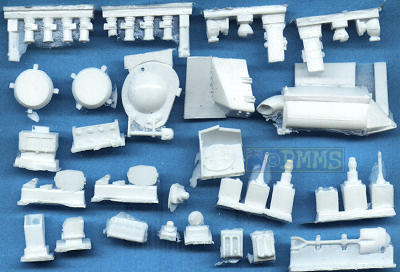
The set consists of 57 parts in white resin, 6 parts in cast pewter, a fret with approx. 30 etched parts and a sheet of aluminium mesh as well as a comprehensive instruction sheet.
Standard of resin casting quite good on the parts themselves with only a few major blemishes such as air holes or warping but there is a substantial amount of excess resin film on many of the parts to be carefully removed as well as the normal casting blocks to deal with. While the air holes are not extensive those present are quite large and will need care with one of the smoke grenade launchers being half missing due to a huge air bubble but most parts are fine once the resin film is removed.
The white metal parts have fairly prominent casting seams that will have to be removed but the etched parts are cleanly etched without any blemishes.
Included on the instructions is a parts list naming all the parts included but unfortunately there is no parts photo or diagram so if you don’t know what the parts look like you are in for a bit of a mystery. Many of the parts though are fairly easy to work out what they are but some such as the lights brackets, antennas and other smaller parts may cause a problem and some additional reference would be of assistance.
The instructions have a number of photos of the real ASLAV showing the parts included in the set but these are fairly small and dark making it hard to see some of the details.
The set itself is very comprehensive as it provides all the required parts to make a Phase 2 ASLAV with the exception of the Michelin XML tyres and I will list here the parts included to give an idea of what you get.| Resin Parts: 1 x Rolled plastic cover for engine grill 2 x jerrycan with holders 1 x external instrument panel 1 x horn 2 x leopard lights 2 x tans 2 x trafficators 2 x Leopard mirrors and mounts 1 x Phone box 1 x Antennae mount on top of phone box 2 x Rear truck lights Axe, Shovel, Pick handle, Pick head 1 x Side stowage rack with cam net 1 x short exhaust pipe and deflector 2 x light mounts left and right 2 x side turret baskets 1 x rear turret basket 1 x Bow plate 6 x aerial mounts turret (3 types) 1 x Discharge outlets for spent cartridges 2 x stalks and 8 smoke dischargers 1 x armoured sight cover Commander (RHS) 1 x Commander’s sight cover (RHS) 1 x armoured sight cover Gunner (LHS) 1 x reworked rear engine grill |
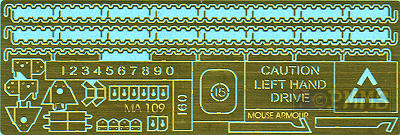
Photoetch: 2 x headlight mounting plates 2 x secondary light mounting plates 2 x wire cutters 2 x wire cutter attachment points 4 x wire cutter mounting plates 2 x rear hatch bump stop mounts 5 x lengths of continuous tie down rod Photoetch - stencil: Recon symbol Caution Left hand drive 15 tonne bridging circle 160 ARN number 0-9 ARN numbers 1 x template for scribing power hatch Pewter: 1 x 25mm fluted barrel 2 x generic front light guards 2 x generic rear propeller guards |
Most of the parts either replace kit parts or are additions requiring little or no kit alterations apart from the new engine grills where you have to cut out the kit grills to be replaced with the resin grills and using the resin parts as cutting guide along with test fitting should see little problems. The other area is the spent shell ejector port on the right side of the turret that requires part of the kit turret be cut away and replaced with the resin parts but this again shouldn’t pose any real problems for average modellers.
The pewter parts are provided for the large head light guards and the rear propeller guards but the guards are cast flat and you have to bend these to the correct shape which will require care. For the rear propeller guards there is a diagram and left and right photos of the real things taken at right angles to help get this right but there is a photo of the right head light guard only so additional reference will be needed here.
There is also a pewter 25mm fluted barrel which has the flutes evenly cast and the muzzle brake has the correct number of openings but you will have to drill out the muzzle for a better appearance. You will need to take care here as the pewter is quite soft so support the muzzle brake between you fingers while drilling and this softness also makes it easy to bend the barrel if not careful so again take care here.
Adding the rear lights and infantry phone box should be fairly straightforward and there is an overhead plan diagram to show the location of the two large ventilator domes at the back and front left of the upper hull and the front trim vane is replaced with the resin item that includes mods for the ASLAV.
The new Commander’s and Gunner’s turret visor covers just
replace the kit items but there is a lot of excess resin on the turret
basket parts that will need care in cleaning up and there are also the
banks of four smoke grenade launchers for each side of the turret front
and the replacement hull driver’s hatch with the correct hinge arrangement.
The remaining smaller items such as the antennas, Leopard style rear view
mirrors and tools can be positioned as required but again there is a lot
of resin flash on the tools needing careful removal to reserve the details.
The long rows of tie down cleats along the rear sides of the hull are provided on the etched fret and while they are the usual flat 2d PE still look the part and provide this important feature of the ASLAV as well as other smaller brackets and the two larger wire cutters for the front hull and turret which will allow you to mount these raised or lowered.
As mentioned the main thing missing to make the ASLAV is the large Michelin
XML tyres and you will need to get hold of either the Hobby Fan (set
#HF 804) or Maple
Leaf Models (set #MLM1001) Michelin XML tyres to complete
the conversion.
But note the ASLAV tyres don't have the Michelin embossing on the sidewalls
but it's easy enough to cut this off the Hobby Fan or Maple
Leaf wheels
to correctly depict the ASLAV wheels.
Conclusion:
While the resin parts require a fair bit of cleanup of the casting blocks and resin film the parts themselves have good details and while there is only two areas needing kit surgery the pewter parts will need care to form to the correct shapes.The instructions have extensive text notes and small photos of the ASLAV to help in construction but some additional reference and modelling experience working with resin and metal parts will help with the set.
In all this set provides everything you need except for the wheels to make a Phase 2 ASLAV but additional items will be needed to make the ASLAV Phase 3 which is the type currently serving in Iraq.
Recommended for Aussie Armour as well as Modern Armour fans in general. 7/10