
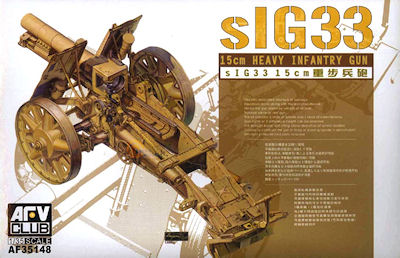
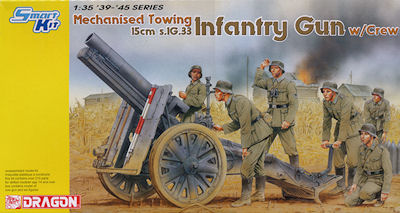
15cm s.IG.33 Infantry Gun
AFV Club kit No. AF 35148 - DML Smart Kit No. 6261
1:35 Scale Kit Comparison Review by Terry Ashley

They were introduced into the German military in 1933, hence the designation. About 4,600 were made during the design's production life. The 15cm sIG 33 close infantry support guns were made in many variants, some of which were mounted on vehicles such as the chassis of a Panzer II, 38(t), Panzer III, and Panzer IV tanks, making them self-propelled guns.
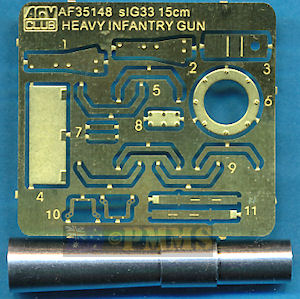
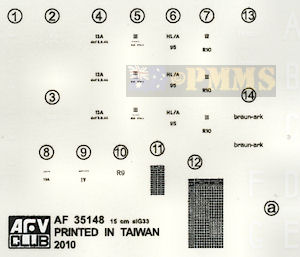
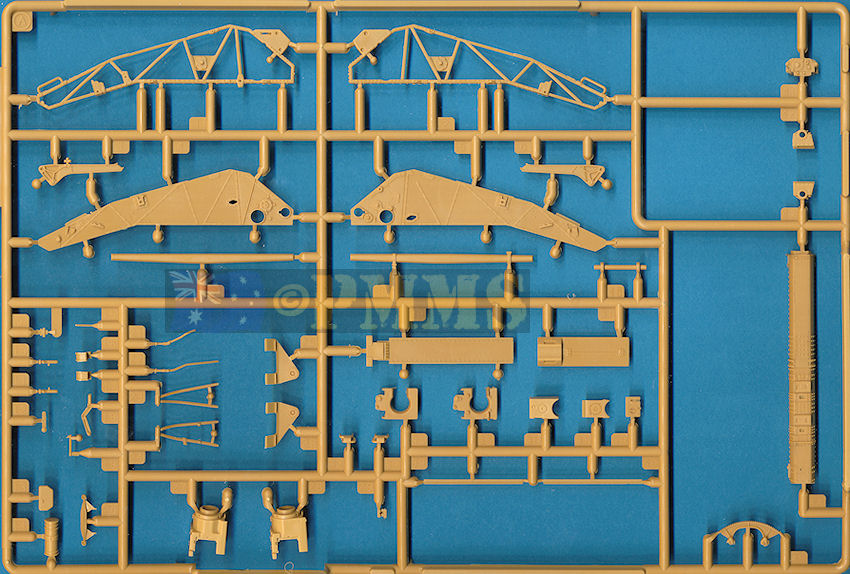
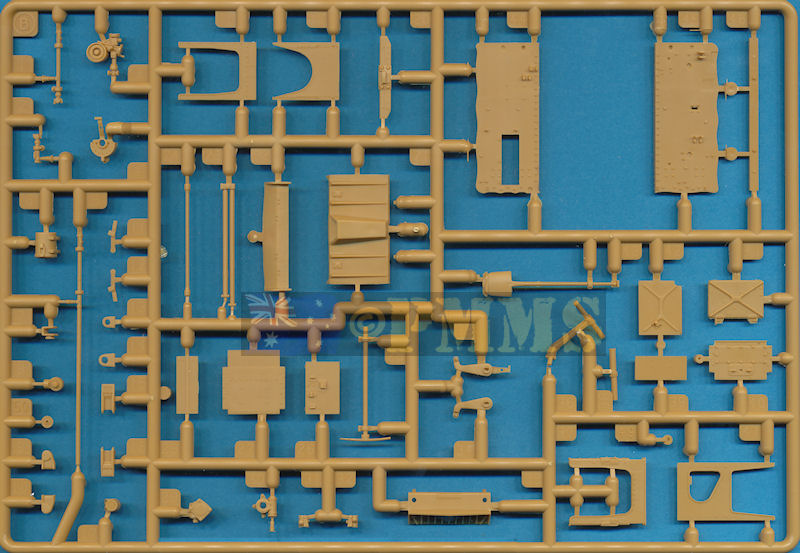
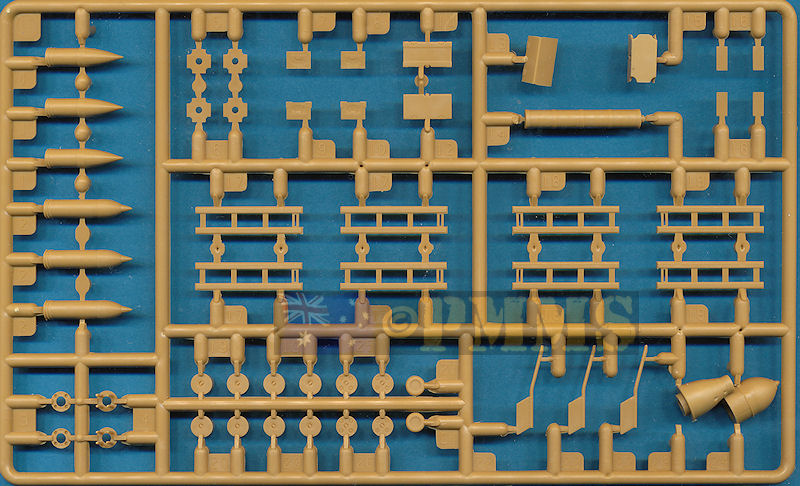
 This new kit from AFV Club of the 15cm s.IG.33 Heavy Infantry Gun has 227 parts in beige plastic, 18 in etched brass, a single turned aluminium barrel plus the small decal sheet and instruction booklet.
The kit has multi parts choices in a few areas and some moving assemblies as well as a good selection of ammo and equipment to go along with the gun.
Standard of moulding is excellent throughout with clean crisp details minimal visible pins marks, the two on the spade being the most obvious and just the usual moulding seams and plastic nodes. There is some very fine flash on a few parts, you have to look closely to see it but does need removing before assembly, notably on some of the very small parts and the carriage frames.
 The basis for this DML kit of the s.IG33 Infantry Gun began back in August 2008 with the release of the Geschützwagen 38 M für s.I.G.33/2 “Grille M” (kit #6429), followed in early 2009 with the Geschützwagen 38 M für s.I.G.33/1 “Grille H” (kit #6470) and now this Infantry Gun version which as a consequence of its lineage has a number of parts from the previous kits that are not used with the Infantry gun.
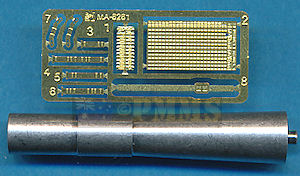
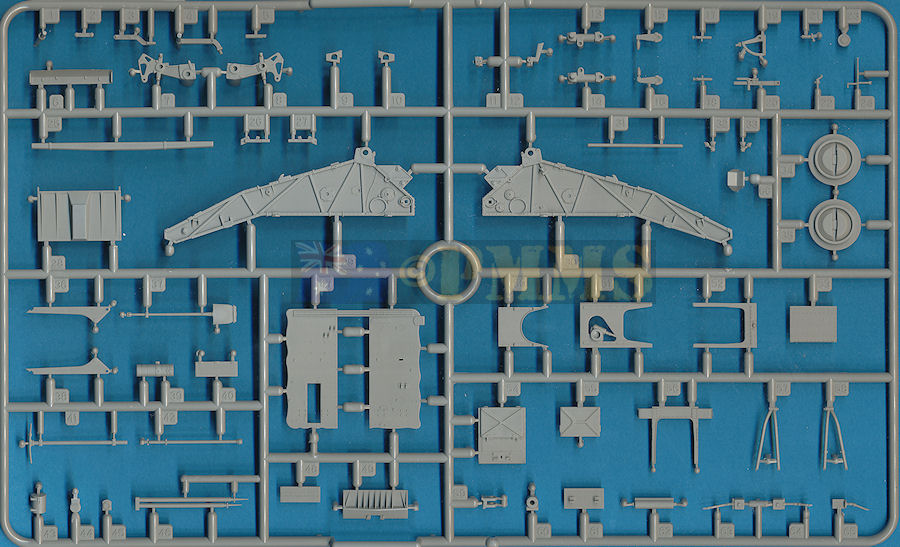
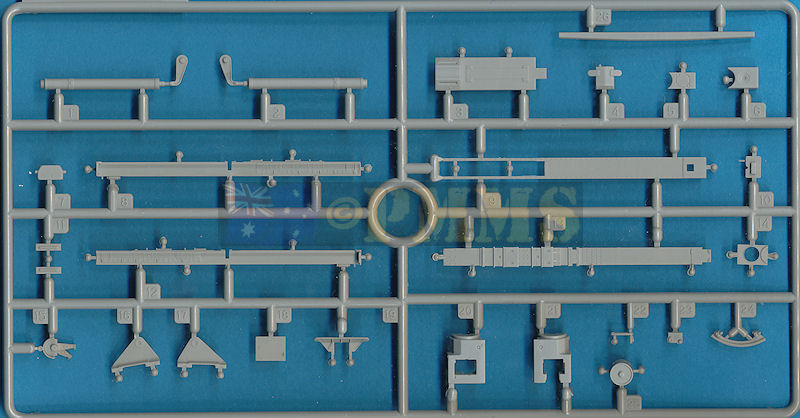
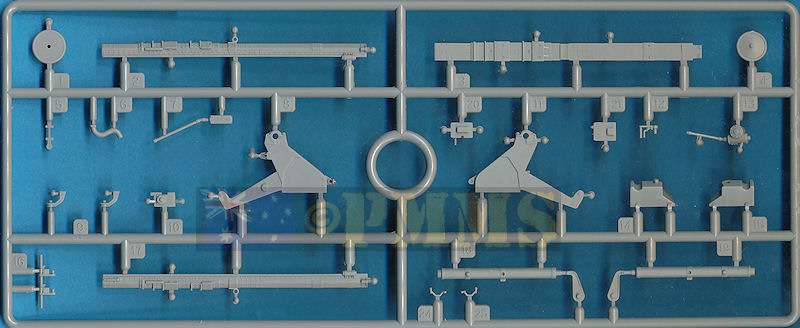
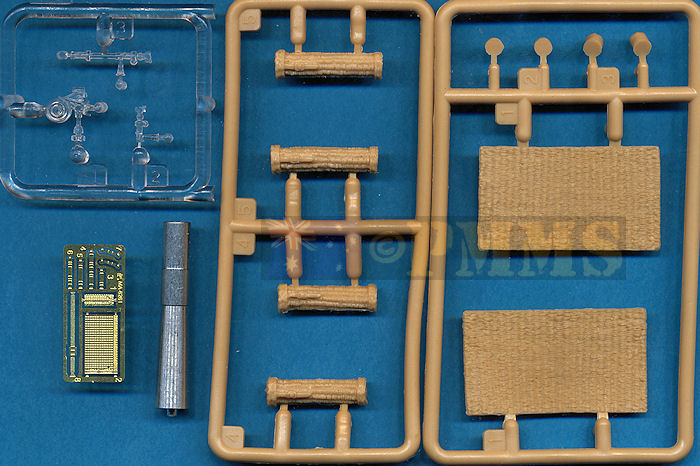
The kit has 146 parts in grey plastic plus another 80 in grey plastic for the figures, 10 in beige DS vinyl, 3 clear plastic, 9 etched brass and the barrel tube in turned aluminium along with a small decal sheet and the instruction sheet.
As well as the crew there is a selection of ammo and equipment to go along with the gun.
The standard of moulding is very high with clean crisp mouldings, no flash and only minimal pin marks usually in places not seen after assembly. There are the usual mould seam lines and the many small nodes on the parts to remove but other than that it’s ready to go.
This review will look at both the kits with comparisons of the details and sub-sections but let me say firstly that we are looking at two good current generation kits with the differences mainly in the detail.
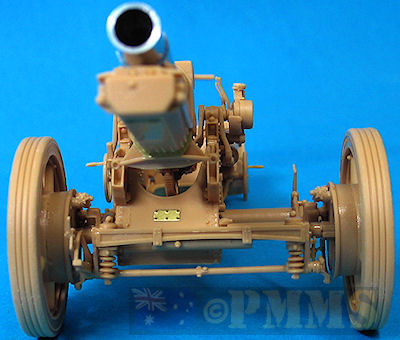
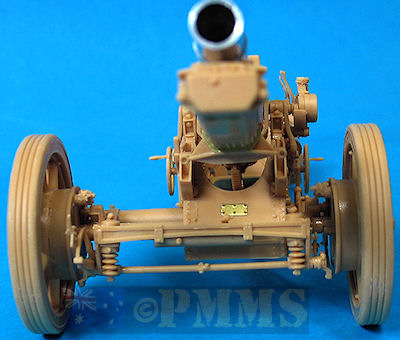
Note; on the kit images below I have not filled or cleaned up any joins or removed any pin marks, the only cleanup had been the mould seam lines and fine flash on some of the AFV Club parts plus any adjustments to fit the parts which will be noted at the appropriate time below. This is to show what may be required for each kit during assembly and also highlights any fit problems along the way.
All images show the AFV Club kit in beige plastic and the DML kit in grey plastic.
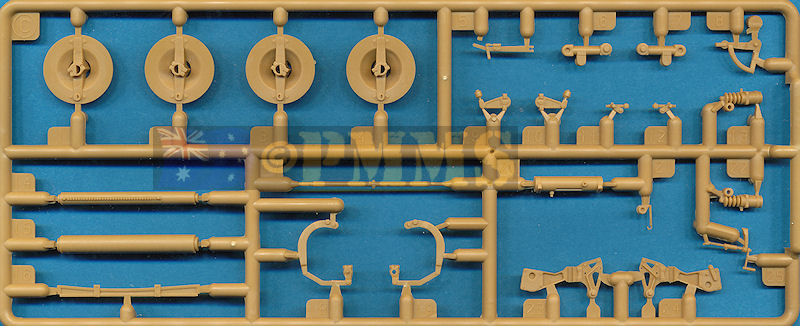
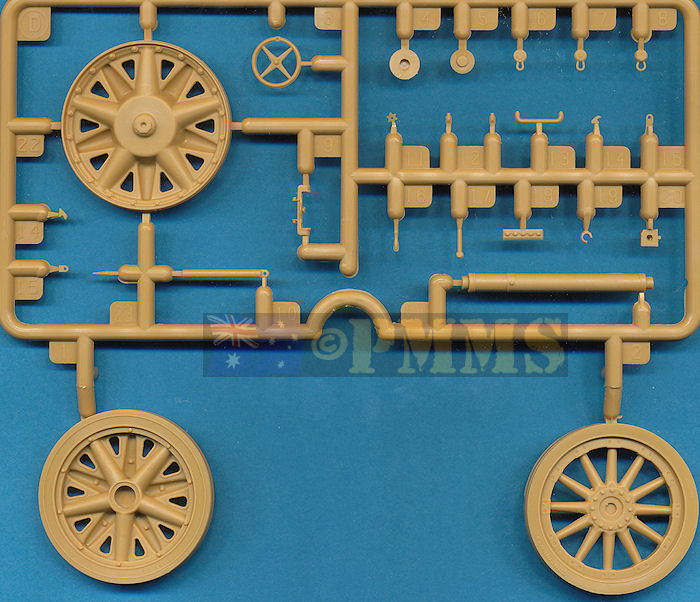
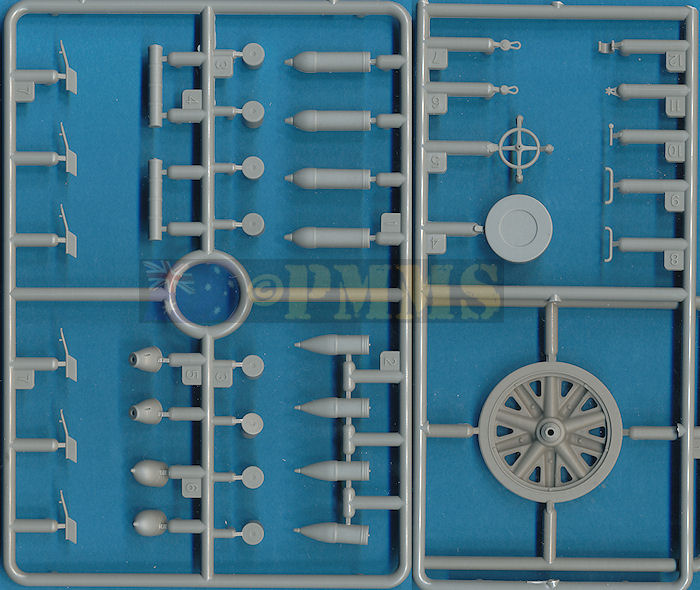
All the wheels match available plans well in diameter with the AFV type (1) having excellent definition on the pressed wheel contours, the outer rim bolt with a separate centre hub cap with small eye. AFV type (3) has well defined wood spokes but the mould seams will need care in removing from the spokes and inside of the outer rims. The rubber tyres also have good definition with fine sidewall embossing for “Continental” (spelt correctly) as well as the tyre size data, these can be read clearly with the aid of a magnifying glass. The centre hub has excellent bolt heads with separate hub covers and outer hub cap.
We’ll have a closer look at the AFV type (2) and the DML wheels as these are the same type but the level of detail differs between the two kits.
The AFV tyres have fine sidewall embossing for “Continental” as well as the tyre size data and the concave pressings (looking from the outer side) of the wheels have the correct rounded profile as they meet the outer rim. The AFV wheels have the correct 10 securing bolts around the outer rim as well as on the insides rim and also have very fine casting data on one of the raised ribs to add to the detail and have separate hub covers and outer hub cap with the small eye.
The DML tyres are devoid of any sidewall embossing and the concave pressings (looking from the outer side) lack the correct rounded profile with the recess meeting the outer rim squarely. There should be 10 securing bolts around the outer rim but the wheels only have 5, strangely they have the correct 10 bolts on the inside of the wheels but not the outsides? It should be an easy task to add the additional bolt heads using a punch and die or available bolt head set.
It should be noted that there is a moulding seam on both the AFV and DML tyres that runs around the outer shoulder and careful sanding will eliminate these.
Wheel Synopsis:
While the dimensions of both kits wheels are good the AFV wheels are far more accurate in detail as well as providing the three choices with the single wheel type in the DML kit lacking or poorly representing most of the same detail.
The AFV wheels have separate brake drums with separate brake lever and quadrant as well as separate actuating arms around the drum to the small top locking bracket which in turn has a very small separate star wheel. There are additional axle mountings with very good detail plus the shock absorbers required for the mechanised towing version if using the wheel types 2 and 3 as above.
There are different small fittings for the left and right hand units so take care with the right side shown in step 14 and the left in step 16 with the units building into very detailed but delicate sub-assemblies.
Also included is the front compressed air cylinder (part C20) and front crossbar (part C16) with both these items only fitted on the mechanised towing version, there is scope for adding the air cabling from the cylinder to the brake units to finish off the detail.
The assembled brake units fit to the back of the chosen wheels and when fitting to the axles it is important to glue the units level and aligned correctly. Both the main axle and traverse axle are not glued (see below) allowing the gun to traverse which on the gun means the axles slide left or right for the required traverse. As the axles are loose it is easy for these to move out of alignment with the wheels/brake units when you glue these to the axles so take care that everything is aligned correctly as the glue dries. Note; in travel mode the gun is usually locked in the central neutral position on the traverse axle.

The DML brake units have separate brake drums with separate brake lever but the actuating arms around the drum are moulded with the drum face with just the separate axle mountings and small top locking unit also with a very small star wheel. The inner mounting bracket includes the outer sections of the main and traverse axles which are glued to the sides of the carriage for a fairly simple assembly. Note there is a small part A5 added to the inner edge of the left traverse axle for the traverse teeth.
Not included in the kit is the additional shock absorber, compressed air tank or towing crossbar which would be required for the mechanised towed version applicable for the wheel type included in the kit. The wheel layout is that of the early horse draw gun as this is the version included in the DML Grille kit so there is a choice of either living with the omissions or finding a set of early steel rimmed wheels to use with this kit?
Suspension/Brake Units Synopsis:
As mentioned the DML brake/suspension setup is for the early horse draw gun and lacks the additional parts required for the mechanised towing version that the wheel type included represents. The AFV kit on the other hand does include the required shock absorbers, compressed air tank and cross bar required for the mechanised towing version to go along with 2 of the 3 wheel types included in the kit.
There are at least four types of gun breech used on the s.IG.33 as identified in documentation with possibly more and both kits including a choice of two breech types. For convenience I’ll refer to these as types 1 (earliest), 2, 3 and 4 with the distinguishing features shown in the images below.
- 1.1 This is the earliest type breech and has two lifting eyes above the breech opening. 1.2 Two large conical bolts below the breech opening. 1.3 Angled forward top section of the gun breech. 1.4 Indentation on the lower front section. 1.5 Rounded edges to the breech.
- 2.1 Rounded edges to the breech with the lifting eyes and conical bolts omitted. 2.2 Angled forward top section of the gun breech. 2.3 Indentation on the lower front section.
- 3.1 Rounded edges to the breech. 3.2 Rounded forward top section of the gun breech. 3.3 Indentation on the lower front section omitted.
- 4.1 Square edges to the breech. 4.2 Rounded forward top section of the gun breech. 4.3 No indentation on the lower front section.
- Note: All the breech types have four recessed bolts around the forward round breech/barrel collar.
The AFV kit has the type 1 and type 4 breech included while the DML kit has the type 1 and a second with a mix of Type 2 and 3 features. This is based on my observations of breech types and as mentioned there may be more produced, so there may be evidence of the second type in the DML kit which I’ve yet to discover.
The breeches in the AFV kit are moulded in two pieces, the main breech and separate face section with a separate top plate which makes for a very clean moulding with just some fine flash around the lower edges to be removed. The only other clean up/filler required being for small joins on the top plate; this will vary depending on how precise they are attached.
The breech block has 4 parts with excellent engraved detail on both sides and the separate face plate and also includes the indent on the top of the block as it should. The fit of the block into the main breech housing is very snug and can be positioned open or closed. The separate block handle on top should be positioned according to the position of the block, see images for handle position for the open or closed breech block.
Detail wise the type 1 breech includes the two lifting eyes moulded with the breech housing but these are really quite basic to say the least and would be best replaced with wire for a better appearance. The two large conical bolt heads are included as is the angled forward section of the breech with the lower indent for a well done early breech other than for the inadequate lifting eyes which don’t really measure up the detail in the rest of the kit.
The type 4 breech has similar parts breakdown and cleanup required with the correct features of squared corners on the main housing and the rounded front section without any other issues.
Both the AFV breeches include the four indented bolts around the forward breech ring as they should; the type 1 also has an etched bolt ring added between the breech and metal barrel.
The DML breeches are in two halves resulting in prominent joins down the front and inside the breech opening will need to be filled and sanded before proceeding. Added to this is a separate top plate and lower guide bracket and the join line for this will also need to be eliminated as will the top plate join and this seam filling is a little tedious due to the contours on the inside of the breech opening.
The breech block has 3 parts with engraved detail on both sides and the separate face plate but doesn’t include the indent on the top of the block if you position this open? The separate face plate has a raised section down the right side and I have not seen this feature on any photo of s.IG.33 breech block while the fit of the block into the main breech housing is very snug and can be positioned open or closed. The separate block handle on top should be positioned according to the position of the block, see images for handle position for the open or closed breech block.
The type 1 breech has separate lifting eyes for good definition but these are also a little oversized resulting in the ends being too close together at the centre, see the image of the actual breech to illustrate this. It also lacks the two large conical bolts on the lower face of the breech which need to be added but has the correct angled front section and lower indent.
The later type breech has a mixture of type 2 and 3 features according to available data with the rounded corner breech housing and no indentation on the lower sides but has the earlier angled front top section with the references indicating this should be rounded.
Neither DML breech has the four indented bolts around the forward breech ring as they should and you may wish to drill these to add this detail?
Added to both kit breeches are the breech slide with added bolt brackets at the front but neither slide includes the lower slide attachment strip. This is something common to most artillery kits and must be to do with injection moulding constraints; this strip can be added from thin plastic card for a better detail appearance.
Breech synopsis:
Both kits give you a choice of two breech types with the AFV breeches having the correct features for the type represented other than the poorly done lifting eyes on the early breech. There is some minor seam filling required around the top plate but otherwise assembly went smoothly.
The DML breeches have substantial seam filling issues due to the two part breech breakdown as well as missing some details on the early breech and mixing the details on the later breech. The breech block is also simplified compared to the better detailed AFV breech block.
Barrel:
Both kits include a turned aluminium barrel tube with the length and contours matching available data well within accepted limits and both also include spiral rifling inside the barrel.
The AFV barrel is drilled out for the full length of the barrel and also includes the spiral rifling the full length of the tube, this being the first time a metal barrel has been produced in 1:35 scale featuring the inner rifling the full length of the tube to my knowledge.
This makes for an excellent scale appearance as the rifling is also quite fine and not overdone as can be the case, you can even pass one of the supplied 15cm rounds through the breech and down the barrel indicating everything is designed to fit together nicely. This will also allow you to include a round being fed into the breech in a diorama should you wish to do so.
The DML barrel is only drilled to a depth of 10mm as are most available metal barrels with the rifling as a consequence also only being 10mm deep. With the larger 15cm calibre the bottom of the drilled barrel is quite obvious when viewed from forward angles; the kit does include a muzzle cover should you wish to hide this from view?
The barrels are simply glued to the barrel slide and breech using cyanoacrylate (super glue) for quick and easy installation on both kits.
Barrel synopsis:
The AFV barrel is clearly superior to not only the DML barrel but to every other metal s.IG33 barrel produced due to the fine spiral rifling down the full length of the completely hollow barrel tube, simply superbly done. This AFV barrel quite frankly sets a new bench mark for metal gun barrels especially in the larger calibres where the rifling is more visible.
 The AFV kit has the full U shaped cradle moulded in one piece with nicely defined rivet details on both sides without any pin marks to contend with but there is some fine flash to be trimmed from along the upper edges before adding the rails and top plate. Added to this are the upper rear rails (parts A39, A40) and cover for the front section (parts A30). There are six separate etched ribs added to the underside of the cradle and care is needed as there are two style of ribs (parts G5 and G9) so check the instructions closely to ensure you fit these in the correct position.
Also added to the underside of the cradle is the correctly sized and shaped elevation arc (part A45), this has two shallow pin marks on one side and must take care to fit this correctly as it is not symmetrical with the front section slightly shorter than the rear, the instructions show this clearly so there shouldn’t be any problems. The cradle locking bracket (part A20) is also easily fitted in place but the two locking pin holes are solid and you may wish to drill these out for the correct appearance.
The two cradle frames (parts A25, A26) are added to the sides of the cradle and have the correct small gap between the frame and gun cradle when viewed from above and at the front of the cradle is a separate recoil brake assembly (part A41) with a separate cover plate (part A13). This will allow you to show the cover plate off for maintenance or for a disabled gun as it is usually fitted over the brake on a fully serviceable gun.
There were some issues fitting the brake assembly to the front of the cradle and you should ensure the brake is aliened perfectly with the cradle when fitting but I still had to trim the locating ridge at the front of the cradle for a good fit, so test fit this before gluing to make any adjustments required.
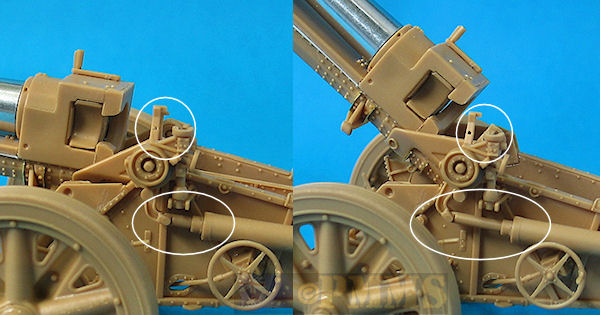
There are a couple of detail issues with front of the AFV carriage, there are two small round buffers at the sides of the carriage but these are flat and appear to have been moulded to represent the buffer bracket without the round buffers. All photos I have seen have the round buffers in place and adding these from plastic rod would give the appropriate appearance, strangely the instruction diagrams show the rounded buffer as they should be? Also the two small brackets that extend outwards from the brake top cover have rounded ends in all photos I have seen and not square as on the AFV parts, some simple sanding will rectify this profile issue.
The DML gun cradle is in three parts, the lower plate and tow sides (parts B8, B12, B13) but there are also the original cradle parts from the previous “Grille” kit still included, so take care to use the correct cradle parts for this kit. Rivet detail is included on both sides of the parts free of any pin marks but fitting these together will require care as there are no locating pins.
All the underside ribs and other detail is included with the lower panel moulded with the only additions being elevation arc (part B24), this unfortunately is undersized and lacks the proper detail of the actual arc (again as per all photos I have seen) as well there are two shallow pin marks on one side and as with the AFV elevation arc you must take care to fit this correctly as it is not symmetrical with the front section slightly shorter than the rear, the instructions don’t indicate this clearly so care is needed. The cradle locking bracket (part A20) is also easily fitted in place but the two locking pin holes are solid and you may wish to drill these out for the correct appearance. Note: the cradle locking bracket is a different pattern on both kits with both styles appearing in photos of the s.IG33 so this is not an issue.
The front of the DML cradle only has a separate recoil brake cover but as mentioned above this is the normal configuration for in-service guns so this detail is perfectly adequate, also the two recoil buffers and small side extensions are correctly depicted as per photos so no adjustments are required for these as on the AFV parts and finally there are the two cradle frames added to the cradle sides but without the small gap between the cradle as there should be.
Gun Cradle synopsis:
Overall the AFV cradle is nicely detailed with more prominent rivet detail as well as the correctly proportioned elevation arc but there was some minor detail and fit issues fitting the front recoil break. The DML cradle has the more accurate detail around the front recoil break but suffers from the undersized elevation arc.
AFV have represented this detail very well by providing the carriage sides and separate rib panels, there is again some fine flash to trim from the frames before fitting and some fine mould seams between the small rivets on the edges of the frames that will need some care and effort to remove. The fit between the side panels and frame is good but you do need to take care while gluing the frames to ensure everything lines up correctly. This obviously requires more work than if the frames and side panels were moulded in one piece but the resulting detail effect is well worth the effort. There are holes in the side panels for the elevation and traverse ducting and again these results in good detail with the ducting passing right through the sides as with the real gun.
When gluing the assembled side panels and the bulkheads care is required to ensure the assembly is perfectly square as it is easy for this assembly to be out of alignment as you progressively add the bulkheads. When the front underside bulkheads are added these assist with the alignment. Note; do not glue the front traverse axle (part C14) or elevation flywheel (part B38) to the side panels, the instructions show not to glue B38 but not part C14 for some reason?
The rear storage box has excellent detail on the insides of the bulkheads and a separate lid again with detail on both sides and you can position the lid open should you wish to stow the sight for example. All the side panels and bulkheads are free of any pin marks and after assembling there are numerous smaller fittings added to the carriage and care is needed when removing the moulding seams from the parts.
When fitting the elevation and traverse hand wheel boxes (parts D20) you have to slip the cable ducting through the holes in the carriage sides, these holes are much larger than the ducting leaving gaps but this is correct so don’t be tempted to fill the remaining gaps in the holes.
The hand wheels themselves (parts D3) are finely done but have substantial mould lines for their size and care is needed cleaning these up, the hand grips (parts D16) are separate parts allowing the correct profile of the handle to be included but care is again needed when fitting as they are rather small and could easily be lost.
Added to the top of the carriage sides are the separate gun trunnions, having these as separate parts allows well defined detail to be included on the front and rear faces as well as the sides. One thing to note is the sprue attachment on the top has to be carefully removed from the indent around the top of the trunnions and this required careful blade work to preserve the detail.
As these trunnions parts have to be perfectly aligned when being glued to the carriage AFV Club give you a temporary brace (part A46) to fit between the trunnions while the glue dries to ensure the correct alignment. This brace MUST NOT be glued as it is removed later to fit the gun assembly, the instructions have the ‘do not glue’ symbol but for some reason don’t include the part number for the brace.
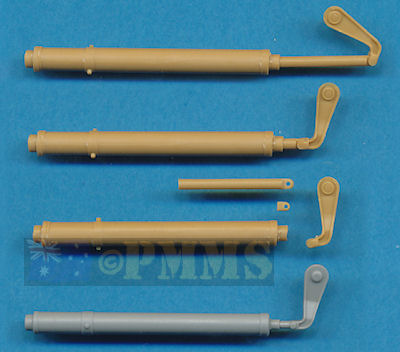
The two side equilibrators are small sub-assemblies in themselves that allow the equilibrator and piston to move as the gun is elevated along with the sight mounting bracket sight arms. This of course requires some very careful assembly to have all the joins movable but if you didn’t want to go to this trouble it does allow you to glue the equilibrator and piston correctly in relation to the gun elevation for a more realistic appearance.
For those preferring to have the kit equilibrators fully workable I have added this short tutorial on the assembly.
The two cylinders are moulded in one piece hollowed out to take the piston shaft with just the moulding seams to be removed before assembly as does the piston shaft.
Attaching the piston to the attachment bracket requires you to fit the piston end over the small pin on the base of the attachment bracket (parts B34, B35) and secure in place with a very small bracket (part D15). It’s best to hold the main bracket (B34) and smaller bracket (B15) together over the piston head (D10) with fine tweezers and apply the smallest dab of glue to the bracket join; you can move the piston while still held by the tweezers to ensure no glue has found its way to the piston. Repeat for the other bracket parts B35, D15, D10.
Image of DML fixed equilibrator/piston arm for comparison
The next part is the trickiest and you first fit the gun cradle into the trunnions and the theory is the pins on the cradle frames that fit through the trunnions are glued to the outside equilibrators attachment brackets (parts B34, B35) allowing the brackets to move with the gun cradle elevation.
Unfortunately it is very difficult to get enough glue on the pin/bracket join to hold these strongly enough without also gluing to the insides of the trunnions and after a few attempts resorted to another solution.
This involved drilling 1mm holes down the centre of the pins on the cradle frames (parts A25, A26) and insert a 1mm plastic rod pin, I then drilled a corresponding 1mm hole right through the attachment brackets (parts B34, B35) and then inserted the pins while fitting the assemblies together. After cutting off any excess plastic rod pin protruding past the bracket you can then apply a small dab of liquid cement on the outside pin join without fear of getting glue on the trunnions.

This resulted in a more positive join to take the stresses involved as the gun is elevated allowing the equilibrator pistons to move in unison. As mentioned if you didn’t want to make these parts workable you can just glue them in place with the equilibrator pistons in the correct extended position for the degree of elevation.
At the back is the two part rear bulkhead that includes separate towing brackets and locking levers as well as having the two large locating brackets for the rear spade pins, these brackets make it easy to line up the rear bulkhead central to the carriage when fitting. The two traverse stake brackets are different for each side so take care of the part numbers to position these correctly, parts A16, A32 on the left and parts A17, A33 on the right. These brackets are correctly shaped and allow you to fit the long traverse stake (part A7) if you wish to have the gun in an action diorama, there is also etched mounting clips if you wish to show the stake attached to the side of the carriage, as well the empty clips for the sides if using the stake in action.
There are also some small etched brass parts added to the carriage including two larger brackets for the tool box lid (parts G1, G2). These brackets are shown in photos of museum guns in the Nuts & Bolts book but may have been added during restoration as I’ve not seen these on any wartime photos, so take note when adding these.
The separate rear firing spade is in two main parts with additional lifting hand grips and locking bush for the traverse handle, the spade also includes the two large locating pins that slip into the corresponding holes on the rear bulkhead when attaching the spade in firing position. There are two large but shallow pins marks on the top face of the spade, these are hidden from view with the spade in firing mode but you will need to eliminate these if showing the spade in travel mode.
When fitting the spade in travel mode the top of the spade fits into two small hooks on top of the carriage and the lower edge sits on the two small bracket pins added to the carriage sides (parts A10, A11). These small bracket pins sit flush with the carriage in firing mode and are swung up to meet the spade lip for the travel mode, take note as the bracket pins are different for either side of the carriage so check the part numbers closely to fit correctly.
The DML carriage sides are moulded as one piece each that includes the reinforcing frames resulting in solid strips for the frames which unfortunately lack the L profile or the underlying rows of rivets.
There is also rivet detail cleanly done on both sides of the carriage sides without any pin marks but there is a fine moulding seam between the rivets on the edges as with the AFV parts that will take a bit of effort to remove. In some areas the detail is quite basic such as the trunnions and square front brackets which are moulded solid and lack any edge detail or indents that should be there, also there are no holes in the carriage sides for the traverse and elevation ducting with the parts (A64/A65, A63) butt joining in place either side of the carriage sides.
On the insides at the rear are large box sections and at the front round axle sections that aid in joining the two carriage halves together as well as additional bulkheads and the front traverse axle between the sides and along the undersides to complete the carriage “box”. In step 6 it indicates to fit the front upper panel (part A50) but this is best fitted at step 5 as it is very difficult to fit in place once the two sides have been joined together.
There is an error in the instructions step 5 that can lead to problems if not spotted and that is part A60 is shown fitted to the end of the front axle stub but in fact should be added to the carriage wall just above the stub on the small raised circle provided.
When fitting the rear bulkhead/base plate (part A49) care is needed to fit this centrally as it lacks the two round rear spade pin brackets that would normally aid it aligning the plate, these pin brackets can be added from sections of plastic tube should you wish to add these? The three sides for the rear storage box are glued in place around the inner box sections and include separate hand grips and locking assembly to add detail to the moulded on detail on the box panels.
Other items added to the carriage are the large side equilibrators which are moulded in one piece including the pistons and attachment brackets, this does mean that when the gun is elevated the equilibrators don’t move accordingly as they should. The same applies to the sighting arms which are fixed in the “travel” or non-firing position and would have to be modified to correctly depict the gun in firing mode when the two arms are aligned.
The real sighting arms on all German artillery pieces are designed so that one arm is set at the required elevation and the barrel then elevated until the two arms are aligned giving the correct elevation for the shot. Also it should be noted that the actual sighting unit is a very fragile devise and was only fitted when the gun was in action, in the travel mode the sight would be removed leaving just the mounting bracket visible and the sight stowed in the box provided at the rear of the carriage. This again applies to all German artillery pieces.
The elevation and traverse hand wheels have the handle included with the wheel and lack the appropriate contours and the two traverse stake brackets are different for each side so take care of the part numbers to position these correctly, parts A10, D12 on the left and parts A9, D12 on the right. Note the main brackets (parts A9, A10) are different to those on the AFV gun in shape but both the rounded (AFV) and square (DML) types are seen on the s.IG33 so both are correct. The DML brackets unfortunately don’t allow you to fit the long traverse stake (part B26) as the stake holes are too small and the wrong angle and work would be needed if you wished to use the stake in an action diorama. There is also a second stake (A25) provided with moulded on mounting clips if shown attached to the side of the carriage as well as etched mounting clips provided if you wish to show the bare stake (B26) attached to the side of the carriage, as well the empty clips for the sides if using the stake in action.
The separate rear firing spade is in three main parts with additional lifting hand grips and locking bush for the traverse handle, the spade lacks the two large locating pins that should slip into the corresponding bracket holes on the rear bulkhead when attaching the spade in firing position, but as mentioned these brackets are missing also.
When fitting the spade in travel mode the top of the spade fits into two small hooks on top of the carriage and the lower edge sits on the two small bracket pins added to the carriage sides (parts A17, A18). These small bracket pins sit flush with the carriage in firing mode and are swung up to meet the spade lip for the travel mode, take note as the bracket pins are different for either side of the carriage so check the part numbers closely to fit correctly.
Gun Carriage synopsis:
Clearly the AFV carriage is far more detailed with the provision of separate L shaped side frames as well as the movable equilibrators and sighting arms plus the open rear storage box with inside detail, to inclusion of the rear spade locating pins and traverse stake bracket that allow you fit the stake in action mode.
But of course this does require a lot more assembly work than the more basic DML carriage, which lacks the detail on the carriage frames as well as missing the rear spade attachment pins and other finer details. This is not to say the DML carriage is poor as it will build easily into a nice representation with the detail included very well done such as rivets for those who can live without the optional and movable items.
 The AFV shields are in three parts, the two shield plates with the distinctive wavy pattern outer edge and the lower beam to join the two shield plates together. Having these separate allows the row of rivets to be included on the inside of the inner shield fillet for added detail with the assembly of the three parts quick and easy.
The shields themselves have excellent rivet detail on both sides without any pin marks to contend with and may be a little thick scale wise but not overly so. The sight aperture door is supplied in etched brass and the thickness between this and the shield is noticeable if the door is in the open position, also the hinge rivet detail is not included on the etched part. Added to the front side are the tail light and reflector with an etched bracket along with the pioneer tools and sighting poles all with moulded on mounting clips. The pointed tips of the sighting poles are also very small separate parts which will require very careful handing and I’m not sure why these are separate as it does seem a little excessive?
On the inner side is the barrel cleaning rod and cleaning brush head canister (part B6) as well as the ranging charts done as decals to give a very good representation of the numbered lists and columns of the real charts. Attached to the shields are the large lower mounting arms and upper V mounting rods, the mounting arms have nicely defined detail on both sides and these attach to the brackets on the front of the gun carriage. The mounting arms require the thin moulding seams to be removed with the right V rods having the mounting pins for the large demolition charge container (part A14).
I actually glued the mounting arms and rods to the shields and after the glue had dried thoroughly then attached to the carriage, this made for a more trouble free fitting instead of trying to align the shields, mounting arms and carriage all at once.
It should be noted that this demolition charge container was only fitted to the guns from about mid-late 1943 onwards, images of early war guns in the Polish, French and early Russian campaigns show them without this charge container fitted, so make sure of the timeframe of your model before fitting the container.
The DML shields are moulded in one large part with the distinctive wavy pattern outer edge and while this means no assembly the shields do not have the row of rivets on the inside of the inner shield fillet with this being just a flat edge.
The shields themselves have excellent rivet detail on both sides without any pin marks to contend with and may be a little thick scale wise but not overly so. The sight aperture door is in plastic which allows the hinge detail to be included. Added to the front side are the tail light and reflector both with plastic mounting brackets along with the pioneer tools and sighting poles all with moulded on mounting clips.
On the inner side is the barrel cleaning rod and cleaning brush head canister (partA43) as well as the ranging charts done in etched metal with engraved chart detail and unfortunately this is overly thick and the engraved detail only represents the columns and lines but no numbers and is only a basic representation of the actual charts.
Attached to the shields are the large lower mounting arms and upper V mounting rods, the mounting arms are flat and devoid of any detail and these attach to the brackets on the front of the gun carriage. The mounting arms require the thin moulding seams to be removed with the right V rods have the mounting pins for the large demolition charge container (part A14). See note above regarding the demolition charge.
I actually glued the mounting arms and rods to the shields and after the glue had dried thoroughly then attached to the carriage, this made for a more trouble free fitting instead of trying to align the shields, mounting arms and carriage all at once.
Gun Shield synopsis:
Again the AFV shields are more detailed with inner shield rivets, better detailed mounting arms as well as the decals for the ranging charts for a better appearance while the DML shields have less assembly with the main shields in one piece.
In the AFV kit there is two types of shells included; 3 x ‘I Gr 33 HE’, 3 x ‘I Gr 38 Nb Smoke’ and a single Stielgranate 42 projectile plus separate charge casings with 8 x unfired cases and 8 x fired cases. These have detail included on base of the casings and also on the insides of the base which differs for the fired or unfired for excellent detail. The outside lip on the casings is not that well defined due to the moulding of the inner detail and the decal sheet includes shell stencilling for both types of shells.
Also included are 4 x wooden skeleton type boxes for the shells as well as fuse protector ring (2 types) plus two wooden boxes with separate lids for the charge casings, these also have stencilling included on the decal sheet for added detail.
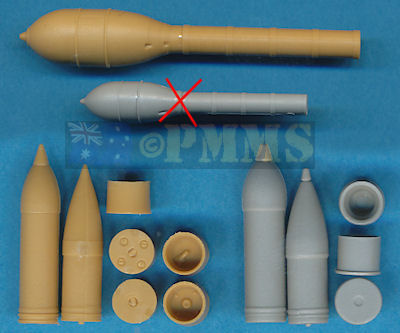
The DML kit also provides two types of shells; 4 x ‘I Gr 33 HE’, 4 x ‘I Gr 38 Nb Smoke’ and 2 x Stielgranate 42 projectiles plus 8 separate charge casings, these have detail on the base but plain on the insides with the base lip nicely defined.
The Stielgranate 42 projectiles had a warhead with 27kg (60lb) of high explosive fitted to a long driving rod that was loaded into the muzzle and fired using a special charge loaded in the breech. The warhead projectile remained outside the barrel and was fitted with three stabilization fins and could be fired to a range of about 1000 meters (1,100yds), the driving rod would separate from the projectile at about 150 meters from the muzzle after firing.
The AFV Stielgranate 42 projectile matches available data in size well and the driving rod will fit snugly into the kit barrel entirely due to the fully drilled out barrel allowing you to fit this at any time for a diorama setting or similar. The decal sheet also includes small stencil data to add to the warhead after painting for added effect to an overall well done projectile.
Conversely the DML Stielgranate 42 projectile is grossly undersized and appears to be closer to 1:48 scale that 1:35 scale, the driving rod should be a scale 150mm diameter to fit into the muzzle but again the kit driving rod is about a scale 75mm or smaller. Also due to the muzzle only being drilled to a depth of 10mm you would need to cut off the driving rod to fit, but then it just flops about due to the size issues.
I don’t want to be too unkind but the Stielgranate 42 projectiles in the DML kit are basically worthless as a depiction of a 1:35 scale projectile.
Note the grossly under sized DML Stielgranate 42 projectile
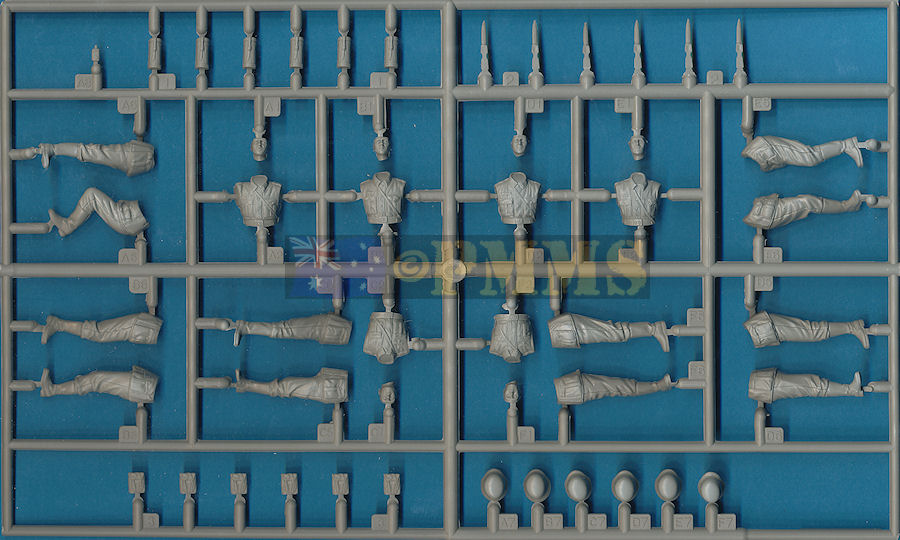
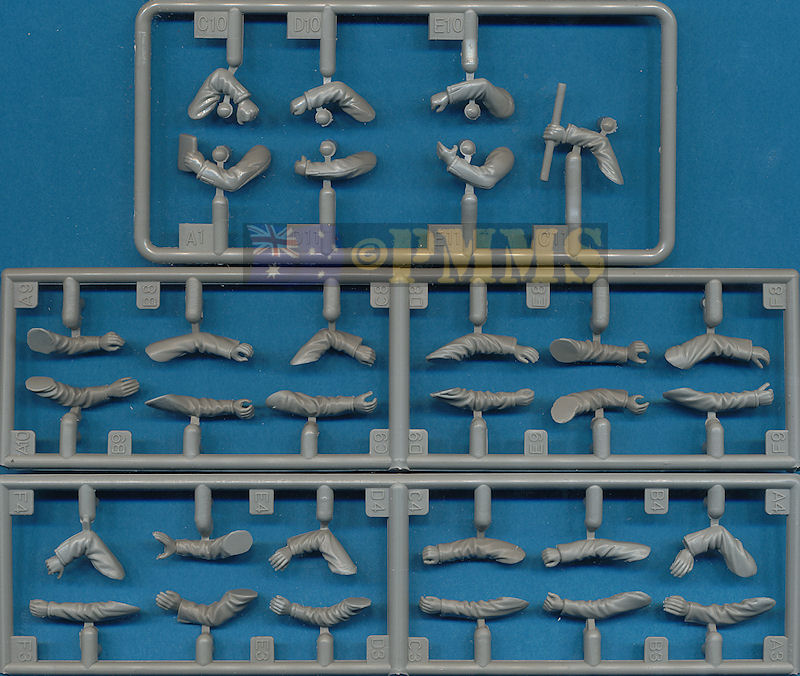
The six figures for the gun crew have had a fairly long gestation, first appearing as a crew for the 60cm Mörser "Karl" Gerät 040 then for the 28cm K5(E) Leopold with additional arm sprues to alter the poses, then as a crew for the 15cm sFH18 Howitzer again with the additional arm sprues and the same combination is included in this kit for the crew.
The figures all wear standard tunics, trousers and boots with steel helmets with the uniform detail nicely done but strangely the boxart figures don’t match the actual figures included in the kit and some modifications may be needed to suit the smaller s.IG33?
It’s almost like the two kits have been produced for a totally different modeller demographic, the AFV Club kit for those who prefer a highly detailed and fundamentally more accurate model but don’t mind some additional work to get there. While the DML kit seems more for those who aren’t that fussed with the accuracy issues and prefer a more straightforward build yet still end up with a nice looking kit with good crisp details ready for the painting.The AFV kit offers a choice of 3 wheel types, 2 breech types as well as offering either fully working equilibrators and sight arms or the ability to position them correctly in relation to the barrel elevation. It has working gun traverse as well as the additional parts for the mechanised towed version. There is also the excellent level of detail from the separate carriage frames, the open rear storage box, on the shield and shield mountings and ordnance details. It also included a nice selection of ordnance but all of this does required extra assembly work with results that reflect the extra effort.
The DML kit has a choice of 3 breech but only 1 wheel style with all components such as the equilibrators, sight arms and traverse all in a fixed position with only the barrel elevation movable.
The detail provided is good with crisp and blemish free rendering but lacks detail on carriage side frames, shield supports and is also missing the suspension parts for the mechanised towed version yet has the wheels applicable to this version. The Stielgranate 42 is unfortunately worthless but you also get the added gun crew figures.
Personally I think this s.IG33 kit from AFV Club is simply superb, the level of detail included from the provision of the carriage frames, the working equilibrators without compromising scale, the gun traverse to the fully hollowed out barrel, just top shelf. But having said all that both kits are good and light years ahead of the ancient Allen s.IG33 kit and both will build into an attractive model as they come and as outlined above it’s really a case of “choose your weapon” very much depending on what you want from the kit.
I’d also like to clarify on what is intended when I mention versions, wheel/suspension and breech types being applicable to certain versions, be it this or any review. As we know virtually anything is possible in wartime where expediency takes priority in tense times but my comments refer to how the vehicle/gun/whatever is designed and originally produced. Not what may have occurred later unless an officially documented modification or upgrade.
Click on thumbnails for larger view

Detail Images
| 15cm sIG33 (sf) auf PzKpfw.1 Ausf.B &15cm sIG33 (Towed) Nuts & Bolts Volume 19  |
German Light & Heavy Infantry Artillery 1914-1945 Schiffer Military Publications  |
Thanks to my credit card for the review kits.
