

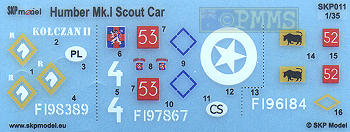
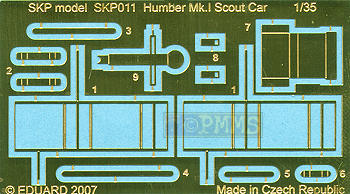
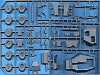
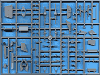
The kit consists of 126 parts in light grey plastic, a small etched fret produced for SKP by Eduard and a sheet of rub on decals with markings for 3 Humbers as well as a 12 page instruction booklet.
The standard of moulding sees the details that are quite crisp but there is a bit of flash and most mating surfaces requiring trimming for a flat surface as well as quite substantial sprue attachment points that in some cases overlap the detail requiring careful trimming to preserve the detail.
Another thing is there is no part numbers on the sprues with just the parts numbered on the instruction part layout diagram which means you have to continually refer back to the instructions to identify the correct part before cutting from the sprue. There is also no locating pins on the parts and just the occasional locating lug which makes aligning the part quite tricky in places compounded by the need to trim the mating surfaces and you will need to resort to some good old fashion modelling skills to tackle this kit. There are also many large ejection pins on the inside of many parts that need to be removed before the parts will fit adding further to the cleanup required.
Detail that is on the parts while crisply done is very basic, especially for the suspension that lacks any detail at all and while the hull parts have respectable weld seams included quite a few of the sprue attachments are right on top of these welds and some nifty cutting will be needed to preserve the welds.
The basic shape and outline looks quite good when compared to available plan drawings but as mentioned the detail is lacking in many areas and the fit of the parts is quite hit and miss with some filler require as well as the trimming already mentioned to get a reasonable result.
The lower hull tub has separate parts for the lower pan and inner bulkhead come support plate, the front side hull extensions and front plate as well as separate rear plate with the fit after trimming the parts to ensure the mating surfaces are smooth was not that bad really but there are some join seams to be dealt with.
The left side access hatch is a separate part but the location is not marked and care is needed to fit in the right place while the fit of the upper hull front (part A6) was less than perfect and a bit more trimming will be needed to get the to fit properly.
Underneath is the very basic suspension and a sub-frame chassis that needs a fair bit of cleanup while the diffs/axles and leaf springs as mentioned are very basic in detail. You also need to supply your own wire to form the rear axle attachment U bolts while on the front axle you have to drill a 2mm hole through the wheel mounting plate to fit to the axle.
There is an issue where the rear differential is located on the wrong side of the axle and should be in fact be a mirror image of that supplied in the kit, this is virtually impossible to fix without major surgery but may not be that noticeable on the finished model.

The fit of the chassis frame to the hull will also require some minor trimming and I would recommend attaching the chassis frame before fitting the suspension to eliminate any minor warping of the frame.
Assembling the suspensions will require care and the front in particular will test your patience as the lack of positive locating points makes for some interesting assembly.
At the front the position of the supports (parts B38) is not indicated and you have to determine this while in the process of attaching the leaf spring while ensuring all is oriented correctly in relation to the diff position. After this you have to drill a 2mm hole though the steering mounts and attach these along with the small brackets (parts B6). One thing to note while cleaning up the substantial seam line on the leaf spring is there is a small locating pin (the only one in the kit) on the bottom but this was lost in the large mould seam and I removed it during cleanup only to have to put it back again from thin sprue to ensure the front suspension fitted correctly to the lower hull.
When fitting the large suspension cover (part B2) note it must be positioned the correct way with the longer legs to the front as the instructions don't tell you this and it's easy to fit it the wrong way around, the wishbone arms are very loose fitting and some trimming may be required.
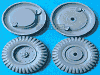
The wheels are in two halves each and again there are substantial ejector pins on the inside that have to be trimmed before the two halves will fit together. The wheel rims have the bolts quite nicely represented but the outer ring look too far inboard, this is because the sides of the rims are vertical and not slanted inwards slightly finishing closer to the bolts and the hub bolts lack definition but this may be getting a little picky?
The wheel tread pattern is well defined on the shoulder but not as well done along the central join line which is understandable given the constraints of injection moulding and there was a join seam on each wheel requiring cleanup also.
When assembling the rear suspension it is not clear from the instructions where the ends of the leaf springs (parts A31) meet with the rear supports (parts A32) or where parts A32 actually go and as this effects the final position of the rear wheels care will be needed getting these in the right place. I actually firmly glued the supports (parts A32) to the leaf springs before fitting to the chassis which made it easier to line up the axle to ensure it is in the right position and square.
Fitting the two drive shafts will also pose a challenge as there are again no locating holes and they only just fit between the basic transfer case and the diffs and you can either butt join them or add small plastic rod pins yourself to aid in fitting.
The exhaust pipe is again quite basic with the pipe needing to be drilled out for a better appearance.
The upper superstructure is in one large part that again has the contours are quite good and features weld seams on the panel joins but take care when removing the sprue attachments from the lower edges as these overlap the weld seams here.
At the front the driver’s plate is separate and the fit is quite good but the joins seams will need eliminating and the fit to the lower hull is also quite good with just some small gaps to be dealt with and the vision ports are separate but are fixed in the closed position.
On top are the separate sliding hatches but again these lack detail and it’s best to glue these closed unless you are adding a figure as there is no interior and the large hatch openings make this easy to see.
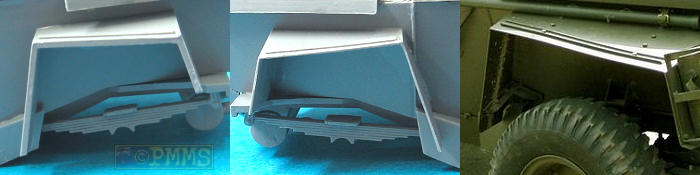
Assembling the front fenders/storage boxes was fairly straightforward with just a little seam cleanup needed but the fit to the hull was not good on both sides and some trimming may be needed for a better fit. It should be noted these assemblies don’t sit flush on the hull sides but have small brackets that lift them slightly off the sides and you may want to add these for a more accurate appearance. There are some of the etched parts in the form of the side raised stiffeners added to these assemblies and these are more subtle than the moulded on detail, just make sure to fit in the correct position as the instructions can be a little vague in places.
Moving back the engine deck is in two halves and you should note these overlap the forward rear full section (part A39) but the side intakes while open have no inside detail allowing you to see into the empty engine bay and adding the bottom fillets to close this off would be better. Also the intake cover in the middle of the engine deck is quite undersized and lacking the four bolts on either end with it just covering the opening the deck top.
On the rear plate the exhaust louvers could do with some thinning for a better
appearance and the exact location of the louvers is again not that clear in
the instructions and some test fitting will be needed.
There is a small intake cover missing from the rear panel under the top rows
of louvers which should be added and the rear wheel mud guards and front mud
flaps are overly thick and again should be thinned considerably to give a better
appearance.
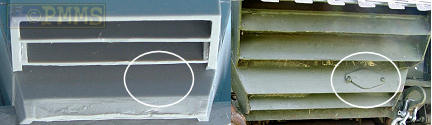
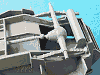
Rear mud guards before and after thinning and image of real fenders
Actual Humber images courtesy Tanxhaven
The etched parts such as the rear water can racks add some good detail definition which is in contrast to the many thick plastic parts but the cans themselves are rather basic with the smaller detail items such as the head lights and pioneer tools also being quite basic in detail and a little on the thick side.
Armament consists of two Bren Guns and while photos exist of the twin Bren setup, the single Bren or twin Vickers arrangement appears more common and they often were also fitted with a drum magazine instead of the standard magazine. The Brens themselves are again on the chunky side and you will need to drill out the barrels for a better appearance.
Other etched parts include the fire extinguisher rack and small fittings on
the hull and tool brackets that add a bit of finer detail.
SKP seemed to have fixed the silvering problem from their initial release decals as these went on easily without any hint of silvering or other blemishes just like rub on transfers should and this makes applying the markings easier as you can eliminate the gloss paint step in the process and apply these directly to the painted surface.
Markings included are:
- 2nd Armoured Brigade, Polish 1st Regiment “Krechowieckich” Lancers 1945
- Czechoslovak Independent Armoured Brigade 3rd Armoured Battalion Reconnaissance Car, 1945
- 11th Armoured Division, 2nd HQ Armoured Car Regiment, 1945
Etched fret by Eduard
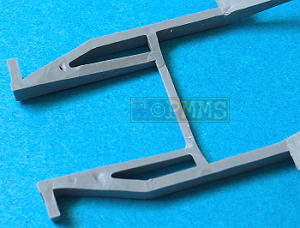
Sprue images
Click for larger view
Close new window to return to review
You will have to reach into your bag of basic modelling skills here but if you are prepared to put in the effort during assembly you will end up with an acceptable representation of the Mk.I Scout Car and while there is plenty of scope for adding additional details it’s certainly better than the plastic Humber Scout car we didn’t have yesterday.
But as with the Trumpeter Stryker kit I feel there is better to come in the form of the Bronco kit to follow shortly, time will tell.
In the meantime this should keep Allied modellers reasonable happy for a while if you don’t mind a bit of work along the way.
Recommended 7/10
For another opinion on the kit, see the review by Jim Rae on Armorama.
Thanks to SKP Models website for the review kit.