
 |
SdKfz
9/1 6ton Bilstein Crane Conversion Kit No.352020 1/35th Scale First Look Review by Terry Ashley |
|
SdKfz
9/1 6ton Bilstein Crane Conversion Kit No.352020 1/35th Scale First Look Review by Terry Ashley |
The 9/1 featured a Bilstein crane with a maximum load capacity of 6-tonnes. The crane was mounted on a wobble plate, which could be traversed 360 degrees, and tilted up to 12 degrees for operations on unleveled terrain. The boom could also be extended as needed. All crane operations were gear driven, and operated by manual cranks. The vehicle was also equipped with 4 adjustable outriggers to stabilize the vehicle during boom operations. When not in use, these legs were disassembled and stowed in the rear storage box, or in 1 of the 2 storage boxes located in the bed of the vehicle, and the feet were stored in brackets along the front crossover box. These adjustable outriggers are provided, but it should be noted that there are no known photographs of these outriggers actually being used by troops in the field. There were also many little variations between production versions, too many to list them all here. It is recommended you refer to Nuts & Bolts Vol. 12, and Military Machine FAMO 18t. They are both excellent references for both the 9/1, as well as the basic FAMO.
The
Conversion Set:
The set arrived
in a large sturdy box about 240mm (9 ¾") x 170mm (6 ¾")
x 70mm (3") with the parts in plastic bags and packed with foam pellet
filler to avoid the bits bouncing around during transit. Only three parts had
minor damage with small parts broken off but nothing that can't be repaired
quickly, that's pretty good considering the number of fine delicate parts and
its travel from the US to Australia.
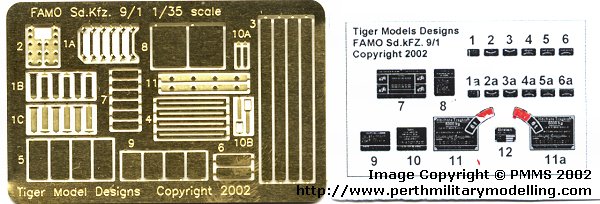
The set contains 118 finely cast resin pieces in light cream resin, a small etched fret with 52 pieces, two large telescoping brass tubes with re-drilled holes, two lengths of brass rod, a small sheet of thin lead, a generous length of fine chain, fine thread for the rigging, a small decal sheet with the data panels and finally a comprehensive nine page instruction sheet.

Also of note is the design
of some parts to avoid warping (a problem with a lot of larger resin pieces)
the large rear bed in very straight and flat, due to care taken in the casting
process This also features very nice surface details with a fine tread plate
pattern included as well as the storage box handles and bolt detail.
The new side fenders have a large casting block with 10 entry points for the
resin pour, again this avoids any distortion with the fenders being perfectly
formed. The casting blocks are attached on the outside of the fenders, so take
care when removing these and sand down for a perfect finish (remembering to
wear a dust mask when sanding resin).
As well as the new fenders there are also new shorter driver's cabin side panels
to replace the Tamiya parts and the alterations start from step 17 in
the Tamiya instruction sheet. The new fenders and side panels are the
major structural changes to the Tamiya FAMO with most everything else
replacing the kit rear section. A bit of minor surgery is required to remove
the fuel tank from kit part F19 and reposition under the front seat, but this
is quite simple to achieve. Quite a few of the smaller Tamiya parts are
added to the new resin pieces as shown in the TM instructions.
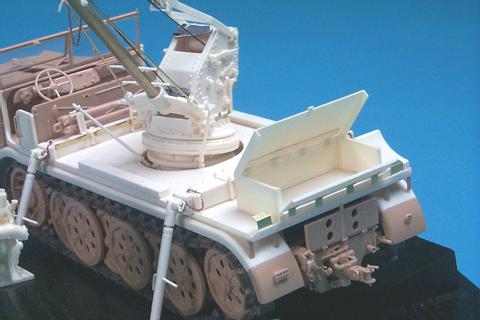
The undersides of the rear bed have large support beams and the lower section of the crane assembly added plus the fenders and you should follow the TM instructions exactly when assembling this section. The kit spare wheel is also added the resin bed.
The cross over boxes added to the upper part of the bed are well detailed with smaller resin and etched parts and again straight forward if you follow the instructions closely. The outriggers are made up of six resin pieces each with the detail extending the fine threads cast into the adjustable end sections. You also get alternate end parts to the cross over boxes for stowed or deployed outrigger legs.
Two supports need to be added to the lower Tamiya chassis and these have subtle differences in their mountings. These are well shown on the instructions so study these before attaching the parts.
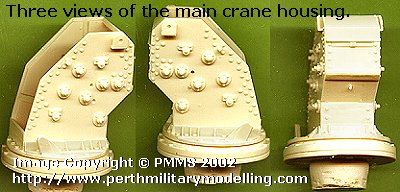
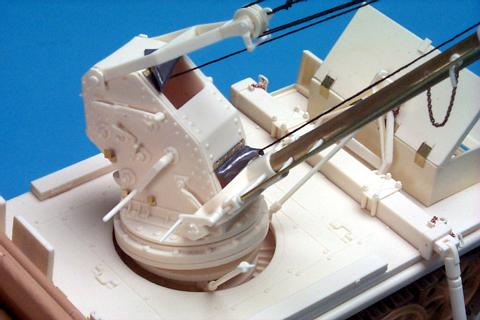
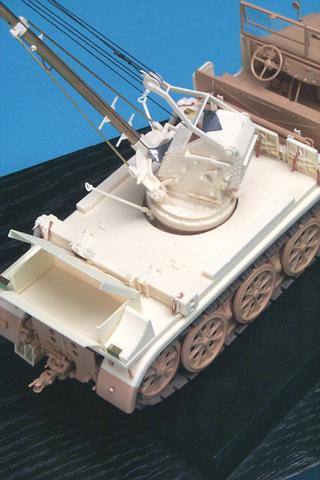
The crane assembly is simply a work of art. The large crane body is yet another example of the superb casting found in this kit.
The main boom assembly is
another superb effort in design and execution. The main boom consists of the
two telescoping brass tubes with the pre-drilled holes so you position this
at any length required. The two side support beams are the brass rod provided
and this is all fitted to resin pieces with superb details included. There are
also many very small parts in this assembly and care should be taken during
assembly.
You are given a nice rigging schematic diagram for adding the thread, but again
care should be taken with this as can be very fiddley, just take your time and
there shouldn't be any problems?
Also included on the etched sheet are four working equipment claps like those
found on ABER sets for attaching as required?
There are a few items not included such as the large two-part half circle dust covers for around the base of the crane when in normal position and some of the internals of the crane body. These omissions are noted in the instructions saying they were left out to help keep the price a low as possible and may be issued as an add-on later. I would have liked to see the dust covers included, but they are fairly easy to make but then it would seem a shame to cover up the superb details included in the lower wobble plate assembly if the covers are used?
The box top illustration shows the crane holding a resin tank engine, this engine isn't included in the kit but the notes say the assembled crane will support the weight of an engine or Panzer IV turret. A small note on the box top saying the engine isn't included would eliminate any confusion on this.
This is just a brief rundown on what is in the kit and a more detailed look will be given in the full build review to follow shortly when done. I usually remove all of the parts from their casting blocks (except the really small bits) before commencing assembly as this saves hassle and time during assembly.
Instructions:
Special mention must be given
to the instruction sheet provided. It consists of nine pages on US letter size
paper. Two pages of text give a history of the 9/1 as well as general instructions
and tips for assembly.
There also is a short note advising if any part is broken or missing to contact
Tiger Models for a replacement, they also welcome any feedback from modellers
with a phone number as well as web site address given.
Seven pages consist of very clear and well laid out assembly drawings supplemented with notes where needed to aid assembly. I can't praise these instructions enough; they are extremely detailed and easy to follow with exploded views showing precise location of the parts. Where needed additional plan views are given to clearly show the locations. But as with any instruction they should be studied carefully before commencing construction to fully understand the process, but these will make assembling this kit a breeze.
Conclusion:
Quite simply this is a superb
conversion set with high quality resin pieces supplemented with the multimedia
items provided. The excellent instructions as noted and also the price, for
mine a price of US$69.95 is very reasonable for a set of this quality and detail,
do yourself a favour and get one before they all go.
Highly recommended.
The resin bits
Click
on thumbnails for larger view


Views of test shots during kit production
(Pics below supplied by Tiger Model Designs)

Click Browsers BACK button to return to page
This conversion set is available
worldwide from Tiger
Model Designs.
References:
Page Created 25 April 2002