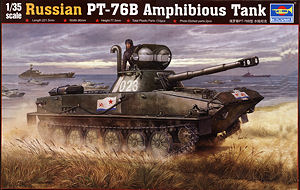
Following closely behind the first PT-76 Mod.1951 (kit #00379) comes the second in the series being the later PT-76B which had a number of improvements over the earlier versions with the most distinguishing feature being the recessed engine intake grills on the rear left hull.
The PT-76 (ПТ-76) an abbreviation for the Russian Plavayushtshiy Tank (Плавающий Танк, swimming tank) was first produced in 1953 at the Volgograd Tractor Factory and in 1958 an improved variant, PT-76B, was adopted and remained in production until 1963.
About 7,000 PT-76s were built of which about 2,000 were exported to over 25 countries including Afghanistan, Albania, Angola, China, Congo, Cuba, Egypt, Finland, Guinea, India, Indonesia, Iraq, Laos, Madagascar, Mozambique, North Korea, Pakistan, Poland, Vietnam, and Yugoslavia.
The PT-76 has seen active service in a number of conflicts such as the Vietnam War, the Indo-Pakistani Wars of 1965 and 1971, the Six Day War (1967) and the Yom Kippur War (1973), and in the Angolan Civil War (1975-1992?).
There are four main variants distinguished mostly by differences in the 76.2mm main armament.
* PT-76 Model 1 - D-56T gun (multi-slotted muzzle brake).
* PT-76 Model 2 - D-56TM gun (double-baffle muzzle brake and bore evacuator).
* PT-76 Model 3 - D-56TM gun (double-baffle muzzle brake only).
* PT-76B, or Model 4 - a D-56TS gun with PAZ stabilization system
A coaxial 7.62-mm machine gun is also mounted at the right of the main gun and some PT-76s are augmented with 12.7-mm AA MGs.
As mentioned this new kit from Trumpeter represents the later PT-76B with the D-56TS gun that had a large muzzle brake and fume extractor on the gun tube. It also has the early style drive sprockets which were later replaced with a revised style plus detail differences to the turret and again most of these features have been captured nicely in the kit.
As much of this kit is the same as the first apart from a new small sprue F and sprue B altered to include the D-56TS gun much of the review below is also the same with additional comments for the new PT-76B parts.
The PT-76 is a fairly simple vehicle and this is reflected in the kit with just 185 parts in light grey plastic along with two frets of etched parts, a length twine plus a set of full length vinyl tracks as well as the decal and instructions sheets.
Standard of moulding is quite good overall with pin marks on some parts to contend with plus a little flash here and there and the usual moulding seams on the parts to be removed with the level of detail in most cases being crisp and well defined. Some parts will need their mating surfaces levelled for a better fit while on others the fit is excellent such as the main hull parts that fall together without any trimming needed.
Dimensionally the main kit matches known data quite well (length, width) and the road wheels are the correct diameter but not having a set a reliable 1:35 plans for the kit I can’t check smaller individual parts further such as the barrel dimensions.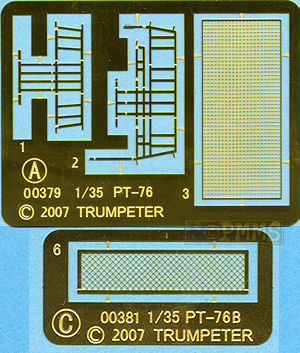
Twine

The flat boat like lower hull tub has some superb details included on the bottom such as weld seams, hull stiffeners and the two water jet intakes being especially well done, it’s a pity much of this is hidden under the vehicle when assembled.
Added inside the hull are the two large water jet channels leading to the rear hull plate and these eliminate the see-though look of the lower intakes and the rear nozzles if you show the doors open. There are a few internal channel pin joints that will be best to remove as this gives the channels a cleaned look as you can see a fair way down them after fitting. You have to fit the rear hull plate as you attach the channels and make sure this is perfectly vertical so it will mate with the upper hull later.
On the outside all the axles are separate parts for good detail definition and to allow articulation if desired but watch as the keyed locating tabs have a bit of movement so you have to ensure all the axles are lined up evenly as you fit them.
Each of the 12 road wheels are in two parts, the outer wheel with rubber tyre and the inner rim section to give detail on both sides but they have a series of raided ribs on the rubber tyre which I have not seen on real wheels. There is also a fairly prominent mould seam around the outer wheel and you will have to remove the ribs to eliminate this so removing the rest of the ribs at the same time will give a better look to the wheels in the process.
The hub rib contours have been captured quite well for plastic wheels but there are two large lubrication points on the rims which are oversized and you should sand these down a little for a better appearance.
The two part drive sprockets are the early style with the later styles being noticeably different with each sprocket half having outer details but are smooth on the inside. These have a keyed pin on the inside but this actually miss-aligns the sprocket teeth when fitted together and its best to “round” the corners of the locating tab and line up the teeth by eye for a better fit. Also the fit of the sprocket to the hull axle is very “sloppy” and you will have to ensure the sprocket is held level while the glue sets.
Other details are the separate bump stops added along the hull side as well as the front tow hooks that capture the look nicely with just the small cable securing clips added to finish off. At the back are the two large water jet door covers and you can fit these open or closed as desired
Finally there are the full length vinyl tracks that have okay detail for this medium but the guide teeth are quite plain lacking the indented detail of the real tracks and the instructions still say that the tracks can be glued together using normal plastic cement. As in the first kit they don’t stick using Tenaz-7R, Tamiya Extra Thin or Faller plastic cement so it’s best to heat weld the join pins in the “conventional” manner.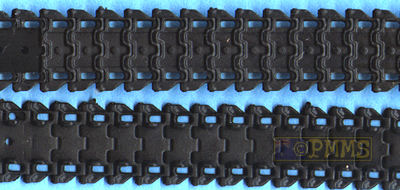
The large flat upper hull is moulded cleanly without any sprue attachments to be cleanup and included the modifications for the B model such as the recessed intake grills and additional small round intakes on either side of turret. These intakes have in real life fine mesh but they are moulded solid in plastic but should be okay on the finished model as they are only small but are one area that can be improved detail wise. The rear most engine access hatch is also new with additional grab rails attached and the side fenders again fit neatly along the sides with these having separate end mud flaps added.
Detail is nicely done with well defined engine intake grills and some nice weld seams as well as the turret ring having small teeth around the ring cut-out but there could be welds added to the top/side join to add further detail.
The three engine access panels are separate allowing better detail to be included and these fit quite well to the hull top cut-outs with fine etched screens provided for the intake grills as well as finely moulded plastic grab handles. You should note that the grab handles inside the recessed intakes extend above the level of the hull but in fact should be below this and you should shorten the handles so they sit below the level of the engine deck.
The two rear side intakes have inner grill inserts for good detail while the separate forward trim vane has rivet detail way oversized but it’s easy to sand these down for a more subtle look and it should be noted the trim vane can only be fitted in the retracted position as there are no extended arms provided.
The head light clusters have fine etched bush guards provided as well as jigs on sprue A so you can bend these to the right shape but the guards suffer the perennial etched issue where they are flat in profile while the real guards are round wire welded together.
Other smaller details include the pioneer tools with moulded on tool clips, the fender supports, side mounted position lights and rear tow hooks as well as some extremely fine hooks for the tow cable which is made form the twine provided added to the plastic end shackles.
The fit of the upper and lower hull is superb without the need for any trimming or filling making the hull assembly a breeze.
This has the upper cone shell and lower turret ring as separate parts with the main gun breech included inside the turret made up of 7 parts to fill the turret if the large upper hatch is shown open and thankfully the miss-numbered parts from the first kit instructions have been corrected.
There is a recessed lip around the turret roof but this should be level with the roof and not indented as depicted with a weld bead around the outer roof as well as a few other weld seams that could be added around the aerial mounts if you wish.
The large top hatch has a couple of large pin marks on the inside to remove if shown open but the fit of the hatch to turret roof is spot on if left closed.
Added around the turret is the upper hand rail moulded in plastic and care is needed to remove the fine moulding seam and added to the back of the turret is the revised large ventilator cover for the B version. This ventilator also has the large fixed snorkel which is another distinguishing feature of the later PT-76s.
The new D-56TS 76.2mm gun tube is in two halves with the cast muzzle brake quite nicely defined but the join of the barrel halves will need a little trimming for a good fit. I had to test fit and trim the mating surfaces a bit for a good fit but its best to do this as it results in virtually no joins to be filled afterwards. Also note there is a large retaining bolt on the underside of the muzzle brake which is offset to the right and the kit muzzle brake has a small square notch to represent this and replacing with an actual round bolt head will improve the appearance.
Also after gluing the halves together you should drill out the muzzle with a 2.2mm drill to both make the muzzle hole perfectly round for a better look.
As you drill hold the muzzle firmly between your fingers or the drilling pressure will just pop to the two halves apart meaning you will have to re-glue and start again.
The large gun mantlet fits neatly to the front of the turret and you can fit the barrel before or after adding the mantlet but there is very limited elevation possible due to the shallow turret and as well the co-axial 7.62mm MG is glued directly to the turret front. You will need to bevel the side of the locating tab for the MG as the tab is straight while the indentation in the turret is angled, but this is simple to remedy. Also drilling out the MG muzzle will improve the look as it comes as a solid moulding.
The other turret details such as the top searchlight, spare track and aerial are straightforward to fit but the turret doesn’t have any locating tabs when fitted to the hull so don’t go turning the model upside down or the turret will take sprue.
These are the usual exploded view type drawings that have a few small photos of the real vehicle included to help with the detail. The sequences are very clear and easy to follow and I didn’t come across any bloopers in the sections of the kit assembled during this review.
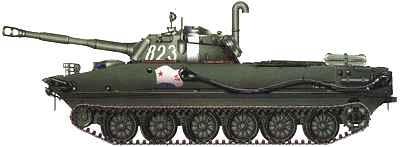
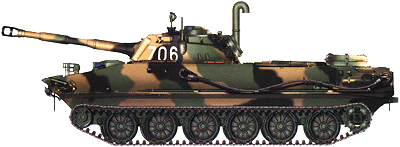
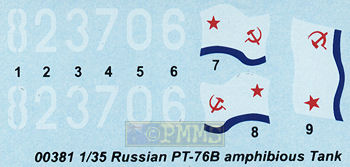
decal sheet has markings for two PT-76Bs both, one in overall Russian Green and the other in a nice looking three colour Green/Brown/Black camouflage scheme but no unit information is provided with again the large colour painting guide showing the location of the decals which are basically just the turret numbers.
|
Overall this is a simple but respectable kit of the later PT-76B that provides all the basics for a nice model with nice clean details and overall excellent fit of the parts. There is a bit of cleanup needed with some pin marks about the place and as with any kit there is room for additional details to be added.
While it is not the final PT-76B configuration which has updated drive sprockets and track fans of Russian armour should still be pleased with this kit and it is also the version used by a number of other countries.
There is one final PT-76 version to come from Trumpeter, which is the Model 2 with D-56TM gun which is based on the initial Model 1951 hull.
Highly recommended 7.5/10
Click on thumbnails for larger view


Detail images


Close new window to return to review
PT-76B, Jacques Littlefield Collection
Toadman's Tank Pictures PT-76B
Thanks to my credit card andthe excellent service from  for
the review kit.
Trumpeter is distributed in Australia by J.B.Wholesalers.


