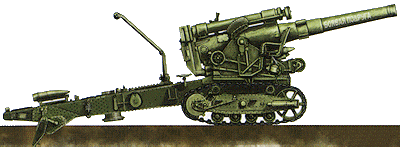
The 203 mm Howitzer Model 1931 (known unofficially as the B4) was the heaviest of the field weapons used by the Soviets between 1941 and 1945. The distinctive feature of the B4 was the two tracked bogies which allowed the heavy weapon to move over soft ground and snow unlike other contemporary weapons that were all but impossible to move in such conditions.
The Howitzer was not powered but could be towed short distances fully assembled while it was broken down into smaller loads for longer distance travel by road or rail.
The B4 was a very powerful weapon but also had a slow rate of fire due to the large heavy projectiles and came fitted with a shell handling crane to assist the crew during loading. It was used primarily to attack fortifications and bunkers with a range of 18 km (11 miles) for its 100 kg (220.46 lb) shell.
There are numerous period photos of the B4 in action but none as dramatic as those taken during the battle for Berlin in 1945 where the massive B4 was used at almost point blank range for such a weapon and must have been a fearful sight and sound for the defenders on the receiving end at such ranges.
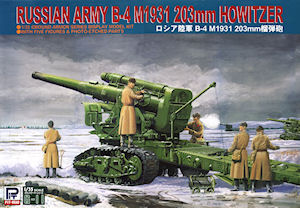
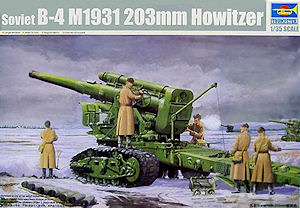
This new kit from Trumpeter of the Soviet B4 Model 1931 203mm Howitzer is also released in Japan under the Pit Road label with both kits being the one in the same. The Pit Road kit also includes a set of 5 crew figures that will be released as a separate kit #00427 Soviet B-4 Artillery Crew by Trumpeter.
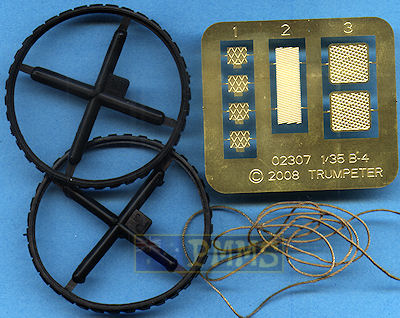
The kit consists of 261 parts in the usual light grey plastic with a further 84 individual track links also in the light grey plastic plus 75 parts for the figures in beige plastic. Added to this are two black vinyl tyres for the transport limber, 7 etched parts and a length of twine as well as the small decal sheet and 12 page instruction booklet.
While I don’t have any accurate or dependable 1:35 plans of the B4 some sectional drawings and other available data would indicate the kit is well within acceptable limits as far as proportions go but more reliable info would be needed to make a definitive statement in that regard.
The standard of moulding is good overall with well defined details with the use of slide moulds on some parts to enhance the detail and just a little thin flash about the place which is easy to deal with. The main issue is the quite prominent mould seam lines on the parts which in some cases poses a few problems to remove without compromising the surrounding rivet detail and is rather tedious on the many smaller parts.
There are also some small and delicate parts that will need care removing from the sprues and in fitting with the hundreds of rivets on the main carriage chassis, trunnion mounting and bogie units cleanly done in most instances.
The parts fit is also good overall with only a very few areas where trimming was required but you must ensure the mating surfaces are smooth on a number of the larger parts to ensure the best fit with the fit of the many small parts trouble free overall.
The kit like the real Howitzer is made up of a number of sub-assemblies that come together for final assembly. This allows you to work on one sub-assembly while the glues dries on another with the fit of the major sub-assemblies also very good making bringing everything together quite straightforward.
This is the largest assembly in the kit and is made up of 7 main parts; the rear fantail section has the top and two sides moulded together with the use of slide moulds to ensued good definition of the rivet heads on the three sides.
The two side arms are in two halves each to portray the hollow look of the actual arms that can be seen through the inner round holes. It is essential to firmly clamp the two arm halves together while gluing to make the join lines as small as possible to reduce the amount of cleanup required. If you do this the top join seam is negligible thankfully as it will be difficult to eliminate a larger seam due to the many rivet heads so take care here and save yourself some work.
When fitting the rear fantail, the two side arms and the front nose make sure these are also pressed as tightly together as possible while the glue dries to again reduce the join seams to the bare minimum. This also applies when fitting the underside fantail panel (part A13) especially at the side join to reduce the seam and cleanup required. Thankfully the fit of all these major parts was good overall making for precise location of the parts but still care is required as cleaning up join seams with all those rivets around is a nightmare.
Sorry if that sounds repetitive but if you are careful with the assembly here you will save yourself a lot of work and possible disasters by keeping everything tight and the cleanup required to a minimum.
There is numerous small detail parts added to the chassis and these all fitted without problems apart from the cleanup of the mould lines a little tedious as mentioned above.
Added to the chassis frame are two larger sub-assemblies with the shell loading crane on the left side and the large rear spade assembly with both of these including moving parts so care is needed when gluing the parts together.
The shell crane has six fine parts with the two jib parts joined by a small central pin (part D24) which needs care when gluing but the top pulley lacks any real definition and you may want to replace this with a pulley that can easily be found in the ship modelling section of your favourite model shop.
The instructions show to fix the crane in the stowed position but it is possible to depict this in the raised position by repositioning the lower base (part D3) on the chassis bracket and by not gluing the lower jib arm (part D5) to the base allowing this to be rotated. The crane is quite nicely detailed apart from the top pulley but there is no crane cable provided which you can easily add from thin thread if showing the crane in use?
On the underside is the large rear stabilizer spade made up of two parts with separate attachment arms and brackets that allows this to be repositioned in the stowed or deployed position exactly like the real thing.
There is a large join seam to be removed from the underside of the spade but other that that assembly is straightforward as per the instructions allowing you to position the spade as required and even change the position after assembly.
This is another large sub-assembly with the fit of the parts again very good although a few of the join seams needed a little putty to eliminate and as mentioned ensuring the mating surfaces are smoothed out prior to gluing will save on this.
The outer barrel tube and muzzle is interesting as the muzzle ring is a complete ring on one half of the gun tube with the other half of the tube fitted to the back of the muzzle ring. Due to this there is no join seam on the muzzle just a small mould line but the fit of the smaller barrel tube half was not good at all leaving quite a bit of cleanup required unfortunately.
The kit provides a piece of etched metal rifling to add inside the muzzle and it’s best to anneal this by running through a candle flame to make bending this to shape a little easier. This rifling adds a nice touch to the muzzle as it is quite large and you can easily see the rifling once fitted in place for a far better appearance.
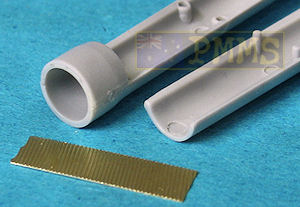
Poor fit of barrel tube halves

At the back is the large breech block in two halves and again a little filler was needed to completely eliminate the join line but nothing excessive and the breech block and door are separate parts. The round breech block lacks the large threads of the real thing and leaving the breech door closed would be the best option here.
All the other detail such as the top recuperator and underside recoil cylinders and elevation sprocket all fit together perfectly and in fact the underside recoil parts will hold in place without glue such is the precise fit, but of course you would glue them in place in the normal manner.
Each of the large trunnion sides are in two halves each and are the most troublesome parts to cleanup of all the parts. On the top edge of the trunnion halves are rows of rivets along with quite prominent moulds seam lines to cleanup between the rivets and extreme care is needed not to damage the rivets.
Once the rivet/mould seams are cleaned up there is a large join seam present between the two trunnion halves although by squeezing the halves together tightly while gluing will reduce this to a minium there is still a join seam that is all but impossible to remove without destroying the many rivets.
You will have to live with the central join seam or completely remove the rivets, fill the seam and then replace the rivets which is really a job to for the courageous to say the least.
Again there are numerous additional parts added to the trunnions such as the elevation and traverse hand wheels and connecting rods as well as the main gun sight and all these accessory parts fitted very well with only one of the locating holes needing to be enlarged slightly to fit.
The large trunnion base plate is a single large moulding to which is fitted the elevation sprocket and front mounted cable drums with the twine provided added to the two small drums. Apart from the usual mould seam cleanup the fit here was also good overall although sliding the mounting rod through the cable drums was a little tricky.
Final assembly of this sub-assembly sees the assembled barrel trapped between the two trunnion mountings as these are glued to the trunnion base plate leaving the barrel free to elevate, this also intermeshes nicely with the underside elevation sprocket allowing the gun to be moved as required.
There was a bit of a gap issue at the front of the trunnion base/side joins that will need care and if you tightly squeeze the two trunnion sides to the central base while gluing this gap will be reduced to an acceptable level otherwise this is another very trickly join to deal with. So again take a little care here and save yourself some more work.
If you want the barrel to elevate after assemble you should not glue the right side parts C17, C35 as indicated in the instructions.
This large trunnion/howitzer assembly can then be attached to the lower chassis frame and thankfully the fit is again very precise making for a trouble free fit. This will also allow you to leave these sub-assemblies separate for painting as there is no joins or other issues when fitted together so you can do this at any stage to make things easier.
The two tracked bogie units are fairly simply sub-assemblies that apart from the quite tedious mould seam cleanup on the 12 road wheels/return rollers per bogie unit go together quickly and easily without any fit issues at all. The smaller detail parts added to each unit also fit without any problems leaving just the tracks to be fitted.
A small note on the two etched steps provided for each unit is they should have rounded corners and not square as they come but this is just a few passes with a fine file to fix and no big deal. The etched steps have nice tread plate included but the locating holes are a little oversized leaving a small gap to be filled when the steps have been fitted, using a small section of plastic strip will fill this nicely.
The tracks are made up of individual links with 4 sprue attachments each that does take a bit to cleanup but those used to cleaning up individual links will be used to this. The links are designed to just be glued together but it would be possible to drill holes in the links and join with wire pins if you wanted fully working track?
Care is needed when joining the links together because if you tightly butt each link together the full run will be about half a link short when the ends meet, but by leaving a small space between each link will spread the full track run out enough to meet together properly.
Test fitting the track runs to the bogies before the glue has fully dried will allow for any small adjustments to be made to ensure the ends meet without any problems?
The instructions show to join the two assembled bogie units together using the central connecting axle and mounting brackets but it is easier to fit the axle and brackets to the chassis frame and then add the bogies later, this again will allow you to paint the bogies separate and bring together for final assembly.
Other items added to the main assemblies are the two large operator’s seats on either side of the trunnion mountings and these are made up of 9 parts each side although there are a few detail issues with these assemblies.
The seat pan and foot plate (parts E14, C8) are actually thin sheet metal on the real platform and the plastic parts are a little overly thick which may not be an issue but thinning these will add to the final appearance of the seats. Also the seat plates are located centrally but in fact should be offset slightly to one side, again this may not be that noticeable on the final assembly but if a stickler for accuracy you could reposition the seats.
The seats provided have a series of raised pins around the edges that would make sitting on these a nightmare when in fact these “pins” should actually be the locating holes for the seat cushions missing from most museum examples.
There are also two large locating holes in the seat backrests that will need to be filled and this could be tricky with the rivets close to the holes? The fit of the assembled seats to the trunnion sides was again very good and these also can be left off until final assembly to make painting and handling easier.
You can either fit a choice of wooden (in plastic) loading platforms or shell loading trolleys behind the breech but most wartime images indicate the wooden platforms to be the most common but it provides a good choice.
The trolleys themselves fit together easily with again just the mould seams to worry about and there are a couple of 203mm shells on their ready trays provided if depicting the gun in action?
This is a fairly simple affair with nice detail on the parts and has the large wheels in two halves with vinyl rubber tyres. These are different for left and right with the angled tread angled inward on both sides so take care to fit the tyre to the correct wheel. The vinyl “sprues” are marked “L” and “R” as are the instructions so this shouldn’t be a problem?
The main axle is in two halves which results a join seam to be eliminated and the steering arm and central towing arm are joined together with separate plastic pins allowing these to articulate. But strangely the steering arm has its outside linkages moulded solid which completely negates the separate locating pins. As the linkages are fairly chunky you could separate these with a little work and make workable which along with the pins already provided make the whole unit steerable allowing some animation in a towing diorama.
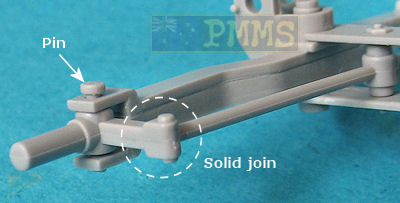
There are two small pins to attach the limber to the main chassis allowing this joint to also articulate which adds more mystery to the solid steering linkages? These attachment pins will again allow you to leave the limber separate for painting to be fitted together at final assembly.
These are typical Trumpeter instructions with exploded view drawings showing the sequences and as the kit is not overly complicated these are easy to follow without any real traps. But as with any instructions carefully studying the assembly and test fitting before gluing will help eliminate any disasters
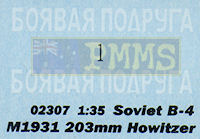
The small sheet has no markings as such just a couple of Russian slogans to add to the barrel tube on the example shown in the colour painting guide. This shows the gun painted in overall Russian Green with steel tracks.
As mentioned above the Pit Road boxing of the kit includes the five gun crew figures that will be marketed separately by Trumpeter as kit #00427 Soviet B-4 Artillery Crew.
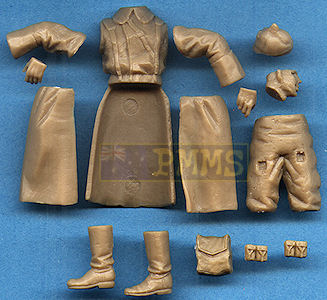
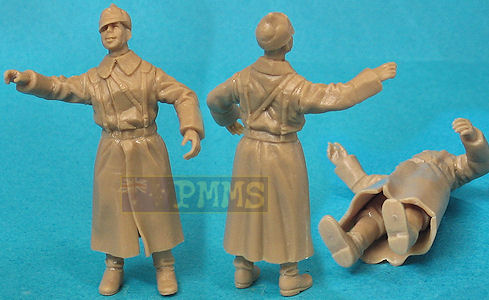
The figures come dressed in full winter great coats which have separate lower coat flaps giving excellent definition to the coat appearance while the rest of the figure detail is average for plastic kit figures. That is to say adequate but not outstanding and careful painting will get the best results.
Each figure is similar in having the upper torso and half the lower coat flap as one moulding with separate lower front coat flaps, legs, boots, arms, hands as well as separate head and helmets along with some rifle round pouches and small rucksack but no rifles are included.
Apart from fine mould seams assembly is very straightforward and the test figure assembled didn’t require any trimming or filling for the joins.
Note up skirt shot to show the separate coat flap.
Overall this is a very impressive and big artillery piece with the tracked bogies giving it a very distinctive look from other artillery pieces.
The level of detail is good and the fit of the parts very good overall although there are a few areas where care is needed, the front joins on the trunnion mountings being to most problematic to overcome. There is also quite a bit of cleanup required due to the prominent mould seams but the end result is worth the effort.
As mentioned above making sure the larger parts such as on the chassis frame and trunnion assembly are tightly held together as the glue dries will help reduce any gaps that need attention saving yourself quite a bit of cleanup work. The end result with this kit will greatly depend on things such as this during assembly to get the best result as just the opposite is possible if not careful.
Impressive as the kit is with the overall level of detail and good fit of the parts there is still scope for additional detailing to take the kit to the next level for those wanting to really turn it into a standout model.
This kit adds to the growing list of large artillery pieces from Trumpeter and will be very welcomed not only by Russian armour fans but by artillery fans in general and should make for an outstanding Berlin street diorama.
Very highly recommended.

Click on thumbnails for larger view


Assembly Images


Overall views


Close new window to return to review
|
Trumpeter is distributed in Australia by J.B.Wholesalers.


