
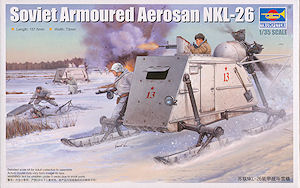
Soviet Armoured Aerosan NKL-26
Trumpeter 1:35 Scale Kit #02321
Review by Terry Ashley
The kit includes the size and hull features of the wartime dimensional drawings and these differ quite markedly from the plans and period photos, if the vehicle was produced to match the drawings then it is extremely camera shy as there is not one photo of the actual NKL-26 with this configuration that I am aware of, certainly they don’t appear in any of published period photos, so where does this leave us?
I’ll firstly outline the main differences between the kit features and those of the plans/period photos before looking at the actual kit you get in the box.
To start with the hull is about 9mm too long mostly at the back while the ski size and placement (plan view) is correct and this leads to some drastic miss-alignment of the hull features.
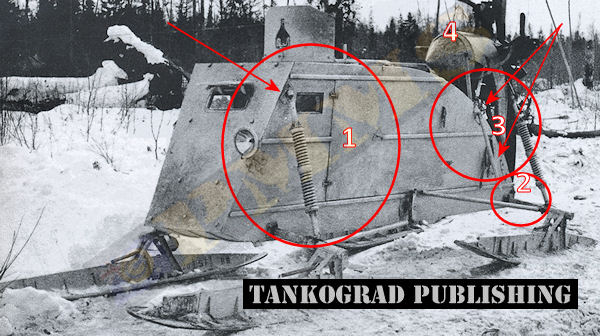
- The entry door is too far forward; this leads to the small side window being squashed up leaving no room for the ski suspension attachment brackets which are located too low on the hull. Also the top machine gun ring is too far back and the shield not tall enough plus the headlight mounted too low. Also the second and third hull strengthening ridges are too low on the hull sides.
- The extra hull length is most noticeable at the back where the hull extends 8mm more than it should do past the rear ski mounting; this leads the rear hull contour being way too high by the same amount as well as the curve not being as flat as it should be.
- As a consequence of the extra hull length and rear curve the mountings for the rear ski suspension and engine mountings are too high on the hull and should be mounted further down the rear hull curve than with the kit.
- The large bulbous engine cover/fairing is that of the NKL-16 and not the NKL-26 but thankfully the kit includes as an option the correct shaped NKL-26 fairing although the engine sits a little too high again as a result of the rear hull profile issues.
There is not a lot you can do about these discrepancies other than completely rebuild the hull with the rear profile and other hull features positioned correctly as well as extending the ski suspension to locate higher on the hull sides.
As mentioned I have not seen any photographic evidence to support the layout of the wartime dimensional drawings and as a consequence the kit layout that seem to be a mixture of NKL-16 and NKL-26 features. Putting aside these issues for now we’ll look at the kit as it comes as modellers may choose to simply build what you get and leave it at that?
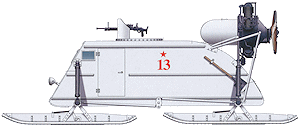
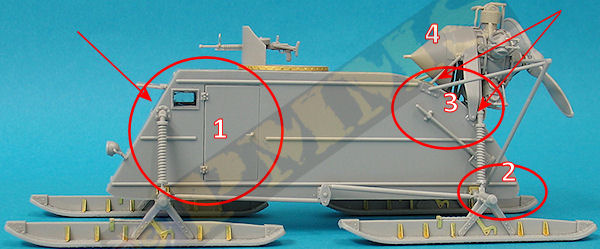
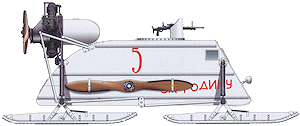
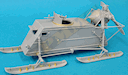
Side on view of assembled kit plus 1:35 plan and image of actual NKL-26 from the Tankograd Aerosan book
with the issues indicated by number as per above
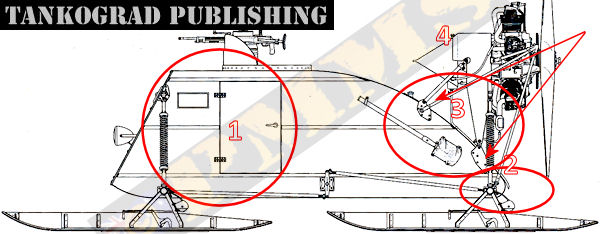
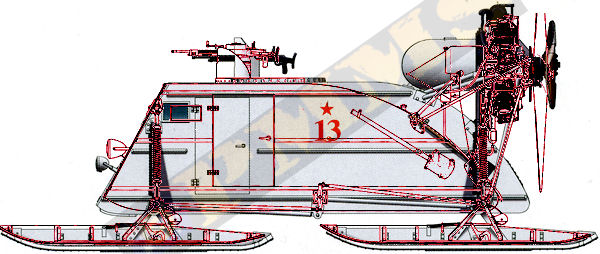
Overlay of the Tankograd 1:35 plans (in red) and the Trumpeter kit side profile highlighting the descrepancies
as described above.
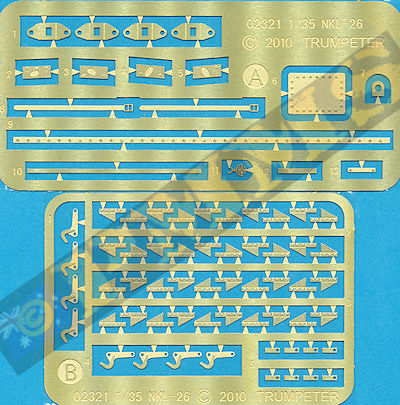
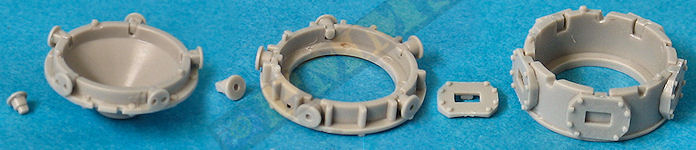
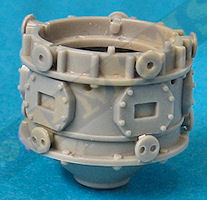
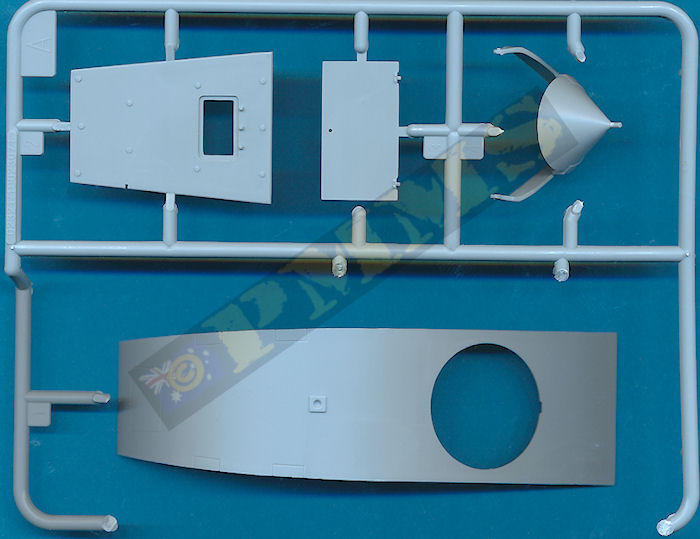
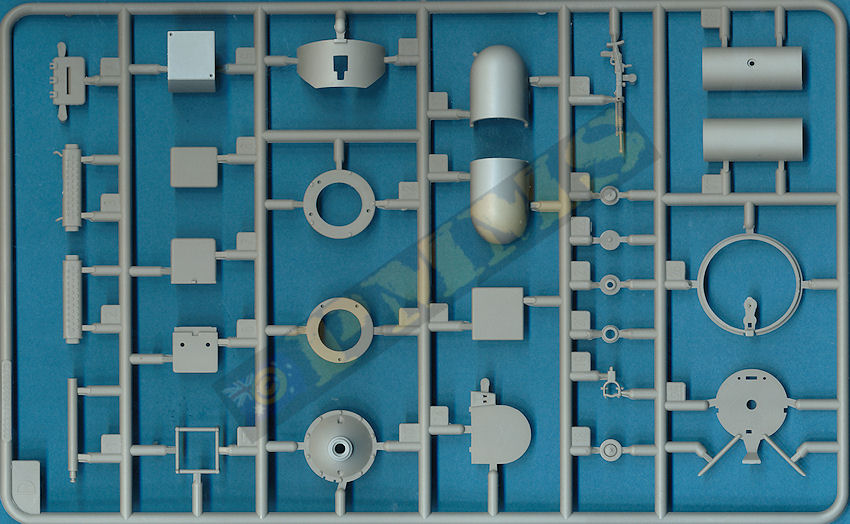
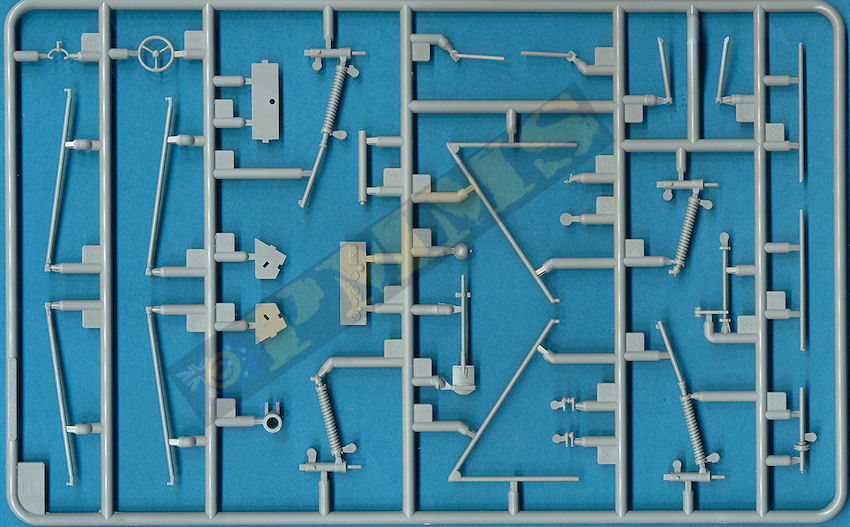
The kit consists of 158 parts in light grey plastic plus 73 etched brass parts, 3 clear parts and the instructions that include colour making sheet and a small decal sheet. The standard of moulding quite good overall with few if any visible pin marks and just the usual plastic nodes and moulding seams, some of the seams are fairly prominent such as on the small engine parts and will need care in removing.
At the front there is the driver’s seat and instrument panel with raised dial detail and the steering wheel but there are no foot pedals or the steering cable pulleys, there should also be a group of six bolt heads on the outside of the right front hull that secure the inner cable pulleys if they were there. You can see the instrument panel if you leave the side entry door open so adding the foot pedals will add detail if the door is to be open, also note there are no internal frame detail on the door which should also be added if open? There is a very small separate door handle but there should also be a small triangular mounting plate for the handle on the door which is missing.
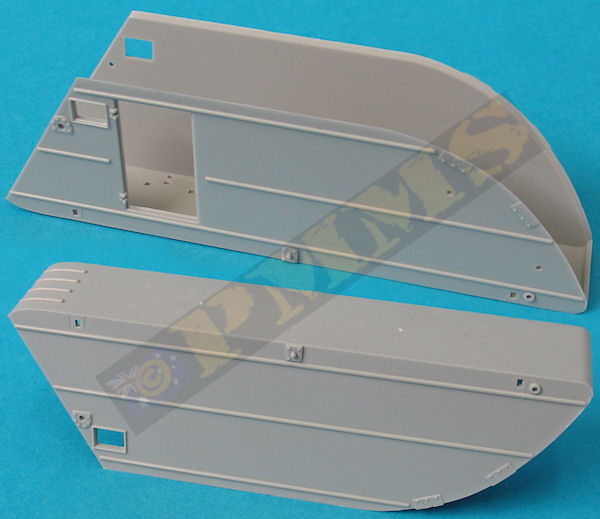
The front glacis and curved top panels fit nicely to the main hull with the top panel joins bevelled to eliminate the join seam but you do have be careful while gluing to ensure no gaps appear and gluing small sections at a time will help get a good gap free join.
There is clear sheet for the side windows and front visor ‘glass’ although it’s not clear from the references if the front visor actually had any glass fitted? The clear windows were all warped and needed to be straightened before fitting and the front visor cover can be fitted open or closed but there are no internal supports to hold it in the open position.
Added the top of the rear hull are four small etched plates for the engine bearer supports as well as an etched bolted panel for the lower rear hull, you will need to add a slight curve on these etched parts before fitting to the hull curve otherwise the edges will sit proud of the hull surface. There should also be a fuel filler point in the middle of the rear hull top where the small square panel is for fitting the larger dome supplied but not used with the NKL-26.
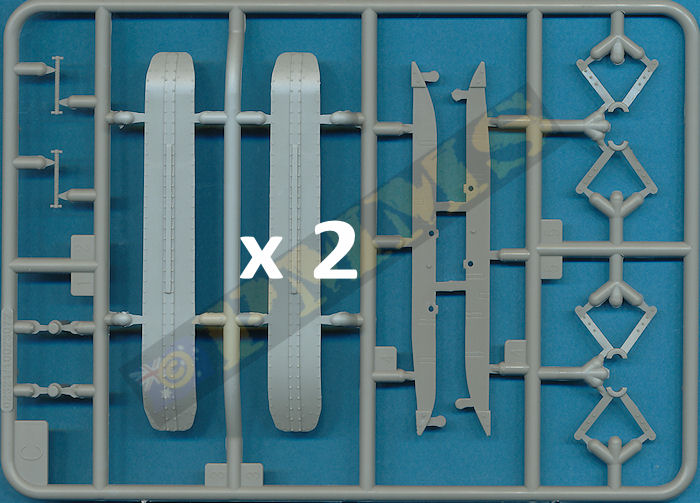
The ski suspension mountings has etched attachment brackets that you have to bend around the axle to fit over the small pins on the axles but there are no attachment bolt head details on the brackets and adding these will improve the appearance. The definition of the springs is fairly basic and there are mould seams that are quite difficult to remove without damaging the spring details. Note when adding the rear suspension springs do not fit the top braces (parts E27, E29) as these are for fitting the large dome to the rear of the engine which is not correct for the NKL-26.
Added between the axles are the steering linkages and the details are again fairly basic, it should also be noted that the front ski track is slightly wider than the rear skis but the kit skis are spaced evenly. The skis themselves are nicely done with 10 small etched brackets on each ski to add along with etched parts for the brake parts but there are no slots in the skis for the brakes nor are there any brake cables which you may wish to add? The brakes are the etched parts PE-B1, B4 that are designed to dig into the snow through slots in the ski as the brakes are applied on the real thing.
When fitting the ski units to the axle pins ensure the skis are aligned perfectly parallel and vertical on the mountings unless you wish to simulate steering with the skis slightly askew.
The top weapons ring has a etched bolted strip to add around the diameter of the ring but I had to trim about 1mm off one end for this to fit snugly, the DT machine gun is nicely detailed and has a separate ammo drum, front mounting and fine etched front sight with this added to the ring mounting. The curved shield is a little thick with bevelled edges to simulate a thinner appearance but some images how the shield taller than in the kit but this may vary between vehicles?
Added to the right hull side is the spare propeller with etched securing straps but the hull side mountings are completely missing, there should be two strips between the middle and bottom strengthening ridges to actually attach the securing straps too and again you can add these from thin plastic strip. There should also be the actual mounting for the central propeller spindle but this is also missing with the propeller just glued to the hull side in fairly unconvincing fashion. mounting for the central propeller spindle but this is also missing with the propeller just glued to the hull side in fairly unconvincing fashion.
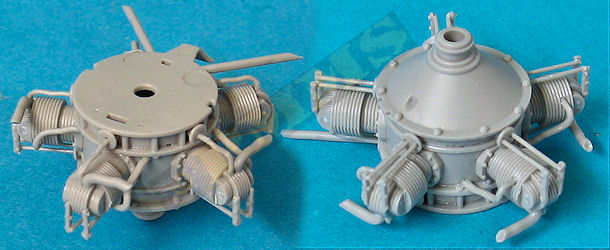
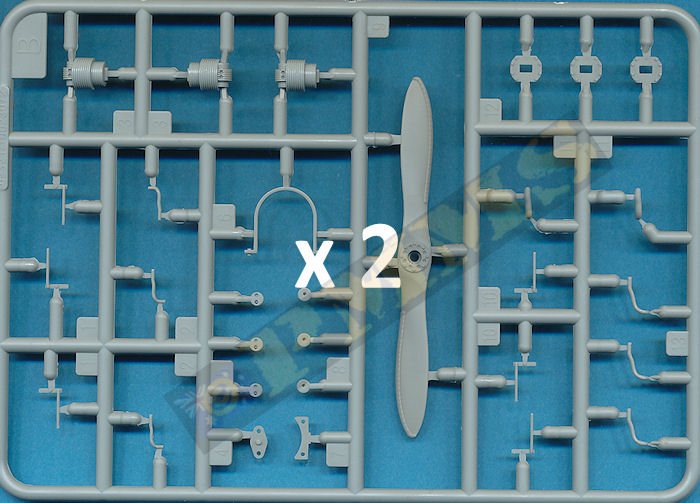
Two cylinder banks are added first and these have to be fitted opposite the two small locating pins for the engine back plate, this is not indicated clearly in the instructions and you could easily fit the cylinders in the wrong place, so take care. Adding the remaining three cylinders and cabling as well as the actuating rods is fairly straightforward but just take your time and ensure everything is attached as per the instructions as there is some subtle differences between the parts.
Only three of the cylinder backs have the small exhaust pipes (parts B11) added and these could be drilled out further for a better appearance while the two part heat exchanger (parts D2, D3) attached to the back plate and first two cylinders fitted, you should note that the heat exchanger should have a series of holes drilled with these just represented as raised detail on the exchanger parts.
Assembled main engine
Fitting the first two cylinders opposite the small back plate locating pins

Adding the other three cylinders plus the piping, rods and exhaust.
Adding the generator, heat exchanger that should be perforated with holes, the etched pulley belt and fitting the propeller.
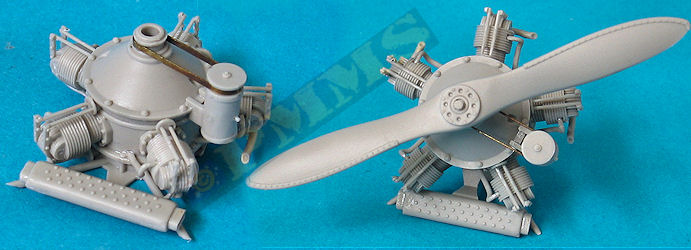
Added to the front crack housing is a 4 part generator with etched belt between it and the starter motor and this strip is best annealed by running through a candle flame to allow easier bending around the pulleys and attached with cyanoacrylate. The propeller blade is nicely done with the metal strips depicted on the forward edges and this has a separate central shaft which can be fitted through the engine casing without gluing to allow the propeller to rotate.
One notable omission from the engine is the large flywheel located between the propeller and front crank case, this is very prominent in all photos of the NKL-26 engine and making a flywheel from a plastic card disc will add further to the nice detail included on the engine.
The assembled engine it attached to the top of the suspension arms and the supports on the engine back plate and while it’s a bit fiddly the engine sits nicely in place with the cone fairing added to the back of the engine with the supports locating on the hull top and sides, again this is a little fiddly and care is needed but the end result looks very good.
But putting aside those issues what you do get is nicely done kit with some excellent details included, the standout being the engine assembly and ski units along with good fit of the parts overall and the kit will build in to an attractive model of the this interesting vehicle without any major assembly problems.
I guess at the end of the day you have to decide what you want from the kit and choose accordingly.
As an interesting footnote, on the RF-8 kit box art there is the front half of an NKL-26 in the back ground which depicts the front
suspension positioned correctly, yet this kit doesn't.
Rating 7.5/10
Click on thumbnails for larger view
Detail Images

Close new window to return to page
| AEROSAN Soviet Aero-Sleighs of World Wat Two Tankograd Special No.2010  |
 for
the review kit.
for
the review kit. 