
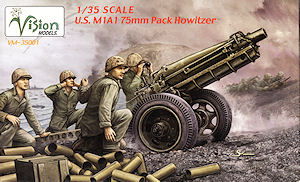
U.S.M1A1 75mm Pack Howitzer
Vision Models 1:35 Kit #VM-35001
Review by Terry Ashley
In the early 1940’s with the onset of WWII the M1 was redesigned for use with Airborne units and featured new pneumatic tyres to replace the original spoked wooden wheels and was redesignated as 75mm Pack Howitzer M1A1 on Carriage M8.
Between 1940 and 1944 almost 5000 75mm Pack Howitzers were produced with the majority used by the U.S.Army Airborne units as well as under the lend lease program by Great Britain and Commonwealth forces, Chine, France and some Latin American countries.
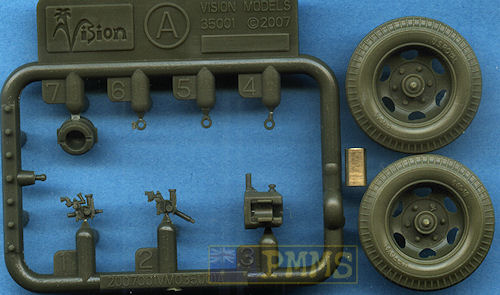
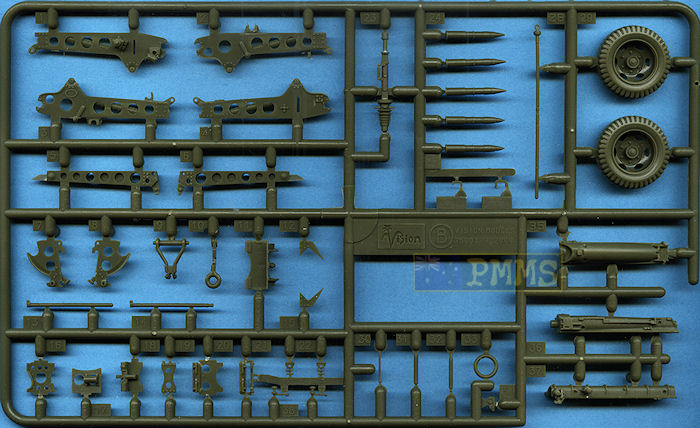
The 75mm Pack Howitzer has soldiered on long after the end of WWII with the modern designation M116 and this first 1:35 kit from Vision Models is of the WWII era 75mm Pack Howitzer M1A1 on Carriage M8 as well as having optional parts for the post war versions.The kit consists of just 54 parts in Olive Drab plastic plus a short length of brass tube for the howitzer tube as well as small fold out instruction sheet.
The standard of moulding is well done overall but there are a few substantial pin marks in places hard to get at plus some fine flash about the place to deal with as well as some mating surfaces that will need to be smoothed out for a better fit. The level of detail on the parts is also well done with clean crisp details in most instances although the numerous very small and delicate parts will need care in removing from the sprues and during cleanup and assembly.
The plastic used is very reminiscent of that in AFV Club kits being a little softer which makes it fairly easy to work with but you must take care not to remove too much material during cleanup.
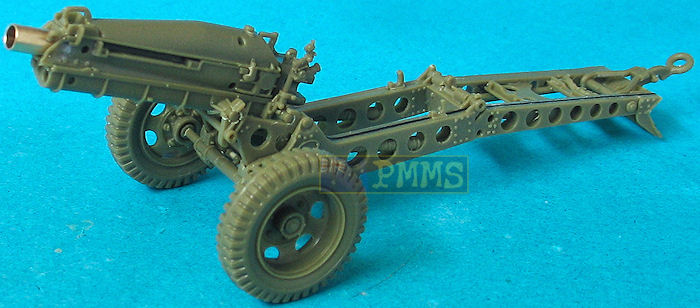
The kit is broken into sub-assemblies very much like the actual Pack Howitzer and these can be assembled separately and brought together for the final assembly.
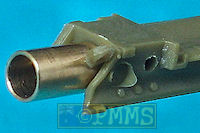
Added to the breech and howitzer tube are very small plastic lifting eyes that really do need care removing from the sprues and during assembly with the brass tube having a small locating hole for the lifting eye which is best glued using cyanoacrylate (super glue).
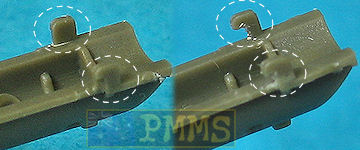
Unfortunately there is also a large pin mark surrounded by some flash on one side of the bottom sleigh and due to its location is not an easy job to eliminate without compromising the surrounding detail, especially the three small bolt heads on the forward sleigh.
The top sleigh is cleanly moulded with virtually no cleanup other than the sprue attachments and this has two additional lifting handles attached which again require care in handling. One feature of the top sleigh is the rear attachment hooks that require you to trim out the excess plastic inside the hook. This is intentional, probably due to moulding constraints or to prevent damage to the fine hooks with the instructions indicating to cut away the excess plastic, this again requires care with a very sharp blade.
Fitting the top sleigh to the bottom sleigh is just like the original with the four hooks (two at the front and back) clipping down and forward over the notches on the side of the bottom sleigh and the top sleigh holds in place firmly without the need for any glue such is the excellent fit here.
There are also two alternate finely moulded sights for both the firing and travel modes depending on your choice.
The two elevating cranks on the sides of the outer trail arm halves are moulded with the trail halves and these lack definition and also don’t allow you to reposition the cranks depending on the gun elevation. Carefully cutting off the cranks will allow a little variation here but not really essential if you didn’t want to bother?
Trapped between the two outer halves are the elevation brackets and you must take care not to get any glue on these while gluing the trail halves together if you want the gun to elevate after assembly?
The mating surfaces of the two trails halves also had to be smoother out a little to remove any excess flash ensuring a precise fit.
After joining the two trail arm halves together there is a very prominent join seam resulting but as the actual trails had a large weld beads along the join line you can use the excellent Archer Fine Transfers Arc Weld Beads (set #AR8806) to both cover the join seam and added the weld bead detail all in one operation. Before adding the welds there are a couple of large gaps at the top of the trails that need to be filled and due to their size it’s best to enlarge these a little and plug with the short section of the plastic strip instead of trying to fill entirely with model filler.
Added between the two trail arms are central bulkheads and there again were some annoying pin marks to be removed from the bulkheads which requires a little care due to their location.
I deviated from the instructions a little by assembling the two part forward trail arms without attaching the real trails for easier assembly but this means not gluing the rear sections of the arms together at this stage until adding the rear trails later. This is not essential but I found it easier to get a good precise fit of the forward section of the trail arms with the elevation brackets without having to worry about fitting the rear trails at the same time.
There should also be a weld beads on the trails similar to the front trails and these again were added using the Archer Fine Transfers Arc Weld Beads (set #AR8806), see images.
Added at the back is a three part spade and upper two part two hitch, this can be made workable if you don’t glue the hitch parts together but unfortunately the instructions don’t tell you this. The lower hitch ring (part B10) will clip into the upper hitch bracket (part B9) with a small pin and corresponding notch on the twp parts.
The assembled tow hitch is then trapped between the two trail arms allowing both the hitch brackets and hitch eye to move independently of each other as per the real thing, this may not seem a big deal but it adds nicely to the final effect.
The assembled rear trails are trapped between the two halves of each forward trail to allow the rear trail to be movable but there is nothing to hold these in the deployed position and so are best glued into position unless you are depicting the gun broken down into its transport loads.
Thr military tread wheels are moulded conventionally on sprue B due to the chunkier tread pattern while the civilian style wheels came separate of any sprue but with the mould pour point right on the central hub bolt. This will require some careful smoothing out and there is also some minor flash in some of the rim lightening holes that is easily removed.
While the wheels are well done there is some detail missing in the form of a series of inner rim rivets and the tyre valve stem, the rivets are quite small on the actual wheel and may not be missed while the valve stem is easily added from a short length of wire or stretched sprue.
The single piece axle is nicely represented although the mould seam will need careful removal and there is a separate traversing hand wheel that while a little on the thick side does give a good representation of the hand wheel.
Fitting the axle to the front of the trail arms is easy with the bevelled section of the axles fitting into the trail cut out and you then revolve the axle just like the real thing to hold in place without any glue just like the original and is another nice touch with the kit.
There was one small issues when fitting the axles in that I had the slightly widen the left side bevelled section by trimming a little off the hand wheel bracket for a better fit of the axle, text fitting will determine if this is required on you kit as it may vary a little depending on the fitting together of the two forward trail arms.
It is possible to assemble the cradle/barrel in the firing or travel position depending on your preference and if in the firing position by not gluing the barrel trunnions to the brackets will allow the gun to easily elevate after assembly.
Also included in the kit are five 75mm rounds of two different types to use in a diorama setting.
There are no decals included with the kit as apart from some small stencilling there were no other markings applied.
The solid rear trials may not be that noticeable on the finished kit but would have been nice if in two halves like the front trails and with the addition of some details such as the weld beads to cover up the trail joins a very nice little Pack Howitzer will result.
The ability to take the sub assemblies apart just like the real thing for transport is another nice bonus along with the two sets of wheels with alternate tread and this kit bodes very well for future releases from Vision Models. As the Pack Howitzer was often towed behind a Jeep there is no shortage of towing vehicles for a diorama setting.
As a final note, Vision Models will also be releasing their own updates for the kit in the form of a metal barrel (set #VA9001) and metal 75mm rounds and shell casings (set #VA9002) in the not too distant future.
Highly recommended
Click on thumbnails for larger view
Detail Images

Click Browsers BACK button to return to page
Thanks to Vision Models for the review kit.