

| Introduction: |
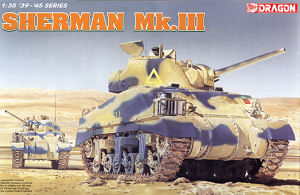
Dragon continue to release Sherman kits at a regular rate with each being updated in some area from the last with this kit following the recent M4A2 Tarawa (kit #6062) with 56° hull and cast driver’s hoods and contains many parts from the Tarawa kit as well as earlier Sherman kits plus some new parts for the Sherman III. The name Sherman III is the British Army designation for the M4A2.
| The kit: |
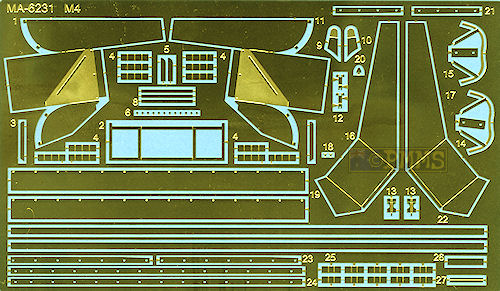
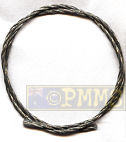
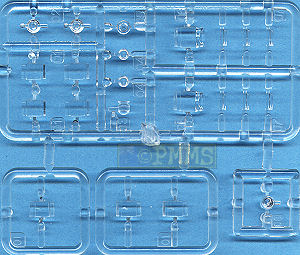
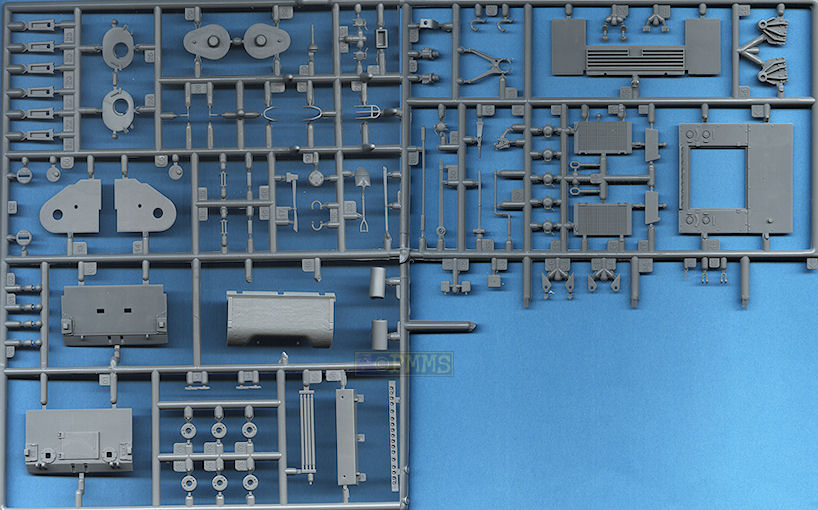
The new kit has 463 parts in light grey plastic (although quite a few are not used here) with 22 in clear plastic, a large fret of etched metal and metal tow cable plus the decal and instruction sheet along with a set of continuous T54E1 tracks in Dragon’s DS vinyl.
As with any review, I simply present the information and facts for your perusal and it's up to the individual to take or leave this as they see fit.
The standard of moulding is typical Dragon with good crisp details and a minimum of flash, pin marks or other blemishes with only the usual minor moulding seams to be cleaned off the parts as with any kit plus the array of small plastic nodes that help keep pin marks at bay and the little extra cleanup is worth it.
The sprues included in this kit sees Sprue A from the recent M4A3E8 (kit #6183) and Tarawa Sherman (kit #6062) with the suspension sprues D and V from kits #6188, #6255 and #6062 with these having a lineage right back to the Italeri Sherman kits plus sprue B from the Tarawa Sherman (kit #6062) and a new sprue E for the bolted transmission cover parts.
This kit overall is probably one of the better Sherman kits from Dragon but not without some detail issues and as with any review, I simply present the information and facts for your perusal and it's up to the individual to take or leave this as they see fit.
| Lower Hull: |
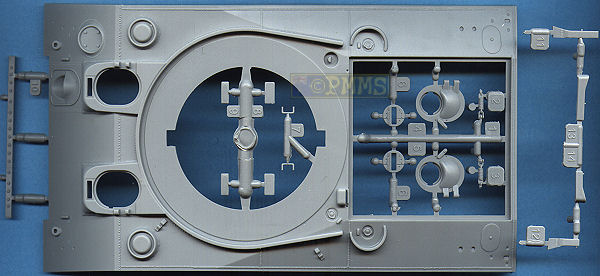
The lower hull tub from the Tarawa Sherman has minor alterations to the underside bolted strip at the front and includes sponson fillers and the lower engine compartment detail applicable to the M4A2 with inserts at the sides to take the suspension bogies.
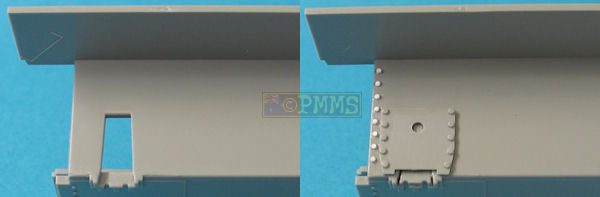
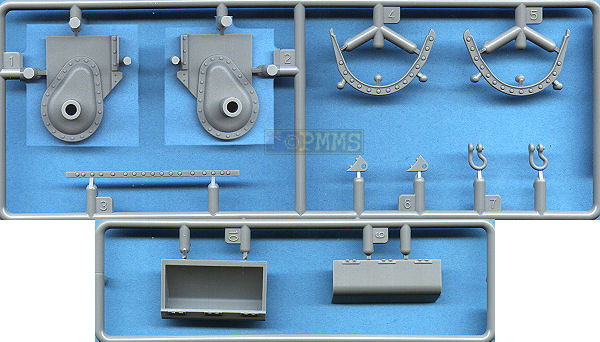
At the front is a new bolted transmission cover which is moulded in one piece including the final drive housings and features a cast surface texture as well as casting foundry numbers and the drain plugs on the inside of the FD housings and on the underside for quite an impressive moulding. The upper bolted strip is a separate part that fits neatly to the top of the cover but watch the angle as it can easily be lined up incorrectly.
There are a couple of minor issues as a consequence of the one piece moulding with three fine mould lines running across the front of the transmission cover at different spots that will need careful removal so not to damage the cast effect. The insides of the final drive housings are smooth without any texturing and as there is casting numbers inside the left housing adding the texture may eliminate these.
The bolted flanges that hold the three sections of the transmission cover together are moulded in one piece each and while they have nicely defined bolt head detail lack the join line that should be between the to flanges and it would be difficult to scribe this evenly.
The new outer final drive covers are the correct size and fit neatly to the sides of the transmission cover and include the upper hull bolted flange and this is an improvement over previous bolted transmission covers from Dragon but would benefit from the bolted flanges being on two halves each to include the prominent join seam for a better look. There should also be 8 prominent bolt heads on the hull sides to attach the transmission housings but these are missing.
To add these I used a hex punch & die set to punch out the bolt heads from plastic card and glue in place on the hull side just in front of the first bogie mounting plate, all very easy and I hope that is enough coverage of that omission?
There are additional weld seams that can be added at the hull sponson join and at the back of the sponson covers as well as the drain plug on the undersides of the sponson covers if you want to add this additional detail but its sort of wasted on this kit due to the full sand shields fitted later but should be on all Sherman welded hulls.
To add the two towing shackles requires the locating holes be drilled out from the inside and care should be taken to drill these evenly as there is scope for misalignment if not careful.
The original sharp nosed single piece transmission cover from the previous kits is still included but is not applicable to the early Sherman IIIs but if Dragon had included the new rounded transmission cover from the Tarawa M4A2 kit it would have added a nice alternative to this kit as numerous Sherman IIIs have the rounded one piece transmission cover.
The separate rear plate has the M4A2 exhaust arrangement with separate top exhaust deflector as well as the idler wheel mountings and central towing pintle.
The fit of the assembled transmission cover was a little tricky as there was a very slight warping of the hull tub (hardly noticeably to the eye) and I glued one side of the transmission cover in place and then held the other in place with pressure as the glued dried to even things up with the fit of the rear hull plate being very good.
| Suspension: |
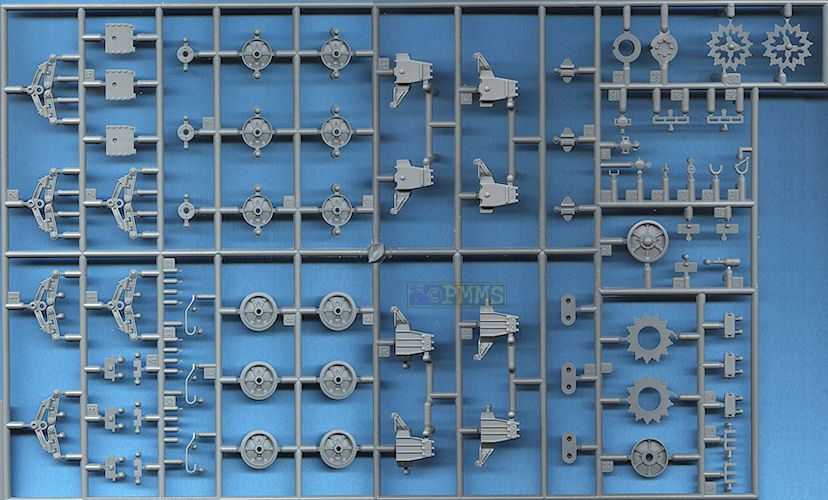
Two sets of suspension bogies are provided in the kit with the straight arm suspension bogies and spaced return roller support and later angled return roller arm but you should use the straight arm bogies for the Sherman IIIs featured in the kit.
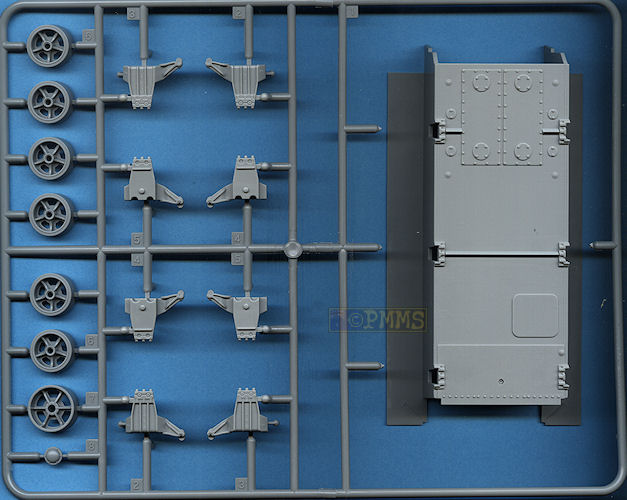
There are separate track guides that could do with some thinning as they are quite thick and the four securing bolts should be added. These are actually included separately on sprue V but the instructions don’t mention them but they are there if you wish to use them? The bogies and arms are nicely detailed with the three bottom bolts and fine casting numbers on the bogies and arms although these were often in different places depending on the manufacturer but add a nice detail touch.
There are also two sets of road wheels and idlers wheels in the kit, the pressed solid spoked type which have basic grease nipple detail and back inserts and the open spoke wheels which are the ones that should be used with the Sherman III decal options in the kit.
There are again two types of drive sprocket supplied, the ‘Fancy Smooth’ sprocket and the solid ‘Simple Plate’ sprocket which again are the ones that should be used with the Sherman III decal options in the kit and these have the sprockets separate from the inner hub/drum which allows quite good hub bolt detail to be included.
| Tracks: |
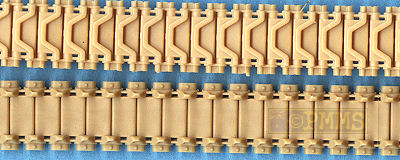
As mentioned the kit has full length T54E1 steel chevron tracks in light beige coloured DS vinyl which have excellent detail incorporated on the end connectors and links and these can be glued together using normal plastic cement.
These are thankfully packed flat in the box eliminating any damage as was the case with the packaging of the tracks in Tarawa kits.
| Upper Hull: |
The early 56° hull from the Tarawa kit has had the front section revised
to include the cast driver’s hoods and has all the angles correct and
also features raised weld beads around the hull which again is good to see
but they are not depicted correctly just like with the recent M4A3E8 and Tarawa
M4A2 hulls.
The weld seams on Sherman hulls have a flowing texture not the pitted style on
the kit welds but you may be able to smooth these out a little to better represent
the actual weld seams.

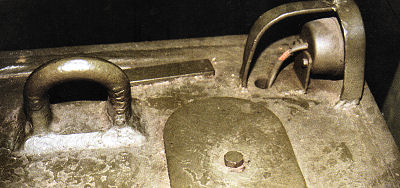
Image of actual M4A2 weld seams from the Armor Photogallery M4A2 book.
As can be seen the weld seam are smooth flowing and not pitted as depicted on the kit welds.
The weld beads at the front around the cast driver’s hood are the correct flowing texture so it shouldn’t be that hard to represent this style on the rest of the hull as Dragon now how they go, maybe on the next Sherman kit?
On small point is there is a very fine mould line where the new hull front meets the original rear end which is virtually invisible and easy to remove but there is also a slight “misalignment” of the upper side weld seams at this join but if you are redoing the weld seam this will eliminate this.
The hull features separate parts for the fuel filler caps, lifting eyes, head and tail lights with a choice of plastic or etched bush guards as well as all the pioneer tools which have moulded on tool brackets. Also included is the bracket fitted behind the fire extinguisher handles on the rear deck and the separate ventilator cover. The head and tail lights are included as clear parts allowing for a clear lens with careful painting, but you should paint the back of the light silver before adding the final cam finish otherwise the lens will be the same colour as the cam finish.
There are a couple of minor detail issues in that the ventilator dome covers are slightly too small inside their guards and the rear grouser compartment covers are too wide and deep by about 1mm meaning the inner edge is too close to the engine deck by that distance.
The engine deck is also separate with separate engine access doors with louver detail on both sides with the fit of the doors to the deck and the deck to the hull being very snug not requiring ay trimming.
The crew hatches at the front have detail on both sides but there is quite a large pin mark on the inside with the hatches which would have been covered by the head pads if these were in the kit and you can add these to cover the pin marks. There are separate periscope mountings with clear periscopes plus separate periscope covers, grab handle and hatch retaining springs which are a little on the thick side and you may want to replace with thin wire springs.
As mentioned the weld beads around the cast driver’s hoods are nicely done but there are a couple of small issues with the glacis in that there are two round ‘lumps’ next to the head lights and these should be cut off as they represent the headlamp socket plug which are usually attached to the sides of the head light bush guards. With the two small weld seams in front of the hull machine gun, the outer one should be angled to meet with the outer edge of the transmission cover.
The aerial pot also needs the weld beads revised for a better look while the welds around the upper ventilator guards are the correct flowing type but those around the turret guard and rear fuel filler guards the incorrect pitted style, easy enough to fix.
If it’s not getting too picky you could also drill out the drain holes in the ventilator and fuel cap guards to add to the details.
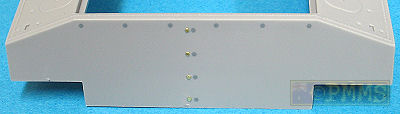
On the rear hull are ten small bolt heads which have the locations marked with painted dots on the plastic and you are provided with the bolt heads on the etched fret. The bolts on the centreline should be offset slightly to the left and this can easily be done by gluing the bolts off centre using the painted dots as a guide.
and showing the repositioned centre bolts
Etched parts are included for the front fenders and the fender attachment strip along the lower sides of the hull sponsons as well as for the full fender suite as used on the British Sherman IIIs in the Middle East and while some careful bending will be required they give a better scale appearance than you could get with plastic shields.
The metal tow cable supplied would need to be annealed by running through a candle flame to get a natural sit on the vehicle as it is very springy as it comes but again is a nice inclusion for additional detail definition.
Also added to the right front fender is an etched box used to POW cans or the like but nothing is provided to add to the box and you will have to fill this from elsewhere.
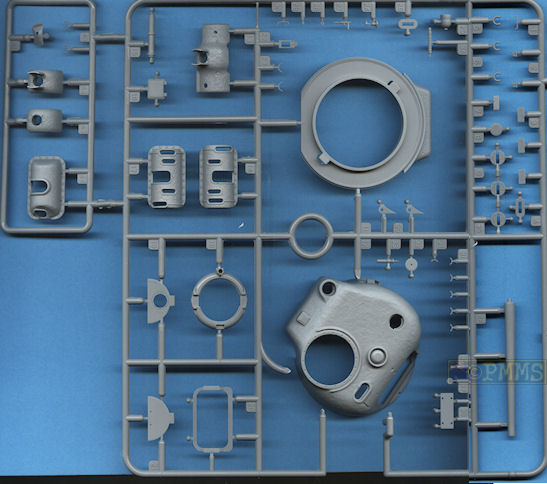
| Turret: |
The early low bustle 75mm turret is from the Tarawa M4A2 kit and has the upper shell and lower ring as separate parts with all fittings also separate parts, this includes the periscope mountings and clear plastic periscopes as well as the separate pistol port door with inner support bracket.
Included on the turret shell is a nice subtle cast texturing but to achieve the pistol port details, slide moulds were used which have left a raised mould seam around the port which you will have to remove and then reinstate the cast texture with “Mr. Surfacer” of similar, this will also be needed at the rear upper and lower part join. But it should be noted that there is actually a raised weld seam where the join line is (not the exact same location) and this should also be added.
There is no cast texture on the right rear of the turret wall due to moulding constraints and you may wish to add this with “Mr. Surfacer” for a more uniform look.
On the inside of the gun opening is added a separate bolted ring for the gun shield which of course can’t be seen after assembly but it is nice attention to detail to add this as a separate part.
The kit still includes the later M34A1 gun mounting from the Tarawa kits as well as a new earlier M34 mounting applicable to the Sherman III and this has the contoured gun shield with cast surface texturing and a choice of rotor covers, one with and one without the protective “ears” for the barrel. Both are applicable to the kit depending on the decal options chosen and more on this later.
There are a couple of minor issues with the M34 gun shield in that the outer contours are too sharp and should be more rounded, easy to fix with some light sanding but you will have to add back the cast texturing and there should also be casting numbers on the right side of the shield.
On the left side there is a lip around the co-ax machine gun opening but the contours of the lip are too rounded as depicted and it should also be noted that most British Sherman IIIs of the time did not use the small machine gun shield as supplied in the kit.
Updated May 5, 2008;
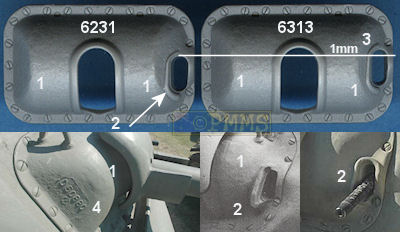
It has been brought to my attention that there was another issue with the M34 Gun shield which I did not notice on this or the shield in the newer Sherman III Sicily kit #6231 (oh shame on me!) in that the co-axial MG opening was positioned 1mm too high in the shield.
The position of the MG opening has been corrected on the shield in kit #6231 (i.e. moved 1mm lower) and presumable will be in subsequent releases of this kit but for some obscure reason the other known issues have not been addressed. One would assume that if you re-visit a part to correct one small issue you would also correct those more prominent known issues on the same part?
Image showing the issues with the M34 gun shield
1. The shield contours too sharp, not corrected
2. The contours of the lip around co-axial MG opening incorrect, not corrected
Note: there are a number of variations in this lip and on some gun shields there is no lip at all as shown
in the three reference photos below, but none that I could find match the contours on the kit shield.
3. The co-axial MG opening 1mm too high on the shield, corrected in kit #6231.
4. Casting numbers on right side of shield, not corrected.
The 75mm gun is moulded in one piece with hollowed out muzzle and just the small moulding seam the be eliminated and the co-ax .30 machine gun has very nice perforated jacket detail and the muzzle is also hollowed out slightly but you may want to drill this out further for a better look.
The split Commander’s hatch has no cast texturing and also has a large moulding seam around the outside that will be easy enough to remove and the split hatches have no pin marks to worry about and separate periscopes, grab handles and inner fittings.
The forward vane sight is in two etched halves to give the stepped looks and there is also a finely moulded .50cal MG clip on the hatch ring but no .50cal MG is included in the kit.
Other details are a nicely detailed search light, alternate aerial mounts at the back but no British style No.19 radio aerial mounting is included and three different foundry cast logos in etched brass to add to the rear of the bustle to give a bit of choice here. Also added to the rear bustle is an additional British style storage box with small plastic tie downs and etched stowage straps that were often fitted here.
A couple of small issue are the undersized ventilator dome cover the front mounted lifting eye (part B5) should be moved further back spaced evenly between the gun shield and top ventilator which will mean filling the locating holes in the turret roof if you wish to move this.
Overall this is very good early 75mm turret and probably one of the better you will
find in plastic this side of a Tasca kit or resin casting but there are a few things to
watch for and the inclusion of the earlier gun mounts add additional options.
| Decals: |
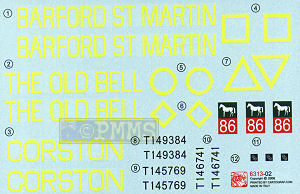
The large decal sheet is well printed with good colour register and closely cropped carrier film and has markings for 3 Sherman IIIs of Royal Wiltshire Yeomanry in Syria in late 1943.
These markings appear to have been “inspired” by those on the excellent Echelon Fine Details Sherman III “Markings for Royal Wiltshire Yeomanry in Syria (1943)” decal sheet No.ALT352002 but there are few issues with the kit decals. The arm of service markings has the shade of green too dark, the style of the serial numbers doesn’t match photos and the yellow of the vehicle names appears a little light. Frankly I would recommend anyone to get the Echelon decal set which is well researched and has specific makings for 8 vehicle including the three in the Dragon decal sheet as well as generic markings for virtually any Royal Wiltshire Yeomanry tank.
The three tanks on the Dragon decal sheet are:
- “THE OLD BELL” A Squadron Royal Wiltshire Yeomanry, Syria 1943 (Reference
image)
Note; This tank had the mantlet “ears” and was armed with a M1919A4 .30cal machine gun on the Commander’s Hatch which is not included in the kit.
- “BARFORD ST MARTIN” A Squadron Royal Wiltshire Yeomanry, Syria
1943 (Reference image)
Note; This tank had the mantlet “ears” but no Commander’s hatch machine gun was carried.
- “CORSTON” C Squadron Royal Wiltshire Yeomanry, Syria 1943 (Reference
image)
Note; This tank does not have the mantlet “ears” and was armed with a M2 .50cal machine gun on the Commander’s hatch which is not included in the kit.

| Instructions: |
These are the usual exploded view drawings that are a little busy in places and can be confusing unless you study them very closely before any assembly but overall are there shouldn't be any real problems as the kit is not overly complicated.
| Conclusion |
This is overall another good rendition of the Sherman with ongoing updates added for a good representation of a Sherman III with some well defined details such as the new turret, the raised hull welds even if not quite right and the new bolted transmission cover plus the DS vinyl tracks.
The kit will build into a very nice Sherman III but as with any kit there are some detail issues but in the overall scheme of things will be a very useful addition to the Sherman ranks and if the rounded cast transmission cover from the Tarawa kit and the nice .30cal and .50cal from the recent half-track kit were included it would have made it even more versatile and ‘finished off’ nicely.
Highly recommended 8/10
| The Sprues |
Click on thumbnails for larger view
Detail images

Close new window to return to review
| References: |
| SHERMAN A History
of the American Medium Tank R.P.Hunnicutt. Presidio Books ISBN 0-89141-080-5  |
Modeler's Guide
to the Sherman MMIR Special. Ampersand Publishing Company, Inc  |
Thanks to my credit card and the excellent service from  for
the review kit.
for
the review kit.