
M5A1 Conversion
for AFV Club M3A3
1:35 #F036
Construction feature by Terry Ashley
Part 1 - Lower Hull & Suspension
Suspension:
Assembling the suspension is pretty straightforward thanks to the excellent
resin parts and the equally good quality AFV Club plastic parts.
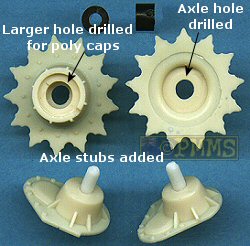
The only modification to the resin hull is the drilling out of the locating holes for the central bogie locating pin but I made an alteration to the drive sprockets for easier fitting.

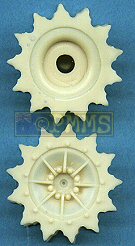
The resin sprockets are designed to glue directly to the final drive axle stub while the AFV Club kit sprockets attach to the axles via poly caps and I decided to make fairly simple modifications to the resin sprockets to also use the poly caps.
Firstly cut the stub axles off the resin final drive and drill a 2mm hole centrally to insert a short length of plastic rod to extend the same length as the AFV Club axles, then drill the axle hole through the inner sprocket half again the same diameter as the hole in the AFV Club sprocket. Drill a larger hole the diameter of the poly caps into the inner drive sprocket, again using the AFV Club as a guide but be sure not to drill all the way through the sprocket (see images). Once this hole is drilled simply fit the poly cap in place and glue the two sprocket halves to together basically the same as for the AFV Club sprockets, the resin sprocket halves have a small notch to ensure the teeth line up so this shouldn’t be a problem but check this before the cyanoacrylate dries completely. This now allows you to fit and remove the sprockets at any time which can come in handy when fitting the tracks.
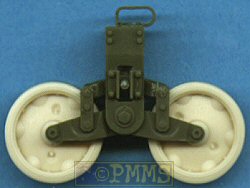
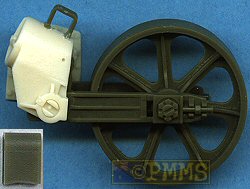
The bogies were assembled as per the kit instructions and I covered this assembly in my review of the M3/M5/M8 Suspension set (#AF 35056) so I won’t repeat the process here other than to say the only thing needed is to drill out the centre axle hole in the stamped wheels the same as the AFV Club kit wheels and fit these in place of the plastic wheels.
The trailing idlers arms require the locating pins to be trimmed right down so they will slip into the inner holes of the new resin idler mounting and once this is done you should take care when lightly “forcing” the idler arms into the mounting, as usual test fit and trim if necessary during this operation but I had no problems using the carpenters catchcry of measure twice cut once.
A small hole was drilled into the resin idler mounting for the AFV Club kit part C45 but you could also trim off the locating pin on part C45 but I found it easier to drill the hole just make sure you don’t drill all the way through the mounting.
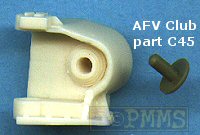
The small bracket (AFV Club part C52) on top of the idler mounting had the lower edges slightly curved to fit the top contour of the brackets and attached with thick cyanoacrylate for the overflow to simulate the weld seams.
The assembled bogie units fitted perfectly to the resin hull as good as they fit the AFV Club plastic hull so there were no problems here, but with the idler mountings there are no locating holes just a raised section on the hull side to correspond the outline of the mountings so take care as you line these up but again with I didn’t have any problems but it is something to watch as the mountings as attached.
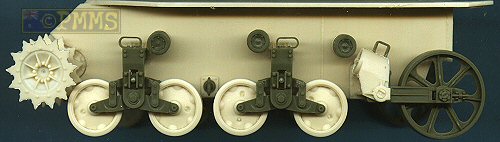
The round bases of the return roller brackets had to be slightly reduced in diameter with light sanding to fit into the indentations on the hull sides but test fitting will determine the amount of sanding required and the AFV Club rollers fitted perfectly to the resin mounting brackets.
At the rear there are the new resin towing eyes (parts D4) to replace the AFV
Club items
(parts C47) to which you add the AFV Club kit shackles which is all
quite straiughtforward.
One other thing is the large towing pintle seen in photos on the rear hull
of some M5A1s which wasn’t on the M3A3 therefore not in the AFV
Club kit but if you want to fit this you can use the pintle from the Tamiya M5A1
kit (I am assuming most Allied modellers will have this in their stash?).
You should of course choose between the underside re-enforcing beam or escape hatch as mentioned in the First Look review and it’s probably best to attach your choice before attaching the suspension for easier handling.
That basically completes the lower hull/suspension construction with no real problems and the very good fit of the resin to plastic parts makes the job a breeze.
Return to the First Look review.
Construction Part 2: Upper Hull & Final Assembly
References:
| M5A1
Stuart Kagero Photosniper 18 Krzysztof Mucha, George Parada. Kagero Press ISBN 83-89088-04-5  |
STUART A History of the American Light Tank R.P.Hunnicutt. Presidio Books ISBN 0-89141-462-2  |
| M3 & M5 STUART Light Tank 1940-1945 Steven.J.Zaloga. Osprey New Vanguard 33 ISBN 1 85532 911 5  |
STUART U.S.Light Tanks in action #2018 Steven.J.Zaloga. Squadron Signal Publications ISBN 0-89747-084-2  |
Page created 5 January 2005