

| Introduction: |
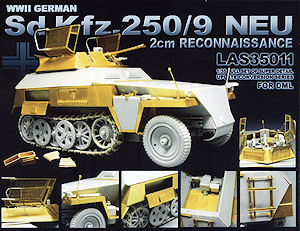
We now have some more extensive sets being released such as these from Tank Workshop in resin and Voyager Models in etched metal but the most extensive without doubt is this new set from Lion Roar which virtually replaces the entire kit apart from the chassis, suspension/wheels, front fenders and some accessories like the radios with etched and resin parts.
| The Set: |


The Update Set:
The set consists of 11 large etched frets (145mm x 85mm) and
2 smaller frets (110mm x 65mm) and these are in different thicknesses with
thicker metal for the body panels and other larger details and thinner sheets
for things like the storage boxes and smaller details and this variation
in thickness gives good definition to the parts when assembled.
Also included are;
- 39 parts in light cream resin,
- A turned M2.50cal barrel and machined brass cooling jacket
- 20 x .50cal full rounds and
- 20 x .50cal shell cases
- A short length of fine chain
- A preformed oil pan for the engine
- Driver’s instrument decal
- Clear sheet for the windscreen
- 6 varied lengths of thin wire and plastic rod
- A length of braided copper wire for the engine wiring
- A large 14 page instruction sheet to help put it all together
The standard of etching is again excellent with good relief where needed and clean crisp etching on parts with finer details plus many very small parts that will require care and soldering would be the best method of assembly for the larger components.
The resin parts are cleanly cast with just very small casting blocks to be removed but there were a couple of small air holes present with the overall detail being very crisp and well defined especially on the engine parts.
Obviously with the set of this size and complexity some experience working with etched parts would seem essential as would having a good etched bending tool and soldering facilities handy.
Of the 13 etched frets, 1 is for barbed wire leaving 12 frets for the model details and of these 3 are devoted entirely to the body panels and another 2 have some body structure parts which leaves about 70% of the set parts for the smaller details and these can just as easily be used to detail up the Dragon kit like a “normal” detail set if you don’t want to use the metal body panels.
But using the resin and etched parts on the existing kit body parts will require a fair bit of surgery to remove things like the moulded on rear compartment seats and other details so there is a lot of work required whichever rout you choose.
Front body and Cab:
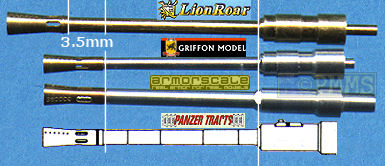
Assembly starts here and the floor section has a number of bends in different directions requiring care as its easy to get ‘trapped’ when bending these and the fitting of the firewall is a rather tricky as there are no actual locating points and it just “sits” on the front of the floor pan till soldered in place and will test your patience and skills early on.armorscale and Griffon Models barrels which are the correct length
Added to the floor are separate tread plate sections plus the Driver’s foot pedals and some of the gear levers plus the front radiator louver operating lever, there is also a new resin gear shift to replace the larger of the kit levers but this unfortunately misses the ‘extra’ bend on this just as the kit lever does.
The two crew seats have 3 part etched bases with resin cushions that have excellent detail and you use the modified kit backrests to finish the seats.
The cab side panels have inner bolted trips added and these must be fitted correctly as they form the only means of lining up the sides with the floor and bulkhead and its important to get these all lined up correctly as any small miss-alignment here will be magnified as you progress with the assembly.
The outer body panels have the panel lines engraved and the many attachment screws etched in place including the screw head slot but as is the want of etched parts these are also flat and lack the domed shape of the actual screws as opposed to the kit screws which have the dome shape but not the screw slot.
The windscreen frame is next and again some nifty bending is required which is complicated due to the bevelled side sections which overlap the edges when you put the part into your bending tool and care is needed.
Added to this is the clear windscreen sheet trapped between two etched screen frames and again you have to take care not to mar the clear sheet when using the cyanoacrylate as soldering here will just melt the sheet. There are also separate windscreen wipers and on the inside some small wing nut fittings to finish off.
Fitting the screen to the assembled cab sides will see you having to make sure everything is lined up correctly as the only attachment guides is the fit of the previous side panel/firewall join which again highlights the need to get this right at the start, sorry if that sounds repetitive but this is important.
The outer armoured windscreen shield is a separate part with workable hinges and the armoured vision port covers also slide within their attachment brackets allowing these to be positioned open or closed as required and the three support posts when the shield is open are from thin plastic rod and small etched brackets.
There are a few additional resin packs with etched straps to use as required to finish as well as the large fret of barbed wire which can be rolled up and added as storage as this is often seen stowed on the front radiator cover.
| Instructions: |
When bending some of the more complex pieces getting the bend order right will reduce frustration but this is not always easy and using a good etched bending tool will certainly help and again I used the original Etch Mate for bending the parts during this review.
| Conclusion: |
As mentioned above about 30% of the parts are used for the body panels leaving the remainder to make up the many detail updates such as the detailed engine, driver’s cab interior, front radiator louvered cover and hinged engine compartment doors and most importantly the rear storage racks with the excellent .50cal added for good measure.
And while the full body rebuild may be too daunting for many the set still has plenty to offer with the numerous other details to use as an extensive detail set for the Dragon kit proper.
Adding the many individual detail updates in the set will require no more skills than would be needed for any other detail set of this type and it’s only if you want to tackle the full body rebuild will you see the additional skills needed come into play.
There is one detail conspicuous by its absence and that is the exhaust pipe support bracket for the right bogie unit which is surprising and this is left to you to make possibly from left over etched fret framing?
I found a lot of very useful items in this set even without the full body panels but there will be some alterations required on the Dragon kit parts to use these as a “normal” update sets but will add considerable detail to the kit whichever way you decide to go and will certaining provide a challenge if you go for the full body.
Highly recommended for more experienced modellers 8/10
| Etched Parts: |
Click on thumbnails for larger view
Close new window to return to review
The M2/M3 Half-Track Subject Page lists other reviews of sets available for the Dragon kit
| References: |
 SdKfz250 Ground Power Special GALILEO Publishing Co.,Ltd |
 Military Vehicles in Detail 1 SdKfz 250/1 to 250/12 Ian Allan Publishing. |
 Sd.Kfz.250 Vol.I Wydawnictwo Militaria #173 |
 Schutzenpanzer (Armored Personnel Carrier) Ryton Publications ISBN: 1930571291 |
Thanks to Lion Roar for the review set.